Wednesday, December 15, 2010

Cute, Quick & Easy Vintage Style Christmas Ornaments

Hello! Today, I have a blog post over at the CMIT Blog showing how to create these fun vintage Christmas ornaments. Click HERE if you would like to see all of the details and more photos on how to create these vintage snowman Christmas ornaments. They are quick and easy---under and hour to make---great last minute gift ideas or tie on to your packages to dress them up!

Thanks for stopping by today!

Hugs & Smiles,
Heidi

Tuesday, December 14, 2010

JustRite Stampers & Spellbinders - Quick & Easy Christmas Card/Gift Idea

Good morning! Today I have a quick and easy Christmas project for a last minute gift idea. It seems like around the holidays we are always in need of those gifts when you just need a little something to give to someone.I created a shape card and embellished a pretty Christmas container. This is very quick and easy to do and it adds a homemade touch to the gift. To create the shape card I used the Grand Calibur™ from Spellbinders™ and LF-124 Grand Scalloped Circles die #1. Shape cards are very easy to make with Spellbinders™ die templates. If you have never made a shape card you simply place the die template just slightly off the fold line on your card and tape to hold in place and then cut/emboss as usual. I also used S4-115 Petite Scalloped Circles Large die #3 for the base on the top of the container and S4-292 Beaded Circles dies #3, #4 with Core'dintaions deep red cardstock. For the images I used S4-301 Labels Sixteen dies #2, #4 with Simply Smooth Ivory Card Stock from DCS.Here is a photo of the diecuts after the images have been stamped and the edges inked. I used JB-09775 From Our House stamp set from JustRite Stampers. The JB-09775 From Our House stamp set includes 6 Designer Centers and 6 Designer Borders and fits JB-09508 Clear 2'' Square Stamper.I used Copic markers to color the image of the tree and the postage stamp border. I also used Copic markers to color the holly and berries on the larger stamped border on the card.Here is a close up of the images.I used White 3D Foam Squares from SCRAPBOOK ADHESIVES by 3L™ to pop up some of the layers and I added an ivory bow to the top of the card.For the container I just embellished the top with layers of diecuts and the Christmas tree image from JB-09775 From Our House. The container was pretty just the way it was but this just dresses it up a little more and gives it a handmade feel.Fill the container up with some Christmas goodies--homemade or from the store.

Supplies
Stamps: JustRite Stampers JustRite Original JB-09775 From Our House, JB-09508 Clear 2'' Square Stamper
Paper: DCS Simply Smooth Ivory; Core'dinations Deep Red
Ink: Tsukineko Memento Rich Cocoa; Ranger Antique Linen Distress Ink; Copic markers
Dies & Punches: Spellbinders™ Grand Calibur™, LF-124 Grand Scalloped Circles die #1, S4-115 Petite Scalloped Circles Large die #3, S4-292 Beaded Circles dies #3, #4, S4-301 Labels Sixteen dies #2, #4
Accessories: Joann's Christmas Container, Ivory Ribbon; SCRAPBOOK ADHESIVES By 3L™ My Stik™ Permanent Strips Dispenser, White 3D Foam Squares

Thank you so much for stopping by today! We had one heck of a winter storm/blizzard this past weekend here in MN--it will be a white Christmas for sure--LOL!! I hope you are enjoying getting ready for Christmas, staying warm and not getting too stressed out--remember to take a little time for yourself! Hope you have a Fantastic Day!!

Hugs & Smiles,
Heidi

Wednesday, December 8, 2010

Youth for Christ - Soup and Truffles - Fund Raiser - Table-scapes

Hello! This past weekend I helped my mom decorate for a fund raising event and I wanted to share a few photos with you. My mom was asked to decorate a table with place settings for 6-8 people and a complete table-scape. It was up to her to pick the theme/colors for the table. The fund raiser is for Youth for Christ and they have many wonderful programs for children of all ages. The person who sponsored the table (my mom) was in charge of inviting ladies to share and experience the event. They had a couple of speakers, a singer and dancers and it was a very beautiful and moving program. After the program they severed soup and rolls for the meal. Then we had the most Amazing homemade truffles I have ever tasted!! It was like a little piece of heaven in your mouth!! Oh they were SO yummy!!! They had a free will donation and gave away many prizes but the best part is that they raised over $5000 for Youth for Christ!!!!

Ok so on to the photos of the tables.Here is my mom's table. The black tablecloth with the red and white looked Amazing!! Here is a close up of the centerpiece I designed. Before my youngest son was born I was a floral designer and managed a local floral shop. These are the place cards I designed for each of the guests at the table. I used the JB-09250 Christmas Nested Frames and JB-08097 Myriad Pro-50 point Font Set from JustRite Stampers. I used Lady Bug and Tuxedo Black Memento inks and all of the coloring was done with Copic markers. For the die cutting I used the Grand Calibur™ and S5-025 Labels Seventeen and S4-290 Labels Fourteen die templates from Spellbinders™. For a little bit of sparkle I added red rhinestones and red stickles.

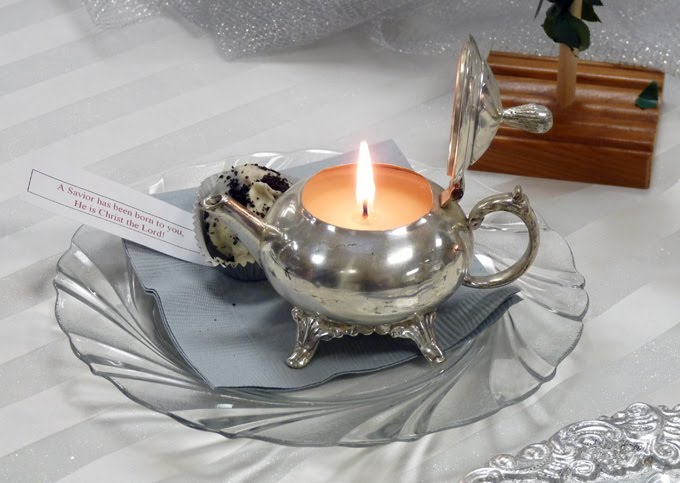
The next few photos are a couple of favorites. I love this table and the centerpiece was so Beautiful!!This table with the white and silver was simply Gorgeous!LOVE these little teapot candles!!This table just makes me smile. It was so pretty and the centerpiece reminds me of the Night before Christmas story--while visions of sugarplums danced in their heads.The centerpiece on this table was so creative! This table was sponsored by a local company that makes soap and the trees were made from soap and then they added the lights!!

Thank you for letting me share! I had such a wonderful day with my mom and friends!! The whole room was so full of the Christmas Spirit and it was so Beautiful!!! I think there were 20-25 tables that were decorated and it was such a wonderful fund raiser.

Thank you for stopping by today!

Hugs & Smiles,
Heidi

Tuesday, December 7, 2010

JustRite Stampers - Spellbinders - Happy Anniversary Card - Baroque Nested Frames

Hello! Sorry it's been a few days since my last post things have been busy, busy around here. I love this time of the year but it's also so crazy--LOL! Today I have an anniversary card to share with you. But before I get into all of the details I want to wish a Happy Anniversary to my Grandpa and Grandma. We went out to eat this weekend and celebrated their anniversary. Today is their actual anniversary.To start creating the card I stamped the border and sentiment from the JustRite Original JB-09200 Baroque Nested Frames from JustRite Stampers. I used Rich Cocoa ink and Simply Smooth White Cardstock from DCS.Next I used the Grand Calibur™ from Spellbinders™ along with S5-025 Labels Seventeen die #4 and S4-235 Fancy Tags to cut/emboss the diecuts. Then I used a Copic marker to airbrush through the die templates. Here is a close up of the diecuts. I added silver stickles to the label diecut and then added some swirly rhinestones and Prima roses. To add some dimension between the layers I used White 3D Foam Squares from SCRAPBOOK ADHESIVES By 3L™.I also used the S5-012 Classic Frame die template to make a diecut for the background. The patterned paper is from My Mind's Eye Lost & Found Collection.

Supplies
Stamps: JustRite Stampers JustRite Original JB-09200 Baroque Nested Frames, JB-09520 Clear Horizontal Stampers-2 pack (2-3/8'' x 4'')
Paper: My Mind's Eye Lost & Found Collection; WorldWin Light Green, Brown; DCS Simply Smooth White
Ink: Tsukineko Memento Rich Cocoa; Copic Markers G24
Dies & Punches: Spellbinders™ Grand Calibur™, S5-025 Labels Seventeen die #4, S5-012 Classic Frame, S4-235 Fancy Tags
Accessories: Ranger Silver Stickles; Prima Roses; Joann's Swirly Rhinestones, Clear Rhinestones; SCRAPBOOK ADHESIVES By 3L™ White 3D Foam Squares, My Stik™Permanent Strips Dispenser

I also want to wish a very Happy Anniversary to my Mom & Dad. Yes, their anniversary is today too! I will post the card I made for them in the next day or so.

Thank you so much for stopping by here today and I hope you are having a wonderful week!!

Hugs & Smiles,
Heidi

Thursday, December 2, 2010

Crafty Secrets & Spellbinders Christmas Ornament

Hello! Today, I have another Christmas ornament to share with you and it involves sewing. Yep you heard me right--sewing! I know my sewing skills are very, very limited but even I was able to pull this off. LOL!It was quick and easy and I love how it turned out! I think I might be making a few more of these for gifts.I started by creating all of my diecuts. I used the Grand Calibur from Spellbinders and S4-283 2010 Heirloom Ornaments die #5 to cut out two felt ornament shapes. The felt isn't wool or any special brand. I found the felt at Joann's and the color is called Sandstone. I also used S4-294 Beaded Ovals die #3 and S4-110 Classic Ovals Large die #2 to cut/emboss the beaded and classic oval. I used Simply Smooth Ivory cardstock for the beaded oval. The beautiful image of the little birds is from the Merry Christmas Creative Scraps from Crafty Secrets. I think this is one of my favorite images. I love using the Creative Scraps from Crafty Secrets!! The sheets are filled with so many wonderful images and there are several themes to choose from.Next I took a needle and thread and started sewing the beaded oval diecut on to the front of one of the felt ornament shapes. Then I took a cotton ball and pulled it apart to use for the stuffing. Real technical here--LOL! I put the other felt ornament on top and sewed the two pieces together. Here is what the ornament looked like after I was done sewing.I added tiny little pearls to the beaded oval diecut and then I used 3D Foam squares on the bird image to pop it up a little. Then I added a ribbon rose and some antique silver glitter fern leaves. Click HERE to see a tutorial on how I created the ribbon rose. To add the sparkle I used Tattered Angels Chandelier Glimmer Glam, I just brushed it on with a paint brush.

Supplies
Paper: DCS Simply Smooth Ivory
Dies: Spellbinders™ Grand Calibur™, S4-283 2010 Heirloom Ornaments die #5, S4-294 Beaded Ovals die #3, S4-110 Classic Ovals Large die #2
Accessories: Crafty Secrets Merry Christmas Creative Scraps; Tattered Angels Chandelier Glimmer Glam; Joann's Sandstone Felt, Light Chocolate Ribbon, Ivory Thread, Antique Silver Glitter Fern Leaves, Pearls, Rhinestone; SCRAPBOOK ADHESIVES By 3L™ White 3D Foam Squares; Cotton Ball

Thank you so much for stopping by today! I hope you are staying warm. ;-)

Hugs & Smiles,
Heidi

Tuesday, November 30, 2010

Spellbinder & JustRite Stampers JustRite Cling Stamp Set and Fairy Wings

Hello! Today I have a fun layout to share with you. Do remember in my last post I mentioned a little girl who LOVES Tinker Bell?Check her out! Is she Adorable or what? I love this photo--so sweet and dreamy looking. Having two boys it's not very often that I get to create a totally girly girl layout project and let me tell you I had so much fun creating this layout!! The background paper started out as a white sheet of cardstock and I used several colors of Glimmer Mist to create the pretty purple/pink/blue and green paper. I used the Grand Calibur and LF 190 Grand Labels Four to cut/emboss and mat the photo. Then I used LF 114 Grand Circles along with Garden Blossom Glimmer Screen to cut/emboss the circle. Then I added airbrushing, inks, Glimmer Mist and Glimmer Glam to the circle. For the title I used My Mind's Eye Lush Printed Chipboard Alphabet Stickers, colored them with Copic markers, Glimmer Glam and Stickles.To create the wings I used two different fairy wings from JustRite Stampers JustRite Cling CL-02050 Quiet Moments stamp set and stamped them using Rich Cocoa Ink.Next I airbrushed the wings with Copic markers and then I hand cut the wings and lightly misted then with Iridescent Gold Glimmer Mist.Here is a close up of the border at the bottom. I used S7-017 On the Vine Border Grand and added the fairy wings with rhinestones and tiny pink roses.The sentiment is also from the JustRite Cling CL-02050 Quiet Moments stamp set. I used S4-293 Lacey Circles die #4 to cut/emboss the circle and then I used a Copic marker to airbrush using the die template as a stencil.Here is a close up of the sentiment.

Supplies
Stamps: JustRite Stampers JustRite Cling CL-02050 Quiet Moments
Paper: Core'dinations Purple; The Paper Company White, Light Green
Ink: Ranger Peeled Paint, Shabby Shutters, Broken China; Tsukineko Memento Rich Cocoa; Copic Markers V04, BG45, B000, RV02, G40
Dies& Punches: Spellbinders™ Grand Calibur™, LF 190 Grand Labels Four, LF 114 Grand Circles, S7-017 On the Vine Border Grand, S4-293 Lacey Circles die #4
Accessories: Tattered Angels Key Lime Pie, Timeless Lilac, Patina, Popsicle, Iridescent Gold, Cotton Candy (Chalkboard) Glimmer Mists, Chandelier (Glam), Garden Blossom Glimmer Screen; Ranger Lime Green Stickles; My Mind's Eye Lush Printed Chipboard Alphabet Stickers Green; Prima Pink Roses; Joann's Rhinestones; SCRAPBOOK ADHESIVES By 3L™ My Stik™ Permanent Strips Dispenser , White 3D Foam Squares

Thank you so much for stopping by today! I hope you have a wonderful day and stay warm.

Hugs & Smiles,
Heidi

Friday, November 26, 2010

JustRite Cling - In the Moonlight - Fairy Ornament

Hello! I hope you all had a wonderful Thanksgiving with your families and lots of yummy food. Did you go out and brave the Black Friday shopping craze? Did you get any great deals? We didn't go anywhere--LOL! But I did do a little online shopping from the comforts of home--gotta love that! *wink*

I have another Christmas ornament to share with you today. I had so much fun making this cute little fairy ornament! As soon as I spotted this fairy ornament at the store I knew exactly what I wanted to do with it and who I wanted to give it to! I have a dear sweet friend and her little girl LOVES Tinker Bell!! The stamp set is one of the NEW JustRite Cling stamp sets, CL-02055 In the Moonlight. I used Memento Rich Cocoa ink to stamp the swirly frame and sentiment on to Simply Smooth White cardstock. Then I taped the S4-290 Labels Fourteen die #3 die template in place and cut/embossed using the Grand Calibur™ from Spellbinders™.Next I used Copic markers and airbrushed inside the die template.I also made a star diecut for the wand using S4-092 Stars Five die #1 and airbrushed with a Copic marker.Here is a close up of the sentiment. The little accent pieces are from the corner die templates in the S4-287 Fanciful Holiday set. I used pink cardstock to cut/emboss the accent pieces. I added Cotton Candy and Star Dust stickles from Ranger and Bling from My Mind's Eye Fine & Dandy Tickled Pink Bling. I added some bling to the little skirt, shoes and wand.
Here is a photo of the fairy before I embellished it. I added Waterfall, Shell Pink, Lacy Lilac Glitter from Sparkle N Sprinkle to the wings. I added the star with a bit of bling to the wand and some pink seam binding for a ribbon.

Supplies
Stamps: JustRite Stampers JustRite Cling CL-02055 In the Moonlight
Paper: DCS Simply Smooth White; WorldWin Pink
Ink: Tsukineko Memento Rich Cocoa; Copic YG13, RV02, Y11
Dies & Punches: Spellbinders™ Grand Calibur™, S4-092 Stars Five die #1; S4-290 Labels Fourteen die #3, S4-287 Fanciful Holiday (corners)
Accessories: My Mind's Eye Fine & Dandy Tickled Pink Bling; Ranger Cotton Candy, Star Dust Stickles; Sparkle N Sprinkle Waterfall, Shell Pink, Lacy Lilac Glitter, Brushable Glue; Pink Seam Binding (to create: Hug Snug Seam Binding, Tattered Angels Cotton Candy Chalkboard, Iridescent Gold Glimmer Mist)

Don't forget to check out the Holiday Sale from JustRite Stampers! Click HERE for all the details! Thank you so much for stopping by today and I hope you have a Fantastic weekend!

Hugs & Smiles,
Heidi

Wednesday, November 24, 2010

JustRite 12 Weeks of Christmas Blog Hop 12

Welcome to the final week of JustRite Stampers’ Wednesday feature, 12 Weeks of Christmas Blog Hops! JustRite has been showcasing their entire Christmas Collection of stamps during the hops and ALL of those JustRite Original stamps are currently on sale at 25% off now through November 29, with free shipping within the U.S. on consumer orders over $50! You can view all of those Holiday Sale stamp sets HERE.

If you would like to go back through all of the hops and see all of the gorgeous Christmas inspiration from the past 11 weeks, you can do so by clicking on the 12 Weeks of Christmas Blog Hops category on the JustRite Inspiration blog. All of the designers’ projects are hyperlinked directly to their blog posts that have full details of how they created the project, so you won’t have to search for them!

Don’t forget that JustRite also has some Christmas stamps in their newly released CLING line of stamp sets, too -- you can find all of their cling stamp sets HERE. This week, the designers joining the JustRite design team are the 2 Sketches 4 You designers! JustRite is sponsoring this week’s 2S4Y #66 sketch challenge. You can find the fabulous sketch inspiration AND details about the JustRite prize package, by visiting their blog post HERE.

Good morning! Wow, I can't believe how fast 12 weeks flew by! For today's project I have a Christmas card to share with you.To create the card I used JustRite Cling CL-02025 Sparky and Friends stamp set from JustRite Stampers. This is a fun Christmas stamp set and includes 12 stamps in the set. I used non traditional colors for the card but I really like the pinks and blues for the Christmas holiday. The designer paper is from My Mind's Eye Lost & Found Collection and the Fine and Dandy Collection. I started with a piece of paper from the Fine and Dandy Collection and randomly stamped three of the snowflake images from JustRite Cling CL-02025 Sparky and Friends stamp set using Broken China ink. In the photo you can see a before and after look of the paper. Here is a close up of the background paper.
Next I stamped the mitten image using Rich Cocoa ink. Then I lined up the die template and taped it in place and cut/embossed the shape. The mitten die template is from S4-285 Nested Mittens. Then I colored the cuff of the mitten and the heart with Copic markers and inked around the edges with Vintage Photo ink.Here is a close up of the mittens.
I cut/embossed the snowflakes using S4-286 2010 Snowflake Pendants and inked the edges with Vintage Photo ink.I used White 3D Foam Squares to layer all of the pieces for the snowflake and mittens. The shape card was created using the Grand Calibur™ and LF-126 Grand Squares die #3, LF-127 Grand Scalloped Squares die #3 from Spellbinders™.I added diamond stickles to the white snowflake, scalloped edge, mittens and snowflake on the background paper.
Supplies
Stamps: JustRite Stampers JustRite Cling CL-02025 Sparky and Friends
Paper: DCS Simply Smooth White, My Mind's Eye Lost & Found Madison Avenue, Fine and Dandy
Ink: Tsukineko Memento Rich Cocoa; Ranger Vintage Photo, Broken China; Copic Markers
Dies & Punches: Spellbinders™ Grand Calibur™, S4-286 2010 Snowflake Pendants, S4-285 Nested Mittens die #1, LF-126 Grand Squares die #3, LF-127 Grand Scalloped Squares die #3
Accessories: My Mind's Eye Holly Jolly Pom Pom Trim, Fine and Dandy Tickled Pink Bling; SCRAPBOOK ADHESIVES By 3L™ My Stik™ Permanent Strips Dispenser , White 3D Foam Squares; Joann's Light Chocolate Ribbon; Ranger Diamond Stickles

Please visit these designers’ blogs to see what fabulous JustRite Christmas inspiration they have for you on the hop today!

Thank you so much for stopping by today! If you are traveling this holiday I wish you safe travels and to stay warm. We have a winter storm headed our way but luckily we are staying close by. I hope you all have a Wonderful and Blessed Thanksgiving Day!!!

Hugs & Smiles,
Heidi

LinkWithin

Related Posts Plugin for WordPress, Blogger...