 Here is the card I created for Heartfelt Creations Product Release Party. I hope to have a blog post and a full tutorial up tomorrow, so please stop back!
 Hugs & Smiles,
Heidi
 Here is the card I created for Heartfelt Creations Product Release Party. I hope to have a blog post and a full tutorial up tomorrow, so please stop back!
  My Technique is Inking On The Edge--click HERE to check it out!! Sharon Harnist and I will be alternating weeks with Technique Tuesday on the JustRite Stampers Blog.
 Even though I made this card for Father's Day it would also make a wonderful birthday card for a Dad.
 The stamped image is from the By The Sea stamp set from JustRite Stampers. The set includes 4 Centers and 4 Interchangeable Borders and fits the 2-1/4'' x 3-1/16'' Oval Stamper. I stamped the image with Rich Cocoa ink onto Solar White cardstock.
  I started by coloring the water with Copic markers.
 Next I colored the sky and the shinning light from the lighthouse.
 I used two colors of green for the grass.
  The black and the gray tones were used to color the top and bottom of the lighthouse and the birds. The yellow was used to add the light in the lighthouse.
  The last part of the image to color was the lighthouse and I used three shades of blue for the coloring. My husband's favorite color is blue. *wink*
 I used the Classic Ovals Small S4-112 die #5 die template to make the oval diecut and then I inked the edges with Antique Linen ink.
 Next I wanted to color these chipboard letters to match the card.
  First I went over the entire piece of chipboard with Copic marker B21.
 Next I added a medium shade of blue.
 For the last step I added a dark blue just along the edge of each letter.
 Here is a close-up of all the letters.
 Here is a close-up of the lighthouse image. I also added a label and a tag diecut. I used Small Labels S4-169 die #5 and Fancy Tags S4-235 to create the diecuts.
  For the bottom half of the card I embellished it with some jute trim, shells, Flower Soft, blue cord, and blue rhinestones. To add dimension between the layers I used 3D Foam Squares from SCRAPBOOK ADHESIVES By 3L™.
  For the background I embossed the Sea Scape Impressabilities™ onto a piece of Core'dinations cardstock from the Chocolate Box and then lightly sanded the paper.
 The technique I am sharing with you today is layering images. It's a very simple technique and anyone can do it but it has beautiful results.
  I started with two images from the NEW Crafty Secrets Garden Creative Scraps, these will be available July 1st. **To do this technique you will need 2-3 sheets of the Creative Scraps. For my project I used two (2).
 When you are doing the layering you want to look at your image before you start cutting and pick out the images that are towards the front or the ones that seem like they could pop off the image. You don't want to cut part of the image that is in the background because it won't look right when you try to layer it. Here you can see the images of the roses that I cut out.
 Distress the edges on the image.
 When you are layering images you want to give them dimension. I added 3D Foam Squares from SCRAPBOOK ADHESIVES By 3L™ from to the back of all of the roses.
 Next you will want to slightly curl the petals under. In this picture the flower on the left is curled under and the one on the right isn't. I think curling the paper adds even more dimension to the flower.
 Layer the flowers over top of the other flower images.
  I love this look of layering the flowers!
 For the base of the card I used a sheet of paper from the Classic Paper Pad by Crafty Secrets. Here is another little tip for you, try stamping on your designer paper. Go ahead you can do it! *wink* I have heard so many times, "I would never think to stamp on my designer paper". I don't stamp on my designer paper all of the time but I do think it adds another fun design element. I used the flourishes from the Birds at Home stamp set from Crafty Secrets to edge the card.
  Then I colored in the flourish with a Copic marker.
 For the next step I colored one of the Font Frames from Tattered Angels with Glimmer Mist and then I added ink around the edges.
 Part of the frame was going to be covered up so I cut off the extra and will be able to use that on another project. I also added Waterfall Glitter from Sparkle-N-Sprinkle.
 Once I had some of my pieces ready I started to assemble the card. For the lace border at the bottom I used white cardstock and the Classic Lace Border Grand S7-014 die template from Spellbinders™. I inked the diecut with Antique Linen and then add Crystal Ice Glitter.
 Another embellishment I create for the card was a lace flower. These are really easy to make! I used a 12'' piece of lace trim and some thread.
 All you have to do is weave in and out of the little holes along the top of the lace. Once you get to the end you just pull the two pieces of thread and tie in a knot.
 When you pull it together you create a little flower. I also added a pearly button to the center.
 Here is a close up of the frame. I also added some pink rhinestones.
 To create the tag I used Fancy Tags S4-235 die templates from Spellbinders™ and then stamped Hello Love for the sentiment. The word stamps for the sentiment are from the Birds at Home stamp set from Crafty Secrets.
 Here is a close up of the lace diecut and the crinkle ribbon.
 Here is a close up of the lace flower.

 I made this card for my mom to give to one of her friends/co-worker who just recently retired. The background paper is so pretty I didn't want to cover it up too much so I just embellished it a bit.
 I made the vine die cut using the Wizard™ and On The Vine Grand Border S7-017 die template from Spellbinders™. Before removing the cardstock I inked it through the die template, using it like a stencil and then once I removed it I added Non-Smear Pastels to make the colors really pop. I cut the border into a few piece and added it around the sentiment.
  Here is a close-up of the sentiment. I printed it onto white cardstock and then used Labels Five S4-229 to make the label die cut. Before removing the cardstock I inked the inside with Vintage Photo Ink.
 This is the bottom half of the card with more of the vine. I also added pearly flower buttons and some chocolate brown ribbon. I added some dimension to the vine and the buttons using 3D Foam Squares from SCRAPBOOK ADHESIVES By 3L™. For a little sparkle I added a few blue rhinestones.
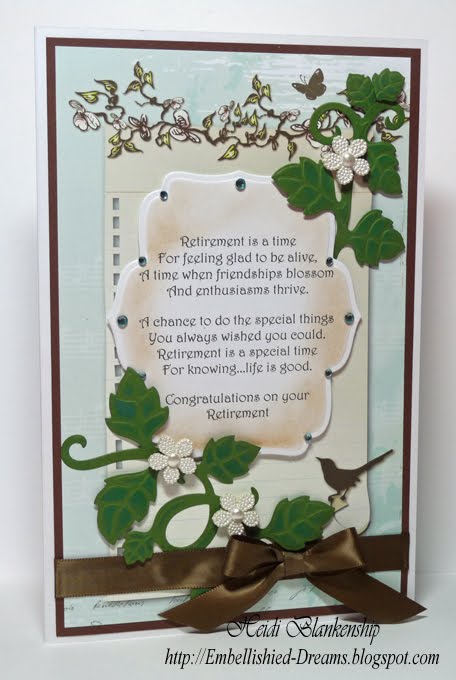
 Here is the card I created using Very Square and Very Square Sentiment stamp sets.
  I can't even begin to tell you when the last time was that I used watercolor crayons! So I thought I would pull them out and have a little fun coloring with them. I started by coloring the polk-a-dot background stamp from Very Square stamp set and then I lightly misted the stamp with water to activate the watercolor crayon and stamped. The watercolor crayons I am using are from SU and honestly I am not even sure if they still sell them but several other companies sell watercolor crayons too, I just happen to have these from back in my SU Demo days.
  Then I used the Wizard™ and the Labels Nine S4-233 Die #5 die template to cut/emboss this pretty label shape and then I inked the edges with Antique Linen. I also inked the edges with Chestnut Roan ink but I forgot to snap a picture before I put the card together. ;-)
  Next I made a lace diecut using the Classic Lace Boarder Grand S7-014 die template from Spellbinders™. I started with white cardstock and I colored the inside of the die template with a watercolor crayon and then I misted the die template with water and then ran my fingers over the entire piece to activate the watercolor crayon. Then I cut/embossed as usual. This is basically the same technique as Reverse Stencil but instead of using ink I used watercolor crayons. I love the way this turned out!
 Here is the same diecut as above but I added some Antique Linen ink.
  Next I inked the edges of the designer paper from DCWV Be Mine Stack with Chestnut Roan ink. I used Crafty Power Tape from SCRAPBOOK ADHESIVES By 3L™ to adhere the diecuts. For the corners I cut off a little piece from the lace border and folded it on the end and attached it to the designer paper.
 Next I stamped the sentiment from Very Square Sentiment stamp set onto a tag and then inked the edges with Antique Linen ink. To create the tag I used Fancy Tags S4-235 die template from Spellbinders™.
  I wanted to add a little dimension to the tag so I added 3D Foam Squares from SCRAPBOOK ADHESIVES By 3L™ to the backside.
  For an embellishment on the card I created an organza grunge flower. I learned how to make these little beauties from Deborah March a fellow Crafty Secrets DT member. Deborah has a wonderful tutorial on her blog Cards and Things, click HERE to check out the tutorial (scroll down to the bottom 1/2 of the post). These little flowers are so quick and easy to make! For my flowers I used the Blossom S4-192 Die #4 die template with the Wizard™ from Spellbinders™ to cut the flower shapes.
 Here is a close-up of the sentiment and the background stamp with the flower. I also added some brown rhinestones from My Mind's Eye.
 After I added the lace diecut I distressed the top edge and I slightly curled up a little bit of the lace.
 Here is a close-up of the corner with the little piece from the lace border.
