Saturday, January 12, 2013

JustRite Papercraft Butterfly Dreams CHA Release

Hello blogging friends!  Today is the first day of CHA and I have a New Release from JustRite Papercrafts to share with you.  The stamp set I am using today is  CL-04390 Butterfly Dreams and I think it is going to be one of my favorites from the CHA Release!


I just love everything about this beautiful stamp set from the butterfly to the flourish and the sentiments.  

Here is the card and matching necklace that I designed using several new release from JustRite Papercrafts including CL-04390 Butterfly Dreams, CL-04430 Floral Flourishes Background Stamp, CR-04350 Special Gifts Labels Twenty-Nine and  CR-04345 Good Friends Label Twenty-Nine.  I used Simply Smooth White, Black Licorice, Sno Cone, Medium Blue paper from DiscountCardstock.com and all of the ink was from Imagine/Crafts Tsukineko.  I used Copic markers to color the little flowers and leaves in the frame image.


Here is a close up of the necklace that I designed the butterfly stamp from CL-04390 Butterfly Dreams and part of a sentiment from CR-04350 Special Gifts Labels Twenty-Nine.  Then I used MD1-008 Squares Two die template to die cut the image and place it in the MB2-005S Squares Two Silver Bezel for perfect placement.  Next I added some beads and rhinestones and then I filled the bezel with ICE Resin®.  It take 6-8 hours for the resin to harden and then you can work with the bezel.  


Once the resin was hard then I added chain, beads and a charm to create the necklace.

I will be posting a full step-by-step how to tutorial on how to design this necklace so please be watching for that.  Please be sure to visit all of the designer in the link list below to see the beautiful projects they have to share with you.


Thank you so much for stopping by today!
Hugs & Smiles,
Heidi


Supplies
Stamps:  JustRite Papercrafts   CL-04390 Butterfly Dreams, CL-04430 Floral Flourishes Background Stamp, CR-04350 Special Gifts Labels Twenty-Nine,  CR-04345 Good Friends Label Twenty-Nine
Paper:  DiscountCardstock.com Simply Smooth White, Black Licorice, Sno Cone, Medium Blue
Ink:  Imagine/Crafts Tsukineko Tuxedo Black, Teal Zeal; Copic Markers
Dies:  Spellbinders Creative Arts™ Grand Calibur® Machine, S5-156 Labels Twenty-Nine, MD1-008 Squares Two, Bezels-MB2-005S Squares Two Silver
Accessories:  ICE Resin®; Beads, Rhinestones, Chain, Mica Flakes

Wednesday, January 9, 2013

JustRite Papercraft CHA Release Ornate Happiness Squares

Hello blogging friends!  Today, I have a beautiful little shape card to share with you using one of the New Release CHA stamp sets from JustRite Papercraft and the matching die template set from Spellbinders.


Here is a look at the New Release CR-04425 Ornate Happiness Squares.  This is a wonderful stamp set designed by Samantha Walker for JustRite Papercraft.  The stamp set matches S5-166 Ornate Square die templates which is one of Samantha's New Releases with Spellbinders.


Here is a look at the fun little shape card that I designed using both the new stamp set and die templates.  I used Sno Cone and Pink Lemonade paper from DiscountCardstock.com.  For the sentiment I used Tuxedo Black ink and for the decorative frame I used Teal Zeal ink.

I also used one of the accent die templates to create a little flower.  Then I added a ribbon slider buckle with a light green flat back pearl to the center of the flower.  The pretty Satin with Iridescent Edge Mint ribbon is from Really Reasonable Ribbon and I thought it matched the pearl perfectly.  


To add some sparkle I edged the card with Scrap Happy Sheer Glue and Diamond Clear Glitter from the The Rubber Cafe.  

Please be sure to visit the other JustRite Papercraft Designers in the link list below to see what they have created to share with you.


Thank you so much for stopping by today!
I am headed to California this morning for the CHA show!!  It's been a year since I went to the show and I can't wait to see everyone!!  I will try to post some picture.  ;-)

Hugs & Smiles,
Heidi

Supplies
Stamps:  JustRite Papercraft CR-04425 Ornate Happiness Squares
Paper:  DiscountCardstock.com Sno Cone, Pink Lemonade
Ink:  Imagine Crafts/Tsukineko Tuxedo Black, Teal Zeal
Dies:  Spellbinders Paper Arts™ Grand Calibur® Machine, S5-166 Ornate Square
Accessories:  Really Reasonable Ribbon Satin with Iridescent Edge Mint; The Rubber Cafe Scrap Happy Sheer Glue, Diamond Clear Glitter; Bling, Ribbon Slider, Large Flat Back Pearl

Sunday, January 6, 2013

Spellbinders Explore Beyond: Sneak Peek and Giveaway - Day Five

Hello!  Welcome to day 5 of the Spellbinders Explore Beyond: Sneak Peek and Giveaway. I am very excited to be sharing the new 3-D Embossing Folder E3D-003 Delightful Daisies with you.  The new 3-D Embossing Folder is beyond amazing!  You are going to love the depth and detailed results from these new folders.


Supply List:
3-D Embossing Folder E3D-003 Delightful Daisies

Cross Promotional Partners:

Other Supplies Used:
Paper:  DiscountCardstock.com Champagne Metallic, Posh Milk Chocolate
Accessories:  Really Reasonable Ribbon Gold Metallic String; Clear Glaze, Crystal Beads


To begin, use the S6-001 5x7 Matting Basics A die template #7 from the set, die # 1 being the smallest.  Cut the Champagne Metallic paper using the Grand Calibur® Machine.


Lightly mist the front and back of the paper to loosen up the fibers in the paper.  This will give you an even deeper and crisper emboss.


Next use a brayer to apply the Golden Glitz ink to the 3-D Embossing Folder for prefect coverage of the ink.  If you do happen to get some ink in an area that you don’t want simply use a Q-tip to remove the ink.  


The 3-D Embossing Folder is a little bit thicker than the M-Bossabilites™ folders so the sandwich is a little bit different.  Starting from the bottom up layer the plates in this order:  B Embossing Plate, 3-D Embossing Folder and D Adapter Plate.  You will use this sandwich for both the larger plates and junior plates.  Once you have your plates lined up run them through the Grand Calibur.


Check out the amazing embossed detail!  I am showing pictures at two different angles since the paper is metallic and the ink is very shimmery depending on how the light catches it you will get different looks.


Next I used a Q-tip with Memento™ Desert Sand and Rich Cocoa inks to add some darker colors and shading to the daisies, butterfly and banner.  Then I used Rich Cocoa ink to stamp the flourish and StazOn® Timber Brown for the sentiment.  The stamp set CL-04390 Butterfly Dreams is a CHA Release from JustRite Papercraft.


Here are some close up pictures so you can see all of the detail.


I layered Posh Milk Chocolate for a mat behind the embossed paper and then added some gold metallic string and beads to dangle on the side and adhered it to a Champagne Metallic card base.


To finish off the card I added a clear glaze and pearls to the flower centers and the body of the butterfly.

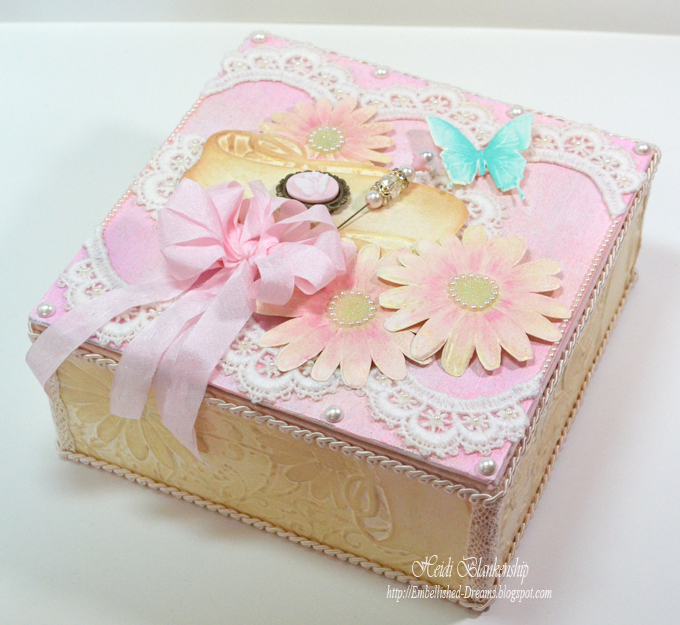
I created a second project using the 3-D Embossing folder but for this project I fussy cut some of the embossed images and embellished the top of the decorative box.


I also made panels using the 3-D Embossing folder and covered the sides of the box.  Then I added lace, trim, pink wrinkled ribbon, pearls, a butterfly cameo and a handmade stick pin.


Supplies:
3-D Embossing Folder E3D-003 Delightful Daisies

Cross Promotional Partners:


Other Products Used:
Paper:  DiscountCardstock.com Simply Smooth Ivory
Accessories:  Really Reasonable Ribbon Crochet Lace, Pink Wrinkled Ribbon; Lace, Trim, Butterfly Cameo, Handmade Stick Pin


For all Official Rules of the Giveaway, click HERE.

To Enter the Giveaway, Click HERE!

Thank you so much for visiting my blog today and please be sure to visit Samantha Walker’s blog for another chance to win! And check the Spellbinders blog through January 8th for additional entries and sneak peek reveals!

Questions? ContestQuestions@Spellbinders.us  No entries will be accepted at this email address.


Thursday, January 3, 2013

Handmade Stick Pins & Spellbinders Explore Beyond Sneak Peek & Giveaway Day Two

Hello everyone!  Today, I want to share some photos with you of several stick pins that I recently made.  Not too long ago I was watching a YT video (sorry I can't remember who's YT channel it was) but the designer was showing some of her stick pins and she had made the comment that if you're wanting to create something but don't have the time to do a lot or if you're ever in a slump and not sure what to do stick pins are always a great things to make.  They are quick and easy and you are still doing something creative.  So I took her advise, got out my beads and pins and just had some fun designing my own handmade stick pins.  I made twelve different designs and three of each design.  


I use E6000 adhesive to hold the bead caps and beads in place.  I put a little dab of the E6000 on a scratch piece of paper and use a pin to pick up the adhesive and put a little on the pin I am using for the stick pin.  I only glue the last two beads in place.  Then I place the stick pins upside down in a votive candle holder until the adhesive is dry.  This keeps the beads all towards the top of the pin and from moving around during the drying time.

I use a variety of stick pins.  The pearl ones are three inches long and I found them in the floral section and Joann Fabrics.  The other ones are from Maya Road and a few online stores.  Most of the beads are from Joann's, Michael's and Hobby Lobby and a few from online stores.


I had a lot of fun making the stick pins.  They are quick and easy and now I am ready to embellish my projects!


Today, is day two for the Spellbinders Explore Beyond Sneak Peeks & Giveaway.  Click HERE for all of the details and be sure to visit Cindy Echtinaw and Linda Lucas to see the fabulous projects they have to share with you.

Thank you so much for stopping by today!
Have a creative day!

Hugs & Smiles,
Heidi

Wednesday, January 2, 2013

Spellbinders Explore Beyond Sneak Peek & Giveaway - Forever Friend Card

Hello blogging friends!  Do you know what today is?  It's the first day of the Spellbinders Explore Beyond: Sneak Peek and Giveaway!  For the next 7 exciting days, some of the Spellbinders Designers will be sharing brand new, never before seen product with you! Each day brings multiple chances to win by visiting the participating reveal blogs. And by the end of the week... they will be revealing a line that will explain why we are all SO excited about Exploring Beyond!


To check out the Sneak Peeks for Day One please click HERE to visit the Spellbinders Paper Arts Blog and be sure to visit Becca Feeken and Darsie Bruno and see the beautiful projects they are sharing today.


Today, I had a little bit of time to just sit down and play so I made a card.  I haven't used the S5-086 Bitty Blossoms die templates in a while, it seemed like I was using it on everything not too long ago--LOL!  I love the die template set and believe me I probably could use it on just about everything but you might get kind of tired of  seeing it all the time so I have to switch it up.  But today I felt like making some pretty roses.  ;-)


To create the roses I used pattern paper from the Prima Tea-Thyme Collection and S5-086 Bitty Blossoms die templates.  After I rolled and shaped the roses I inked the edges with Versa Magic Pixie Dust ink and then sprayed them with Pssst! Sheer Shimmer Spritz Sparkle.  I LOVE the Shimmer Spritz!!  It is so sparkly and shimmery!  I placed the flowers on a piece of wax paper and then sprayed them.  Here's a little tip--let the excess Shimmer Spritz dry on the wax paper and lightly mist it with more Shimmer Spritz or water to re-activate it for use on another project.


Here is a close up of the roses.  I also used the S5-129 Foliage Two die template with Herbal Garden paper to die cut the leafy flourish.


To create the mat with the Prima paper I used S5-131 A2 Matting Basics A and then I added a flourish die cut to the upper corner using S2-006 Garden Weave Die D-Lites™.  For the sentiment I used the CR-04325 Antique Valentine Tag One stamp set, Memento Tuxedo Black ink and S5-127 Labels Twenty-Eight die template.  Then I added some Juliet Natural Crochet Lace and Pink Wrinkled Ribbon from Really Reasonable Ribbon.  To finish off the card I added a couple of stickpins.  The beaded stickpin is one that I made and I will be posting some pictures of handmade stickpins tomorrow.

Thanks so much for stopping by today and Happy 2013!!  
I hope it's an Amazing year for everyone!!

Hugs & Smiles,
Heidi


Supplies
Stamps:  JustRite Papercrafts  CR-04325 Antique Valentine Tag One
Paper:  DiscountCardstock.com Simply Smooth Ivory, Herbal Garden; Prima Tea-Thyme Collection
Ink:  Imagine Crafts/Tsukineko Versa Magic Pixie Dust, Memento Tuxedo Black
Dies:  Spellbinders Paper Arts™ Grand Calibur® Machine, S5-131 A2 Matting Basics A, S5-127 Labels Twenty-Eight, S5-129 Foliage Two, S5-086 Bitty Blossoms, S2-006 Garden Weave Die D-Lites™
Accessories:  Really Reasonable Ribbon Juliet Natural Crochet Lace, Pink Wrinkled Ribbon; Imagine Crafts/Tsukineko Pssst! Sheer Shimmer Spritz Sparkle; Scrapbook Adhesives By 3L 3D Foam Squares, Adhesive Sheets; Stick Pins

Monday, December 31, 2012

Today and Always Card

Hello and Happy New Year's Eve!!  I have one more card and tutorial to share with you for 2012.


The card I am sharing with you today is a wedding card but the sentiment could be switched out and this could be a card for just about any occasion.  I used S5-153 Butterfly Magic die template which is one of the  Spellbinders Shapeabilities® Expandable Patterns.  Basically what that means is that if you wanted to make a larger card, background paper, or cover an altered project the die template is made so that when you make the die cuts the first time you can move the die template over and continue to cut the paper thus expanding the pattern.  I think it's a pretty cool idea and that is what makes the Expandable Patterns die templates so unique.


To start I covered one side of the Sno Cone (blue) paper with Adhesive Sheets from Scrapbook Adhesives by 3L.  Then I used S5-132 A2 Matting Basics B die template to cut/emboss the paper.


Next place the S5-153 Butterfly Magic on the cutting plate, place a piece of wax paper on top and then add the blue paper with the adhesive side down.  Use the Grand Calibur® Machine to cut/emboss the detailed die cut.


Use the S5-131 A2 Matting Basics A to cut/emboss a piece of Simply Smooth White.  Carefully peel the backing off of the adhesive sheet on the blue paper and apply the blue die cut paper to the white paper for a perfect match.


Here is a close up of the butterfly.  I cut/embossed a second piece of blue paper using the S5-153 Butterfly Magic die template and then I trimmed out the butterfly.  I glued down the body of the butterfly on top of the other one and added Diamond Clear Glitter and Pearls from The Rubber Cafe`.  


For the sentiment I used CR-03825 Ever After Antique Labels  from JustRite Papercraft.  I also used S5-148 Decorative Labels Eight to create the die cuts for the sentiment.  Then I added a couple of stick pins and some Noel White Crochet Trim (retired) and Sheer Ruffle Pink Edge from Really Reasonable Ribbon.

If you have any of the Spellbinders Shapeabilities® Expandable Patterns die template I hope you will give this a try.

Happy New Year!!  Blessings to you all and celebrate safe!!

Hugs & Smiles,
Heidi

Supplies
Stamps:  JustRite Papercraft CR-03825 Ever After Antique Labels 
Paper:  DiscountCradstock.com Simply Smooth White, Sno Cone, Pink Lemonade
Ink:  Imagine Crafts/Tsukineko Memento Tuxedo Black
Dies:  Spellbinders Paper Arts™ Grand Calibur® Machine, S5-131 A2 Matting Basics A, S5-132 A2 Matting Basics B, S5-153 Butterfly Magic, S5-148 Decorative Labels Eight
Accessories:  Really Reasonable Ribbon Noel White Crochet Trim (retired), Sheer Ruffle Pink Edge, The Rubber Cafe` Scrap Happy Sheer Glue, Pearls, Stick "EM" Up Tool, Diamond Clear Glitter; Scrapbook Adhesives by 3L 3D Foam Squares, Adhesive Sheets; Ranger Glossy Accents; Stick Pins, Wax Paper

LinkWithin

Related Posts Plugin for WordPress, Blogger...