Wednesday, July 14, 2010

Heartfelt Creations - Daisy Patch Collection Release #3

Good morning! Are you ready for another NEW Release from Heartfelt Creations? Today is the day for Daisy Patch Collection Release #3!! So many fun and beautiful new designs!! Here is the card I created for the New Release. I used the Large Elegant Word Background, Daisy Patch Flowers, Simple Filler Stems, Daisy Patch Swirls and Perfect Petals DieCuts. These are all New Releases. I also have a step-by-step tutorial to share with you on how I created the card.Have you ever thought about using the back of your unmounted stamp to create a background? This is what I used to create an aged background for the stamp. First I covered the entire backside with Antique Linen ink and then I edged it with Vintage Photo ink.I lightly misted over the ink with Pearl Glimmer Mist and then I turned it over using it just like a regular stamp. Here's the result. It looks like an aged background and you can't see it from the photo but it has a nice soft all over pearl glimmer to it.
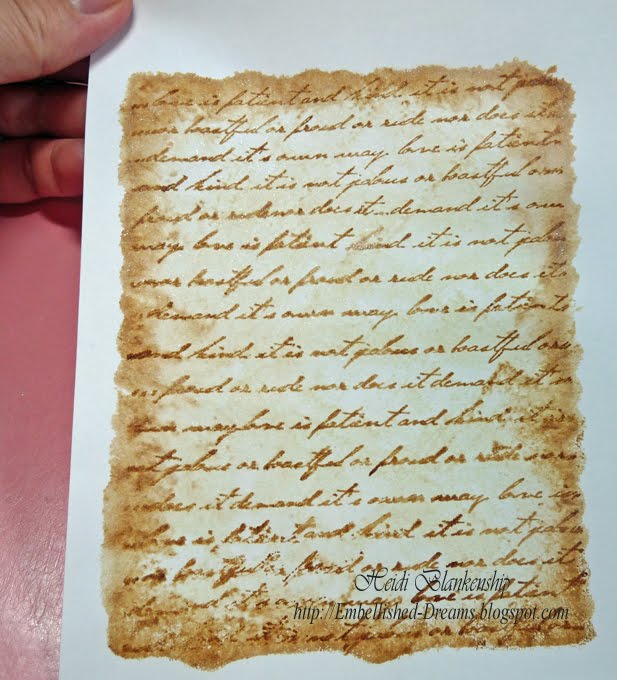
I inked up the Large Elegant Word Background with Vintage Photo ink and then misted it in a few places with the Pearl Glimmer Mist. Next I stamped the Daisy Patch Flowers and Simple Filler Stems and heat embossed with gold embossing powder.I did all of the same steps as mentioned above and embossed a second flower.Next I painted the images with Twinkling H2O's. These are the colors I used, Playful Peony, Terracotta Rose, Lemongrass and Green Tea.I painted the second flower with the same two pink tones and then I cut out the image, curled the petals and layered them. I offset the top flower to make the image appear larger. Then I added Peeled Pain Distress Stickles to the center of the flower. After the stickles was dry I added some green rhinestones from My Mind's Eye to the center. To create this beautiful corner diecut I used the Perfect Petals DieCuts Corner Flourish. I used white cardstock and then I inked the edges of the diecut with Vintage Photo ink and added glitter for a little sparkle.For the sentiment I used a stamp from the Daisy Patch Swirls stamp set and then I used the Fancy Tags die template from Spellbinders™ to create the tag. I used Rich Cocoa ink for the sentiment and Vintage Photo to ink the edges and then I used 3D Foam Squares from SCRAPBOOK ADHESIVES By 3L to add a little dimension to the tag.Here is another close-up of the flower image.Supplies~
Stamps~Heartfelt Creations-HCPC 3323 Large Elegant Word Background, HCPC 3318 Daisy Patch Flowers, HCPC 3319 Simple Filler Stems, HCPC 3324 Daisy Patch Swirls, HCD 704 Perfect Petals DieCuts
Paper~DCWV-The Rustic Stack; Georgia Pacific-White Cardstock
Ink~Ranger-Distress Ink Antique Linen, Vintage Photo; Tsukineko-Memento Rich Cocoa
Accessories~Spellbinders-Wizard™, S4-235 Fancy Tags; SCRAPBOOK ADHESIVES By 3L-E-Z Runner® (33'), 3D Foam Squares; Ranger-Gold Embossing Powder, Distress Stickles Peeled Paint; My Mind's Eye-Pink & Green Lush Rhinestones; Tattered Angels-Pearl Glimmer Mist; Twinkling H2O's-Playful Peony, Terracotta Rose, Lemongrass, Green Tea; Sparkle-N-Sprinkle-Crystal Ice Glitter; Paint Brush; Cotton Balls for inking; 2way Glue Pen; Heating Tool

Thank you so much for stopping by today. I hope you enjoyed the tutorial and I would love to hear what you think about the new releases. Don't forget to hop on over to the Heartfelt Creations Blog to see more beautiful samples! Hope you have a Wonderful Day!!

Hugs & Smiles,
Heidi

Tuesday, July 13, 2010

Spellbinders Big Event - Day One!! and some Fun Photos

Today is Day One of Spellbinders Big Event!! Spellbinders is revealing some of the Newest Releases for Summer Craft & Hobby Association (CHA) trade show 2010 in Chicago Illinois!

For eight days, the Spellbinders Designers will introduce new releases by sharing projects they have created. You will need to click onto their blog links below to see them, and follow the instruction to enter the BIG Event contest as well. Enter each blog’s contest by following the Official Rules HERE – please read and follow all the rules.

In order to be eligible to win today’s products you have to send an email to the addresses listed on each blog. People that enter each contest from each blog, during the days their contests are open, will qualify for the Grand Prize.

You will have until 11:59PM U.S. Eastern Standard Time tomorrow (July 14, 2010) to enter today’s Big Event Contests. Comments are welcome BUT WILL NOT be considered contest entries. I don't have

This contest is sponsored by Spellbinders Paper Arts. For any questions, please email contestquestions@spellbinders.us.

~Here is a link list for all of the Spellbinders Designers~

DAY ONE!!! July 13
Julie Overby
Debbie Olson

July 14
Judy Hayes
Latisha Yoast

July 15
AJ Otto
Kimberly Crawford

July 16
Becca Feeken
Linda Duke

July 17
Sherry Cheever
Deborah Young

July 18
Gina Hanson
Ashley Cannon Newell

July 19
Mona Pendleton
Heidi Blankenship

July 20
Keri Lee Sereika
Kazan Clark

Good Luck and I hope you enjoy the New Releases from Spellbinders and the creative art from the Spellbinders Designers!!!

I don't have an art to share with you today but I do have a few pictures to share.
These are couple of pictures that I took after the rain a few days ago. My neighbors cherry tree---they look so yummy---but they are really sour!! Perfect for baking a pie. *wink*Grilled pineapple and chicken---soooooo yummy!!! The pineapple tastes like candy!!!Here's what Eric made with the pineapple and chicken---Grilled Chicken and Pineapple Quesadillas. OMGosh they are like pure mouth-watering heaven!!!! SO Delicious!!!!! He found the recipe on The Pioneer Woman, click HERE for a link.It's baseball season and the little man has been busy with practice and the games. They are so fun to watch! :-) This was the beautiful view one day last week after a nice warm rain.

Thanks for taking the time to stop by today and I hope you have a good one! Don't forget to check out the Spellbinders Big Event!!

Hugs & Smiles,
Heidi

Monday, July 12, 2010

NEW Shimmer Sheetz - Crafty Secrets - Birthday Card

Hello! I am sorry it has been so long in between blog posts!! I have been right here, I haven't gone anywhere but I have been really busy working on CHA projects and some other background stuff. I hope to be able to share more with you very soon!! However, I do have a BRAND NEW product to share with you today!! I am so excited and thrilled to be sharing this with you!! The NEW Product is called Shimmer Sheetz. Just look at all that shimmery goodness!! Shimmer Sheetz is iridescent and metallic Mylar and it's endlessly versatile. The package comes with three 5'' x 12'' Sheets and it is available in 13 colors!! You can diecut, punch, stamp, ink, emboss, use alcohol inks, markers, Copic, paint, mixed media, used on fabric and it is garment quality (colorfast and washable), it is acid free and can be used for scrapbooking and card making---these are just a few of the things you can do with Shimmer Sheetz!! The possibilities are endless!! Check out Elizabeth Craft Designs to see all the beautiful colors of Shimmer Sheetz. Here is the card I designed using the Light Pink Iris Shimmer Sheetz from Elizabeth Craft Designs and I have a step-by-step tutorial to share with you.To start I took a piece of Light Pink Iris Shimmer Sheetz and a Flourish Impressabilities™ I2-1009 from Spellbinders™ that I cut apart. I cut out part of the center from the Impressabilities™ and then I cut it in half. I used a few pieces of tape to hold the Impressabilities™ in place and then I embossed the Light Pink Iris Shimmer Sheetz using the Wizard™ from Spellbinders™.Leaving the Impressabilities™ in place I added two colors of Copic refills, RV02 Sugared Almond Pink and YR04 Chrome Orange.Here is the result.Next I sanded the Shimmer Sheetz until I had achieved a look I liked, but I wasn't done yet...I wanted the outer edges to have a darker color tone and create a little more depth so I added Copic refill E27 Africano just to the edges and then I sanded the Shimmer Sheetz again.Here is the end result--a multi-colored distressed and embossed Shimmer Sheetz. This is the piece I used for the background on my card.Next I had a white paper flower that I added some glimmer and sparkle to with Glimmer Mist and some glitter. The beautiful floral image is from Crafty Secrets Springtime Images & Journal Notes. I love the Images and Journal Notes they are filled with so many beautiful vintage images. The flourish die cuts were created using the Wizard™ and Doodle Parts S4-121 die templates from Spellbinders™. To create the tag and sentiment I used the Happy Birthday stamp in the Cupcake Party stamp set from Crafty Secrets and made the diecuts using Labels Trio S3-147 and Fancy Tags S4-235 die templates from Spellbinders™. For the layering on the tag I used 3D Foam Squares from SCRAPBOOK ADHESIVES By 3L™.The Rose Shimmer paper was distressed using a distressing tool and I added a few rhinestones and vintage bling.

Supplies~
Paper~Elizabeth Craft Designs-Light Pink Iris Shimmer Sheetz; The Paper Company-Orange Shimmer, Rose Shimmer, Brown & White Cardstock
Stamps~Crafty Secrets-Cupcake Party (sentiment)
Ink~Copic Refills-RV02 Sugared Almond Pink, YR04 Chrome Orange, E27 Africano; Tsukineko-Memento Rich Cocoa; Ranger-Distress Ink Vintage Photo
Accessories~Spellbinders-Wizard™, Fancy Tags S4-235, Labels Trio S3-147, Doodle Parts S4-121, Flourish Impressabilities™ I2-1009; Crafty Secrets-Summertime Images & Journal Notes, Vintage Bling; Tattered Angels-Glimmer Mist Tattered Rose, Candle Light, Coral Reef; Joann's-Rhinestones; SCRAPBOOK ADHESIVES By 3L-3D Foam Squares, E-Z Runner® (33'); Cotton Balls; Tweezers; Sanding Block; Distressing Tool

So what do you think about the Shimmer Sheetz? I have been having so much fun playing with them and seeing what I can create! I would love to hear what you think!! Please be sure to hop on over to Elizabeth Craft Designs to check out the Shimmer Sheetz! Thank you so much for stopping by today and I hope you had a Wonderful Weekend!!

Hugs & Smiles,
Heidi

Monday, July 5, 2010

3rd of July Parade and 4th of July Fireworks

Good morning! I hope everyone had a Happy 4th of July!! We had a really nice weekend with family, good food, the parade, a little R&R and the fireworks. I have a picture filled post for you today. Several years ago our town switched the 4th of July Parade to the 3rd of July so there could be more entrants and have a larger parade. It's kind of nice because it stretches out the festivities for a couple of days. We live on one of the main streets in our town which just so happens to be the street for the parade. So for the past several years we always have a big cook out at our house & have everyone over for the parade. Here's a few pictures from our weekend.The theme for the parade this year was Hometown Heroes.
Drum Line from the Albert Lea Marching Band.
Yummy food!!Eric, the "Grill Master". He did an excellent job!!Evan doing a fist bump with the bear.This was the Gorgeous sunset down by the lake. They shoot the fireworks off from the beach.Evan waiting and waiting and waiting---how many more minutes? LOL!!It's getting darker... The sunset is always so beautiful down by the lake.The fireworks were amazing!!! Evan was thrilled--we ended the night with sparklers. I love how this picture turned out!!

I have more picture that I will be sharing over the next day or so. I hope everyone had a Happy and Safe 4th of July!!! Thank you so much for stopping by!! Have a Great Monday!

Hugs & Smiles,
Heidi

LinkWithin

Related Posts Plugin for WordPress, Blogger...