Wednesday, March 13, 2013

Really Reasonable Ribbon March Blog Hop


Good morning blogging friends!  Today, is the Really Reasonable Ribbon Blog Hop for the month of March.  The RRR Design Team Members and Special Events Design Team Members will be showcasing the Monthly Ribbon Club


This month there is a beautiful assortment of Pink, White and Green ribbons included in the March Ribbon Club. This is such a pretty combination for Spring projects.  Click HERE for more details on how you can sign up for the Monthly Ribbon Club.

If you are following the order of the blog hop you should have just come from Judy's Blog. If not and you just happened to pop in for a visit please click HERE to start the blog hop at the Really Reasonable Ribbon's Ramblings! Blog.


For my project I designed a card using three of the ribbons/trims from the March Ribbon Club Assortment - Sweet Pickle.  I used two of the ribbons to create a banner across the top of the card and I used some of the white crochet trim to make a little rosette.


To start I used StazOn Opaque Roasted Coffee ink from Imagine Crafts/Tsukineko to stamp the word banners on to the pink ribbon.  The stamps are from JustRite Papercraft CR-04375 Live, Love Laugh Vintage Labels Two stamp set.  These little word banners are the perfect size for stamping on ribbon.


Next I fussy cut the ribbon to make little banners.


The rosette was very quick and easy to make.  I did a straight stitch through the top of the white crochet trim, pulled it to ruffle up the trim and sewed the ends together.


Here is a close up of the banner at the top of the card.  I used a piece of crochet thread and 3D Foam Squares from Scrapbook Adhesives by 3L to adhere the ribbon.


The sentiment is from the same stamp set.  I die cut a S4-110 Classic Ovals Large, stamped the sentiment with Opaque Roasted Coffee ink and inked the inside edges with Memento Inks Toffee Crunch.  Then I added the rosette, pink roses and leaves.  I added a buckle slider with large pearl to the center of the rosette.  For the leaves I used Herbal Garden paper from DiscountCardstock.comS4-328 Foliage die template and Memento Ink  Pistachio.  


I used BoBunny Prairie Chic Collection and S5-131 A2 Matting Basics A die template to create the mat for the card front and then I used Posh Milk Chocloate for the base of the card.  To finish off the card I added some tiny pearls to the banner and around the flower cluster.

I hope you enjoyed my project and tutorial. 
Don't forget StazOn inks are prefect for stamping on ribbon!

Now to continue in the blog hop you need to hop on over to Vivian's Blog and check out her fantastic project!

Thank you so much for stopping by today and I hope you enjoy the Really Reasonable Blog Hop!! Don't forget to visit the RRR Store and check out all of the beautiful ribbons, lace and trims!
I hope you have a wonderful and creative day!

Hugs & Smiles,
Heidi  


Supplies
Really Reasonable Ribbon:  March Ribbon Club Assortment - Sweet Pickle
Stamps:  JustRite Papercraft CR-04375 Live, Love Laugh Vintage Labels Two
Paper:  DiscountCardstock.com Posh Milk Chocloate, Simply Smooth Ivory, Herbal Garden; BoBunny Prairie Chic Collection
Ink:  Imagine Crafts/Tsukineko StazOn Opaque Roasted Coffee, Memento Inks Toffee Crunch, Pistachio
Dies:  Spellbinders Creative Arts™ Grand Calibur® Machine, S5-131 A2 Matting Basics A, S4-110 Classic Ovals Large, S4-328 Foliage
Accessories:  Recollections Pearls; Buckle Slider with Large Pearl; Pink Roses; Scrapbook Adhesives by 3L 3D Foam Squares; Needle/Thread, Hot Glue

Tuesday, March 12, 2013

Secret Garden Jewel Floral Frame

Hello everyone!  Today, is my post day over at the Positively Me Blog.


I have an altered frame to share.  I used some of the beautiful Secret Garden Paper Collection from Graphic 45, S5-143 Jewel Flowers & Flourishes and S5-099 Jewel Keys die templates from Spellbinders Creative Arts™ Positively Me Collection by Julianna Hudgins to alter and embellish the frame.

Using the S5-143 Jewel Flowers & Flourishes I was able to make perfect flower embellishments for my Secret Garden frame.  I love how the frame turned out and it's a perfect home decor piece for Spring.

To see more photos and find out all of the details on how I designed the Secret Garden frame please click HERE.  Thank you so much for stopping by today!

Hugs & Smiles,
Heidi

PMJ DT:  Spellbinders Creative Arts™ Positively Me Collection by Julianna Hudgins S5-143 Jewel Flowers & Flourishes, S5-099 Jewel Keys
Other Supplies
Paper:  Graphic 45 Secret Garden Collection
Ink:  Imagine Crafts/Tsukineko Memento Inks Angel Pink, LuLu Lavender, Summer Sky, Pistachio 
Dies:  Spellbinders Creative Arts™ Grand Calibur® Machine, S5-157 Labels Thirty
Accessories:  Ranger Stickles - Fruit Punch, Lavender, Waterfall, Lime Green; Scrapbook Adhesives by 3L™ 3D Foam Squares; Mod Podge, Sponge Brush, Wood Frame, Decorative Brads, Sanding Block

Friday, March 8, 2013

Cowgirl Silver Turquoise Necklace - Spellbinders Media Mixáge - ICE Resin

Hello blogging friends!  Today, I have another necklace to share with you using some of the Media Mixáge™ Collection from Spellbinders Creative Arts™.  


Here is the necklace that I designed using the Artisan X-plorer™ machine, MB1-002S Squares One - Silver bezel and the matching die template MD1-002 Squares One.


Inside the bezel I used a vintage digital image of a little cowgirl on her horse, a metal filigree piece, rhinestones, Relique Glitz Powder Silver Sparkle and ICE Resin® 1oz Syringe Single.  


To create the necklace I used a combination of Chains, Pearls Chain, Rhinestone Chain, Filigree Spacer Chain, Turquoise Beads, Bead Caps, Head Pins and a Clasp.

Remember you can click on all of the images to see enlarged pictures and all of the detail.

Thank you so much for stopping by today and I hope you have a Fantastic Friday!!

Hugs & Smiles,
Heidi

Supplies
Spellbinders Creative Arts™  Media Mixáge™ Artisan X-plorer™, MB1-002S Squares One - Silver (bezel), MD1-002 Squares One (matching die template)
Accessories:  ICE Resin® 1oz Syringe Single, Relique Glitz Powder Silver Sparkle; Chains, Pearls Chain, Rhinestone Chain, Filigree Spacer Chain, Turquoise Beads, Bead Caps, Metal Filigree, Head Pins, Clasp, Digital Image

Wednesday, March 6, 2013

JustRite Papercraft March Release Day Four - Graceful Monograms - Grand Damask Background - Media Mixáge & ICE Resin Tutorial

Hello blogging friends!  It's day four of the  JustRite Papercraft  New March Release.  Today, the designers will be sharing projects made two new stamp sets. 


The first stamp set is CR-04495 Graceful Monograms.  This set includes an beautiful uppercase font, three frames, four images and several flourishes.  It is also designed to coordinate with Spellbinders Creative Arts™ Media Mixáge™ bezels and matching bezel die templates.


This is the second stamp and it's a gorgeous damask, CL-04500 Grand Damask Background Stamp


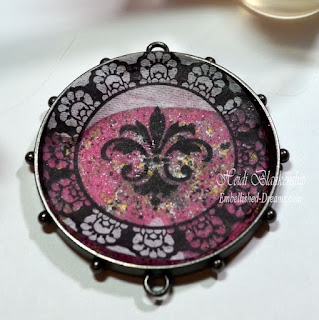
Today, I have two projects to share with you using the CR-04495 Graceful Monograms stamp set and I have a step-by-step tutorial.  The first project is this Raspberry Fleur de Lis Necklace.


I made a personalized key ring for my second project.


For the first step I applied ICED Enamels Medium (not shown) which is like a liquid glue adhesive to the MB1-007S Circles Three-Silver large bezel.  Then I added the ICED Enamels - Raspberry Relique and Relique Glitz Powders Silver Sparkle and heat set with a heat tool.  When doing this start about 5-6 inches away from the bezel and as it warms up and you see it starting to melt then come in closer with the heat tool and keep heating until it is all melted.  *Be VERY Careful--the bezel will be HOT!  Let is sit for a few seconds to cool before touching it.


Here is a close up once everything was melted.


Next I stamped one of the frames and Fleur de Lis from the CR-04495 Graceful Monograms stamp set on to white tissue paper using Jet Black StazOn ink from Imagine Crafts/Tsukineko.


I used MD1-012 Circles Three die template with the Artisan X-plorer™ to die cut the frame.


Now for the fun part!  Mix the ICE Resin®1 oz Syringe Single according to the instructions on the packaging, let sit for five minutes and then it's time to pour.  I started by added a little bit of ICE Resin on top of the ICED Enamels and then I added the die cut piece of tissue paper.


Here is a close up when I first placed the tissue paper in the bezel.  You can start to see the magic happening right away--when the ICE Resin is added to the tissue paper it makes the tissue paper transparent so all you see is the stamped image.  Pretty cool!  I used the stir stick to push the tissue paper down in to the bezel and get just the right placement.  Then check for bubbles, if you have any bubble use a toothpick to bring them up to the top and remove them.  Set the bezel aside to dry for 6-8 hours.  I usually let mine sit overnight, then I know the resin is fully set and I don't have to worry about touching it too soon and getting marks or fingerprints in the resin.  


These are a couple of close up pictures with the bezels were still drying.  I used the same steps to make the monogram bezel.


To create the necklace I wire wrapped several beads, added the dangles to a chain, added the bezel and a lobster claw closure.  For the key ring I wire wrapped several bead, added the dangles to a piece of chain, added the chain to the bezel and added a key ring.

Using the beautiful stamps from JustRite PapercraftSpellbinders Creative Arts™ Media Mixáge™ Collection and ICE Resin® you can create custom pieces of jewelry and personalized key rings.

Please be sure to visit all of the  JustRite Papercraft Design Team Members in the link list below to see what they have created to share with you.


I hope you enjoyed the step-by-step tutorial and if you have any questions please let me know.

I hope you have a wonderful and creative day!

Hugs & Smiles,
Heidi

Supplies
Stamps:  JustRite Papercraft  CR-04495 Graceful Monograms
Paper:  White Tissue Paper
Ink:  Imagine Crafts/Tsukineko StazOn Jet Black
Dies/Bezel:  Spellbinders Creative Arts™ Artisan X-plorer™, Media Mixáge™ MB1-007S Circles Three-Silver (bezels Lg and Med), MD1-012 Circles Three (dies)
Accessories:  ICE Resin®, 1 oz Syringe Single, ICED Enamels Medium, ICED Enamels - Raspberry ReliqueTurquoise Relique, Relique Glitz Powders Silver Sparkle; Rhinestones, Beads, Bead Caps, Jump Rings, Head Pins and Chains come from Michaels, Hobby Lobby, Joanns and Online Stores.

Monday, March 4, 2013

JustRite Papercraft March Release Day Two - Grateful Hearts Vintage Labels Two

Hello everyone!  It's day two of the March New Release from JustRite Papercraft.  I have another fantastic stamp set to share with you and a card I designed using the new set.


Here is the CR-04450 Grateful Hearts Vintage Labels Two stamp set from JustRite Papercraft.  Check out the beautiful floral image to color!  This stamp set also includes three frames, a flourish and several sentiment and it is compatible with JB-03990 Vintage Labels Two Custom Dies from JustRite Papercraft.  


Here is the card that I designed using CR-04450 Grateful Hearts Vintage Labels Two stamp set.  The base of the card is Bubble Gum and then layered with a piece of Simply Smooth White.  The pattern paper is from Prima Divine 6 x 6 paper pad.  I stamped the floral image on to Simply Smooth White and then added the color using Copic markers (listed below).


Here is a close up of the image.


I made a little flag with a sentiment in the upper corner.  I stamped the flourish using Angel Pink and then the sentiment with Rich Cocoa ink and edges the flag using Copic markers E31 and 0.  Then I glued a flat back stickpin to the back of the flag and added some pearls.


To finish off the card I added some Melon Seam Binding which matches the colors of the floral image and pattern paper perfectly.  I also added Juliet Natural Crochet Lace and 1/4'' Natural Crochet Lace.  All of the ribbon and trims are from Really Reasonable Ribbon.

Please be sure to visit each of the JustRite Papercraft Design Team Members in the link list below to see what they have created to share with you.

JustRite Inspiration
Becca Feeken 
Amy Tedder 
Angela Barkhouse
Kellie Fortin 
Marisa Job
Eva Dobilas
Kazan Clark
Barb Schram
Heidi Blankenship 
Michele Kovack 
Sheri Holt
Darsie Bruno
Margie Higuchi

Thank you so much for stopping by today!  I won't be posting for day three of the JustRite Papercraft March New Release so be sure to hop on over to the JustRite Inspiration Blog on Tuesday and check out the newest releases.

I hope you have a wonderful day!

Hugs & Smiles,
Heidi

Supplies
Stamps:  JustRite Papercraft  CR-04450 Grateful Hearts Vintage Labels Two
Paper:  DiscountCardstock.com Simply Smooth White, Bubble Gum; Prima Divine 6 x 6 paper pad
Ink:  Imagine Carfts/Tsukineko Memento Rich Cocoa, Angel Pink; Copic Markers E000, R20, RV10, R81, R85, R22, BG10, BG70, Y11, G40, G21, G24, YG13, E31, E25
Dies:  JustRite Papercraft Custom Dies JB-03990 Vintage Labels Two
Accessories:  Really Reasonable Ribbon Melon Seam Binding, Juliet Natural Crochet Lace, 1/4'' Natural Crochet Lace; Scrapbook Adhesives by 3L™ 3D Foam Squares; Recollections Pearls; Hot Glue

Sunday, March 3, 2013

JustRite Papercraft March Release Day 1 - Winged Vintages Labels Two & Three

Hello blogging friends!  Today starts the kick off for the March New Releases from JustRite Papercraft.  March 3-7 the JustRite Papercraft Designers will be sharing artwork creating using all of the New Releases.


Here is the first new release CR-04465 Winged Vintage Labels Two & Three from JustRite Papercraft.  This stamp set three frames, two large and two small butterflies, sentiments and tiny little words and can be used for many different occasions.  This stamp set is also compatible with  JustRite Papercraft Custom Dies JB-03990 Vintage Labels TwoJB-03995 Vintage Labels Three and  Spellbinders Creative Arts™  LF-006 Wonderful Wings die templates.


Here is the card that I made using the new CR-04465 Winged Vintage Labels Two & Three stamp set and JB-03990 Vintage Labels TwoJB-03995 Vintage Labels Three and LF-006 Wonderful Wings die templates.  For the base of the card I used Simply Smooth White cardstock and then layered it with Prima Firefly 6 x 6 Paper Stack paper.  


To create the framed die cuts and sentiment I used Simply Smooth White cardstock, Teal ZealParis Dusk and Grape Jelly Memento inks and the die templates listed above.


To create the butterfly I used Simply Smooth White cardstock and then added Teal ZealParis DuskLuLu LavenderGrape Jelly Memento inks to the paper and then die cut the shape using LF-006 Wonderful Wings die template.  I die cut two butterflies, layered them together and added bling for the body and Diamond Stickles around the outer edges of the wings.


I stamped some of the tiny words along the bottom of the card creating a little border.


Before I assembled the card I stamped some of the tiny butterflies, added some bling to the center of each and some Diamond Stickles.  I also added a pretty bow using Textured Two-Tone Pink Ribbon from Really Reasonable Ribbon.  To finish off the card I added a little more bling and a handmade stickpin.

Please visit each of the JustRite Papercraft Designers in the link list below to see what they have created to share wit you.  I also want to say a warm Welcome to JustRite Papercraft newest Design Team Member Margie Higuchi!!  Please be sure to leave her some love on her blog!  


Thank you so much for stopping by today!  I hope you have a wonderful and creative day!

Hugs & Smiles,
Heidi


Supplies
Stamps:  JustRite Papercraft CR-04465 Winged Vintage Labels Two & Three
Paper:  DiscountCardstock.com Simply Smooth White; Prima Firefly 6 x 6 Paper Stack
Ink:  Imagine Crafts/Tsukineko Memento Teal Zeal, Paris Dusk, LuLu Lavender, Grape Jelly
Dies:  JustRite Papercraft Custom Dies JB-03990 Vintage Labels Two, JB-03995 Vintage Labels Three; Spellbinders Creative Arts™ Grand Calibur® Machine, LF-006 Wonderful Wings
Accessories:  Really Reasonable Ribbon Textured Two-Tone Pink Ribbon; Ranger Diamond Stickles; Scrapbook Adhesives by 3L™ 3D Foam Squares; Recollections Bling; Handmade Stickpins

Thursday, February 28, 2013

New Oceans - 3D M-Bossabilites Folder-Inks-Glitter & Glue Tutorial

Hello blogging friends!  Today, I have a tutorial to share with you using some of my favorite products--Scrap Happy Sheer GlueImagine Crafts/Tsukineko inks and  3D M-Bossabilities.  


Here is the card that I designed using the new E3D-001 Shell Beauty 3D M-Bossabilities folder from Spellbinders Creative Arts™.  The background has several layers of inks, gesso, glue and glitter and I am so happy with how it turned out.


I started out by added a few different colors of ink directly on to the folder using Inkblushers applicators.  I used Versa Magic Aloe VeraTurquoise GemWheat and Sahara Sand inks to cover the entire folder.


Next I used the Grand Calibur® Machine and a piece of Simply Smooth Ivory with the inked up folder to emboss the image.  Once I removed the paper from the folder I added a little more ink to highlight some of the embossed areas.  


Then to soften the colors and add another element of texture I dry brushed gesso over the entire piece.


Once the gesso was dry (it only takes a couple of minutes to dry) then I used a makeup sponge to lightly apply Scrap Happy Sheer Glue from The Rubber Cafe around the outer edges and worked my way in towards the center but I didn't cover the entire piece.


Next comes the fun part!  One of the things I love about the Scrap Happy Sheer Glue is that even once the glue is dry it still remains tacky and it works perfectly for a light application of glitter.  Before I added the glitter I sprinkled some Stampendous Gilded Mica Fragments and then I added the You're So Fine Glitter Diamond Clear Cool Highlights.  The You're So Fine Glitter is an ultra light glitter and it is very easy to work with--just rub it in with your fingers--easy peasy!  Look at all the glittery goodness!


Once I had the background done then I started to assemble the card.  I used Frosted Teal and Kraft paper from DiscountCardstock.comS6-001 5 x 7 Matting Basics A and S6-002 
5 x 7 Matting Basics B die templates from Spellbinders.  I used  F-648 New Oceans stamp from The Rubber Cafe for the sentiment and I fussy cut it in to blocks, inked the edges with Memento Rich Cocoa and then I added 3D Foam Squares for a little dimension.  


Towards the bottom I added 1.5 Champagne Netting from Really Reasonable Ribbon and then I filled MB2-001 Circles One-Bronze (Bezel) with some Scrap Happy Sheer Glue, shells, You're So Fine Glitter Diamond Clear Cool Highlights and  Pearl Jellie Dots.  I tied True Hemp 4mm Hemp Twisted Rope on to the ends of the bezel, tied the ends and glued the rope in place.


I had a lot of creative fun making this card and I hope you enjoy the tutorial!

Thanks so much for stopping by today!

Hugs & Smiles,
Heidi

Supplies
Stamps:  The Rubber Cafe F-648 New Oceans
Paper:  DiscountCardstock.com Simply Smooth Ivory, Kraft, Frosted Teal
Ink:  Imagine Crafts/Tsukineko Versa Magic Aloe Vera, Turquoise Gem, Wheat, Sahara Sand, Memento Rich Cocoa, Inkblushers
Dies:  Spellbinders Creative Arts™ Grand Calibur® Machine, S6-001 5 x 7 Matting Basics A, S6-002 
5 x 7 Matting Basics B, E3D-001 Shell Beauty 3D M-Bossabilities, MB2-001 Circles One-Bronze (Bezel)
Accessories:  The Rubber Cafe Scrap Happy Sheer Glue, You're So Fine Glitter Diamond Clear Cool Highlights, Pearl Jellie Dots, Stick "EM" Up Tool, Stampendous Gilded Mica Fragments; Really Reasonable Ribbon 1.5 Champagne Netting, True Hemp 4mm Hemp Twisted Rope; Scrapbook Adhesives by 3L™ 3D Foam Squares; White Acrylic Gesso, Sponge Brush, Makeup Sponge

LinkWithin

Related Posts Plugin for WordPress, Blogger...