Showing posts with label Heartfelt Creations. Show all posts

Sunday, October 21, 2012

A Little bit of This & That.

Hello blogging friends!  For today's blog post I have a little bit of this and that to share with you.  I have some beautiful artwork to share with you--but it's not mine.  I have some artwork from my aunt Gail to share with you!  Gail doesn't have a blog and she doesn't do FB either so I am very excited to be able to share some of her work with all of you.  


Here is a little wedding ensemble that Gail made.  I think this is so Gorgeous!!  The sweet little set includes the amazing little high heeled and pearl embellished shoes, the gift box and enclosure card.


Here is a close up of the shoes so you can see all of the details.


The little shoes and card fit just perfectly in the gift box.


Look at this beautiful little sun bonnet!  I tell ya, Gail is just amazing!!  She stopped by one day to show me a little prototype of this bonnet and it wasn't long when she stopped back to show me what she had whipped up.  I LOVE these flowers!!  And look at the gorgeous, deep and crisp embossing detail!!  She used a plastic doily and the Grand Calibur to achieve the embossing.  
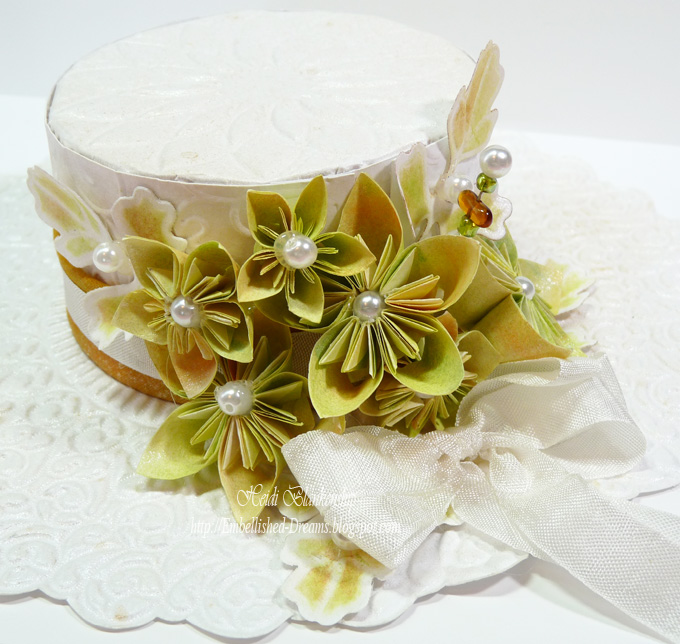

Here is a close up of the beautiful flowers.  Love the pearl centers and the pretty stickpin!


Gail also misted the entire bonnet with pearl glimmer mist.  It was so pretty and shimmery!


Ok, now I have a couple of things to share.  ;-) 


I am happy to share that I had a card published in the October 2012 issue of Crafts 'N Thing.  
Spread Your Wings page 36


I also have a card that was published in the November 2012 issue of CardMaker.
Give Thanks page 38

I have one last thing to share with you today.  About a month ago Gail and I went to a couple of garage sales and let me tell you we totally scored at one of the sales!!


Look at all of this gorgeous lace!!!  Some of it was newer but most of it was vintage lace and trims.  We bought it ALL and then we came back here to my place and split it up.  This picture is my half!!  We were both so excited--just like two little girls in a candy shop!!  LOL!!

Well, I guess that's it for today.  I am so happy to be able to share some of Gail's artwork here on my blog and I hope you enjoy seeing it.  Thanks so much for stopping by today!!

Hugs & Smiles,
Heidi

Monday, October 11, 2010

Creating Memories In Time Blog Hop Winner (Huge Bag of Prima Flowers), Photos from the Memory Expo & Photos from this weekend

Good morning!! I hope you had a wonderful weekend. I have several things to share with you today--the CMIT Blog Hop Winner, Photos from the Memory Expo and a few photos from this weekend.

First I want to Congratulate the WINNER for the CMIT Blog Hop!!

Pam and Presley said...AWESOME! I absolutely LOVE this card, the colors the black vine going all around the card and the beautiful vintage Halloween scene.
Thank you so much for sharing
Pam
pamandrandy@gmail.com
October 8, 2010 5:49 PM

Pam and Presley said...I also wanted to thank CMIT and all your designers for a great blog shop I had a lot of fun and thank you for a chance to win an AWESOME prize of the gorgeous
flowers I am a flower NUT!!!
Thank you
Pam
pamandpresley
October 8, 2010 5:54 PM

This was also posted on the CMIT Blog and we want to thank everyone who participated!! Also as a reminder ATC Tuesday will begin on October 12th so come take a look at the CMIT blog to see what the design team creates, play along to win a prize. Thanks!!

Next, I want to share some pictures with you from the Midland Care Memory Expo. The Expo was held in Topeka, Kansas Oct 1-2. One of the best things about the Memory Expo was getting to see my dear sweet friend Karen Taylor! We talk almost everyday but it has been almost 2 years since we have seen each other! It was so wonderful to spend the weekend with her!! Karen & I had asked if we could share a room together and we had these fun gift bags from Jennifer Friedley filled with all kinds of goodies waiting for us! This shot is from the Memory Expo VIP reception on Friday evening. Amazing and Very Talented Industry Personalities from left to right: Brooke Smith, Associate Editor of CardMaker magazine, Heidi Blankenship (me) crafter/teacher, Nikki Sivils owner of Nikki Sivils Scrapbooker papers, Kristi Van Doren crafter/teacher, Trudy Sjolander crafter/teacher, Karen Taylor crafter/teacher, and last but not least, Tanya Fox, Editor of CardMaker Magazine. Here is a photo with Tanya Fox. We have seen each other several times at the CHA shows but have never really had a chance to just sit down and visit and we were able to do that. What a wonderfully sweet lady!! Here's a couple of pictures from one of the classes I taught. The Memory Expo was such a wonderful experience and I met soooo many talented ladies!!

Are you still hanging in here with me? LOL! I know lots of info for one post! I wanted to share a lot of this with you last week but things just kept coming up and life happens. :)

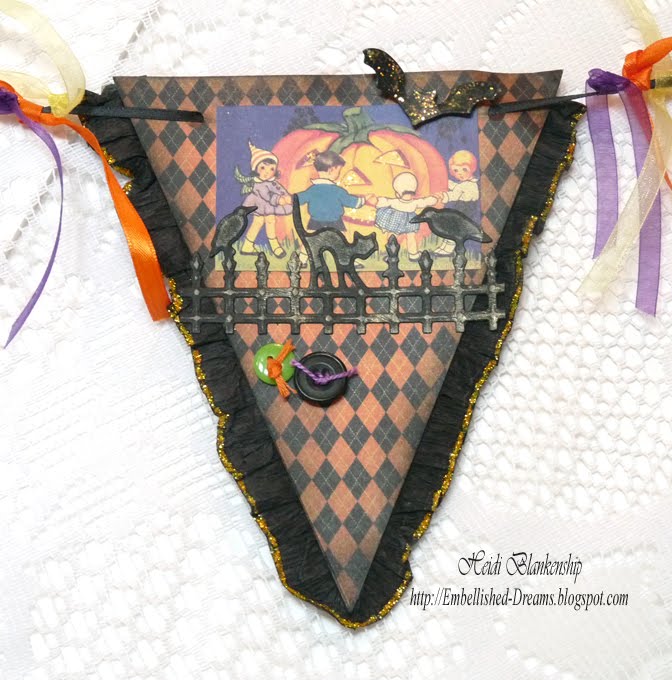
I also wanted to share with you the projects from one of my classes. We created a Vintage Halloween "Boo" Banner and 2 quick Halloween Card.Here is some close up pictures of the cards and each piece from the banner.Supplies
Paper: My Mind's Eye Blackbird Argyle; The Paper Company Black, White, Orange, Yellow, Purple, Green
Ink: Tsukineko Memento Tuxedo Black Ink
Dies: Spellbinders™ Grand Calibur™, S4-126 Classic Squares die #3, S4-301 Labels Sixteen die #3, S4-280 Halloween Fence Scene and Shapes, S4-282 Witches' Brew, S4-277 Nested Bats
Accessories: Crafty Secrets Halloween Greetings Creative Scraps; SCRAPBOOK ADHESIVES By3LCrafty Power Tape, 3D Foam Squares; Joann's Buttons, Ribbon, Thread; Ranger Lime, Orange Peel Stickles; Black Crepe Paper

I have to say a HUGE "Thank You" to several companies that helped sponsor and donate products for the classes and make-n-takes: Spellbinders™, JustRite Stampers, Crafty Secrets, My Mind's Eye, SCRAPBOOK ADHESIVES By 3L™, Heartfelt Creations and Elizabeth Crafts Designs.

Ok, just one more things---LOL! I took a few pictures of my oldest son this weekend for his senior pictures until we can decided for sure on which photographer we are going with.I have to tell you earlier this summer we were driving out in the country and I thought it would be really cool to have some pictures of my son with his drum set outside and I had to laugh when one day he said--hey mom do you think it would be possible to take some pictures with my drum set outside? I think that would be so cool!! He LOVES this one! *wink*Yes, those are real Texas Longhorns in the background! It was interesting working around them--LOL!Ok, taking this one kind of freaked me out!---LOL!
OMGosh I think this is the longest blog post ever--LOL!!! I just had a lot to share and thanks for letting share it with you!! Thanks so much for stopping by today and I guess I better get busy and create something! I hope you have a Wonderful Day!!

Hugs & Smiles,
Heidi

Wednesday, July 14, 2010

Heartfelt Creations - Daisy Patch Collection Release #3

Good morning! Are you ready for another NEW Release from Heartfelt Creations? Today is the day for Daisy Patch Collection Release #3!! So many fun and beautiful new designs!! Here is the card I created for the New Release. I used the Large Elegant Word Background, Daisy Patch Flowers, Simple Filler Stems, Daisy Patch Swirls and Perfect Petals DieCuts. These are all New Releases. I also have a step-by-step tutorial to share with you on how I created the card.Have you ever thought about using the back of your unmounted stamp to create a background? This is what I used to create an aged background for the stamp. First I covered the entire backside with Antique Linen ink and then I edged it with Vintage Photo ink.I lightly misted over the ink with Pearl Glimmer Mist and then I turned it over using it just like a regular stamp. Here's the result. It looks like an aged background and you can't see it from the photo but it has a nice soft all over pearl glimmer to it.I inked up the Large Elegant Word Background with Vintage Photo ink and then misted it in a few places with the Pearl Glimmer Mist. Next I stamped the Daisy Patch Flowers and Simple Filler Stems and heat embossed with gold embossing powder.I did all of the same steps as mentioned above and embossed a second flower.Next I painted the images with Twinkling H2O's. These are the colors I used, Playful Peony, Terracotta Rose, Lemongrass and Green Tea.I painted the second flower with the same two pink tones and then I cut out the image, curled the petals and layered them. I offset the top flower to make the image appear larger. Then I added Peeled Pain Distress Stickles to the center of the flower. After the stickles was dry I added some green rhinestones from My Mind's Eye to the center. To create this beautiful corner diecut I used the Perfect Petals DieCuts Corner Flourish. I used white cardstock and then I inked the edges of the diecut with Vintage Photo ink and added glitter for a little sparkle.For the sentiment I used a stamp from the Daisy Patch Swirls stamp set and then I used the Fancy Tags die template from Spellbinders™ to create the tag. I used Rich Cocoa ink for the sentiment and Vintage Photo to ink the edges and then I used 3D Foam Squares from SCRAPBOOK ADHESIVES By 3L to add a little dimension to the tag.Here is another close-up of the flower image.Supplies~
Stamps~Heartfelt Creations-HCPC 3323 Large Elegant Word Background, HCPC 3318 Daisy Patch Flowers, HCPC 3319 Simple Filler Stems, HCPC 3324 Daisy Patch Swirls, HCD 704 Perfect Petals DieCuts
Paper~DCWV-The Rustic Stack; Georgia Pacific-White Cardstock
Ink~Ranger-Distress Ink Antique Linen, Vintage Photo; Tsukineko-Memento Rich Cocoa
Accessories~Spellbinders-Wizard™, S4-235 Fancy Tags; SCRAPBOOK ADHESIVES By 3L-E-Z Runner® (33'), 3D Foam Squares; Ranger-Gold Embossing Powder, Distress Stickles Peeled Paint; My Mind's Eye-Pink & Green Lush Rhinestones; Tattered Angels-Pearl Glimmer Mist; Twinkling H2O's-Playful Peony, Terracotta Rose, Lemongrass, Green Tea; Sparkle-N-Sprinkle-Crystal Ice Glitter; Paint Brush; Cotton Balls for inking; 2way Glue Pen; Heating Tool

Thank you so much for stopping by today. I hope you enjoyed the tutorial and I would love to hear what you think about the new releases. Don't forget to hop on over to the Heartfelt Creations Blog to see more beautiful samples! Hope you have a Wonderful Day!!

Hugs & Smiles,
Heidi
Wednesday, June 30, 2010

Heartfelt Creations - Perfect Petal Collection - Release #2

Hello! I am very excited to share today's card with you!! Today is the "Perfect Petal Collection" and Release #2 from Heartfelt Creations. This release features 7 new precut stamp sets, and one exclusive Heartfelt Creations Diecut manufactured by Spellbinders™. CLICK HERE to see all the New Products from Heartfelt Creations.Here is the card I created using HCPC 3315 Lily Petals PreCut Set, HCPC 3314 Elegant Single Leaves PreCut Set, HCPC 3312 Uplifting Scriptures PreCut Set, and HCD 704 Perfect Petals Diecuts from Heartfelt Creations. To start I stamped a total of six petals from the HCPC 3315 Lily Petals PreCut Set onto white cardstock using Rose Bud ink. Next I misted the paper with two colors of Glimmer Mist--Tattered Rose and Pashmina and heat set to dry. Then cut the petals using the die templates from the HCD 704 Perfect Petals Diecuts.Then I made a score line down the center of each petal.Next I worked on shaping the petals. I folded them on the score line and then I curled the tips and shaped them using the scoring tool.For the leaves I started with a white piece of cardstock and added Peeled Paint ink and then Sage and Honey Dew Mist Glimmer Mist and heat set to dry.Then I stamped several of the leaf image from HCPC 3314 Elegant Single Leaves PreCut Set using Peeled Paint ink. Then cut the leaves using the die templates from the HCD 704 Perfect Petals Diecuts. I also shaped the leaves just like I shaped the petals as shown in the photos above. To create the stamens for the lily I used Autumn Flower Soft. Just dab a little glue on the wire and then pick up a little of the Flower Soft on the glue. Once the wire is covered then I gently roll it in my fingers to shape it and set aside until dry--just a couple of minutes. Next I assembled the flower. You can use your favorite glue or adhesive to assemble the lily. Click HERE to see a fantastic video tutorial by Emma Lou from Heartfelt Creations on how she assembles her flowers. Once I had my flower assembled I used a paper piercer to poke a hole in the center of the flower and then I added the stamen.Here is a close-up of the finished lily with the leaves.
I made a square diecut using Classic Squares Small S4-128 die # 7 die template and then airbrushed with a Copic marker. I used the square as a mat for the lily. Next I made two large corner flourish diecuts with white cardstock and using the HCD 704 Perfect Petals Diecuts. Then I hooked the end loops together. I added this piece to the top of the square diecut. Here is a close-up to see more details. Here is another close-up at a different angle.On the bottom part of the card I added a sentiment from the HCPC 3312 Uplifting Scriptures PreCut Set. I stamped the sentiment and then lined up the Fancy Tags S4-235 die template to make the diecut. Before removing the paper I airbrushed with a Copic marker. To make the tag fit and give it a different look I cut off the one end and rounded the corners. The pretty blue designer paper is from the Be Mine Stack from DCWV and I also added pink rhinestones from My Mind's Eye.

Supplies~
Stamps~Heartfelt Creations-HCPC 3315 Lily Petals PreCut Set, HCPC 3314 Elegant Single Leaves PreCut Set, HCPC 3312 Uplifting Scriptures PreCut Set, HCD 704 Perfect Petals Diecuts
Paper~DCWV-Be Mine Stack; The Paper Company-White Cardstock
Ink~Tsukineko-Memento Rose Bud, Rich Cocoa; Ranger-Distress Ink Peeled Paint
Accessories~Spellbinders™-Wizard™, Classic Squares Small S4-128 die #7, Fancy Tags S4-235 die templates; Flower Soft-Glue, Wires, Autumn; My Mind's Eye-Pink Lush Rhinestones; Copic-B02 Robin's Egg Blue, Airbrush System; Tattered Angels-Glimmer Mist Tattered Rose, Pashmina, Sage, Honey Dew Mist; SCRAPBOOK ADHESIVES By 3L™-3D Foam Squares, E-Z Runner® (33')

I hope you enjoyed my card from the New Release and be sure to check out the Heartfelt Creations Blog to see more beautiful samples. Thanks for stopping by today and I hope you have a Wonderful Day!!

Hugs & Smiles,
Heidi

LinkWithin

Related Posts Plugin for WordPress, Blogger...