Showing posts with label Ken Oliver Crafts. Show all posts

Saturday, March 26, 2016

Pretty In Pink Sparkling Kensington Hand Bad with Tutorial - Tonic Studios

Hello everyone!  Today, I have a sparkling and pretty Kensington Hand Bag  from Tonic Studios to share with you.  These little hand bags are so fun to make and with all the different dies that come in the set you will have a variety of styles you can create.  The hand bags are a perfect size to add a gift card, jewelry or some sweet treats.


Here is a look at the hand bag I designed.  Now I have to tell you I am a total girly girl and I love all the glitz and sparkle with the glitter and pearls being added to the hand bag.  I have a tutorial to share with you how I added all of the glitter to the decorative front panels of the hand bag.  If you would like to see a video on how to assemble the hand bag you can click HERE for a link.  Jodie Johnson, from the UK Tonic Studios has a fantastic video showing how to assemble the hand bag.


The great thing about the Kensington Hand Bag is that you can really create it to your own liking and style.  To start I die cut the base of the hang bag with Recollections - Spring Decorate It paper.  You will need to cut two (2) of each piece base piece and if you are wanting your handbag to look the same on both sides with will need to cut two (2) of each piece.  To create the front panels I covered a sheet of pink carsdstock with Stick It! adhesives sheets and then I die cut two (2) of each of the front panels--both the large and small.
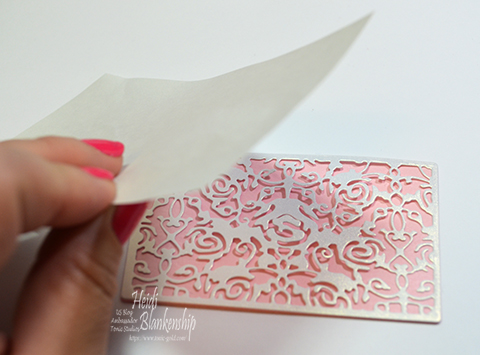

Peel away the release paper from the adhesive sheet but save at least one of the pieces of release paper.  For the lacy decorative panel I used a white pearl paper.  Line up both of the die cuts and then use the piece of release paper to press the two papers together.  Doing this allows you to adhere both pieces without having the touch the sticky adhesive.


With your fingers rub over top of the release paper to adhere the two panels together.


Next pour some of the 705 US Pure Sheen Glitter Diamond on top of the panel.


Using your fingers rub or burnish the glitter over the areas with adhesive.  Then tap off the excess glitter.


Die cut three (3) of each size of the flowers from the 757E Entwining Trellis - Bellus Buttercup Die Set from the white pearl paper.  Lightly mist the paper with water and use the styluses from the 380 - 266E Floral Crafters Tool Set to shape each flower and set aside to dry.


Once the flower is assembled I used an old makeup brush to apply the ink to the tips of the flower.  Then I added pearl stamens to the center and edged the flower with 758N Glitter Drops - White Blizzard.


Here is a close up of the flower and you can see all of the sparkle from the glitter.  I also added mini pearls hearts to the top of the hand band and for the handles I added Melissa Frances White Pearls.


Thank you so much for stopping by the blog today!  I hope you enjoyed the project and tutorial.   
All supplies will be listed below.  :)

Happy crafting!


Tonic Studios Supplies
Dies:  763E Kensington Hand Bag Gift Box Die Set, 757E Entwining Trellis - Bellus Buttercup Die Set
NUVO:  705 US Pure Sheen Glitter Diamond, 758N Glitter Drops - White Blizzard, 669N Crystal Drops Gloss - Apple Green
Adhesive:  419E Crafty Tacky Glue 120ml
Tools:  Tangerine Die Cutting Machine, 550E US Decoupage Scissors, 160E US Tim Holtz Trimmer, 380 - 266E Floral Crafters Tool Set

Other Supplies Used
Paper:  Cardstock - White Pearl, Pink; Recollections - Spring Decorate It
Ink:  Distress Ink Picked Raspberry
Accessories:  Ken Oliver - Stick It! Adhesive Sheets, Melissa Frances White Pearls, Mini Pearl Hearts, Wild Orchid Craft -White Leaves, Pearl Stamens, Foam Squares, Scor-Tape, Fine Mist Spray Bottle w/ Water, Makeup Brush, Hot Glue

Saturday, June 6, 2015

The Stamp Simply Ribbon Store - Thinking of You Watercolor Rose

Hello everyone! Today, is my day to post for The Stamp Simply Ribbon Store and I have another CAS card to share with you using some of the Ken Oliver Crafts Watercolor Memories 6 x 6 Paper.  I love all of the papers from the Ken Oliver Collections but I think the Watercolor Memories is my favorite.  Letting the paper do almost all the work for you, you can create beautiful cards in minutes.


I love the soft light colors of the rose image.  Another great thing about the papers from this collection is that one side has soft and muted colors and the other side is bright and bold colors.


I cut the rose image down in size just a bit and then layered with pink cardstock and a ivory card base to create a 5.5 x 5.5 card.  The sentiment is from CR-02152 Best Wishes Clear Stamps from  JustRite Papercraft.  I used Versa Mark Ink and heat set with Ranger Super Fine Gold Embossing Powder.  Then I added a few Melissa Frances Cream Pearls to the corner.


Along the bottom portion of the card I added some Baby Pink Seam Binding and Venise Lace 1.75" - Gabriella Ivory.  Then I finished off the card with a rose from the Prima Butterfly Collection.


I have to say I love how this card turned out!  I think its one of my favorite CAS cards.  :)

Thank you so much for stopping by!

Please be sure to check out The Stamp Simply Ribbon Store for all of the fantastic paper crafting products and the Blog for inspiration from the Design Team.

I hope you have a wonderful weekend!

Hugs & Smiles,
Heidi


Supplies
Stamps:  JustRite Papercraft CR-02152 Best Wishes Clear Stamps
Paper:  Ken Oliver Crafts Watercolor Memories 6 x 6 Paper, Cardstock-Ivory, Pink
Ink:  Versa Mark Ink
Ribbon:  Baby Pink Seam BindingVenise Lace 1.75" - Gabriella Ivory
Accessories:  Melissa Frances Cream Pearls, Ranger Super Fine Gold Embossing Powder, Prima Butterfly Collection, Scrapbook Adhesives by 3L 3D Foam Stickers, E-Z Runner Permanent Strips-Refillable Dispenser 49'

Friday, May 29, 2015

The Stamp Simply Ribbon Store - Happy Dad's Day Card

Hello everyone! Today, is my day to post for The Stamp Simply Ribbon Store and I have a Father's Day card to share with you.  I think this is one of the quickest cards I have ever made but the paper is so easy to work with and cards come together so quickly.


Here is the card that I designed using the Ken Oliver Crafts 6 x 6 The Studio pattern papers.  I love this collection--fantastic images and colors!  I used kraft cardstock for the card base and as a mat and I inked both pieces on the outside edges with Memento Espresso Truffle ink.  My card is 5.5 x 5.5 so I trimmed down the background paper to fit.  Then I took a smaller image and stamped a sentiment from  JustRite Papercraft CR-02166 Stacking Sentiments Clear Stamps.


Here you can see a close up of the sentiment.  I added 3D Foam Squares for a little dimension.  Then to finish the card off I added May Arts 1.25" Woven Stripes Ivory/Olive Green ribbon.  I frayed the edges of the ribbon just a bit to give it a distressed look.


Father's day is just around the corner so if you need to make some cards I hope you will check out the Ken Oliver Crafts 6 x 6 The Studio papers.

Thank you so much for stopping by!

Please be sure to check out The Stamp Simply Ribbon Store for all of the fantastic paper crafting products and the Blog for inspiration from the Design Team.

Happy Friday and I hope you have a wonderful weekend!

Hugs & Smiles,
Heidi


Supplies
Stamps:  JustRite Papercraft CR-02166 Stacking Sentiments Clear Stamps
Paper:  Ken Oliver Crafts 6 x 6 The Studio, Cardstock Kraft
Ink:  StazOn Jet Black, Memento Espresso Truffle
Ribbon:  May Arts 1.25" Woven Stripes Ivory/Olive Green
Accessories:  Scrapbook Adhesives by 3L 3D Foam Squares, E-Z Runner Permanent Strips-Refillable Dispenser 49'

Thursday, May 7, 2015

Mixed Media Sing Out Loud Canvas - JustRite Papercraft May Release Day Three

Hello everyone!  Today, is the third and finally day of the JustRite Papercraft May New Release and I have a fun mixed media canvas to share with you.


How fun is this bright, bold and playful canvas?  Now I will admit using the bright and bold colors for me is a little out of my comfort zone but what the heck--I just had fun with it.  Check out the cute little birdie--love it!!  I used the CL-02157 Script Background Cling Stamp kind of randomly in the background and for the main focal point I used the New CR-02183 Sing Out Loud Clear Stamps.  Lots of fun layers with Ken Oliver Crafts-Color Burst , Stamping, Gesso, and paper piecing.


I don't have a full tutorial for the canvas but I did snap a couple of pictures of the background from when I started working on it.  I actually used a piece of Strathmore Mixed Media paper and then the finished piece was adhered to a hard canvas board.  I misted the paper with water and then I sprinkled on some of the Pthalo Green and Ultramarine Blue Ken Oliver Crafts-Color Burst .  I let the colors and the water kind of do their magic on their own.  I misted a little more water and then just moved the paper around a little.  Then I used a heat tool to dry the paper and set the colors.  Next I misted more water on to the craft mat where there was still color burst and then I gently tapped the paper into the mix picking up more color.  I did this a few times until I was happy with the look and then I heat set and dried the paper again.  Doing this will add layers and depth to your paper.


Next I did a combination of lightly misting the paper and also spraying some water in to my hands and letting it drop on the paper.  I let the water sit on the paper for a minute or so and then I put a paper towel on top of the paper and blotted to remove the water.  Doing this also removes some of the watercolor wherever the water was.  It creates a fun textured look.


Once I had all of the color added to the background then I sprayed a couple layers of Krylon Clear Satin Sealer on to the paper.  Doing this will seal the colors so you can add layers of other paints, mediums or whatever you would like on top of the background without messing up the background.  Next I used Stazon Jet Black ink and randomly stamped the CL-02157 Script Background Cling Stamp.  When the ink was dry I dry brushed over most of the paper with white gesso.  The gesso does help to tone the colors down just a bit and it covers up some of the script stamping in the background.  Once the gesso was dry then I applied some Golden Glass Bead Gel.  I mixed some of the Ultramarine Blue Color Burst in with the gel.  You can see the beaded gel at the top of this picture (you can click to enlarge the picture for more detail).


The gel does take a little time to dry so while I was waiting on that I stamped and fussy cut the little bird, wing, and flowers,  For the banner I used a EK Success punch.  Once the gel was dry then I started stamping on to the paper.  I stamped all of the images using StazOn Jet Black ink.  Then I wanted to add some shading so I went over the bird and flowers with a Spectrum Aqua Marker Black working in just small areas and then I rubbed and blended out the color with my finger.  Once the shading was done then I added all of the paper piecing.


All of the pattern paper is from the Simple Stories I AM 6 x 6 Paper Pad Collection.  I added 3D Foam Squares to all of the pattern paper pieces except for the body of the bird.


To finish off the piece I added a few pearls.


The Sing Out Loud Clear Stamps is perfect for mixed media, art journaling and card making.  I had a lot of fun playing with the new set and creating the canvas.

Please be sure to visit all of the Design Team Members in the link list below to see all of the fun projects they have created to share with you.


Thanks so much for stopping by today!

Hugs & Smiles,
Heidi

Supplies
Stamps:  JustRite Papercraft CR-02183 Sing Out Loud Clear Stamps, CL-02157 Script Background Cling Stamp
Paper:  Strathmore Mixed Media Paper, Simple Stories I AM 6 x 6 Paper Pad
Ink/Paint:  StazOn Jet Black Ink, Spectrum Aqua Marker Black, Ken Oliver Crafts-Color Burst Pthalo Green, Ultramarine Blue
Punch:  EK Success Banner Punch
Accessories:  Gesso, Krylon Clear Satin Sealer, Golden Glass Bead Gel, Ranger Multi Medium Matte, White Pearls, Gray Twine, Scrapbook Adhesives by 3L 3D Foam Squares, Mini Canvas Board

Tuesday, April 14, 2015

JustRite Papercraft - Tutorial Tuesday - Color Burst Tutorial Series 1

Hello everyone!  This is my week to post for  JustRite Papercraft  with a new Tutorial Tuesday.  For this week's tutorial I will be sharing with you the fun new Color Burst by Ken Oliver Crafts.  


You will be happy to hear that  JustRite Papercraft is now carrying Color Burst and Stick It Adhesive Sheets by  Ken Oliver Crafts!  I know so many people who are excited to try the new products!


I have both a video tutorial and a tutorial with step out pictures and instructions on the JustRite Inspiration Blog.  Over the next few weeks I will be doing a tutorial series using Color Burst and sharing with you all kinds of fun techniques, tricks and tips to create some beautiful projects.  In the first tutorial I will be sharing how to hand dye seam binding, create color mist spray, and quick and easy watercolor backgrounds.  You can click HERE to see the video and you can click HERE to check out the blog post.  There is also a Giveaway for a $20.00 Gift Certificate to the JustRite Papercraft Store--so be sure to check it out!

I hope you enjoy the tutorial with Color Burst!
Thanks so much for stopping by today!

Hugs & Smiles,
Heidi


Supplies
Stamps:  JustRite Papercraft CR-02172 Grand Handwritten Sentiments Clear StampsCR-02166 Stacking Sentiments Clear Stamps
Paper:  Strathmore Watercolor Paper, White Cardstock
Inks/Paints:  Ken Oliver Crafts Color Burst-Ultramarine Blue, Alizarin Crimson, Lemon Yellow, Orange, Pthalo Green; Memento Tuxedo Black, VersaMark, Ranger Distress Ink-Mowed Lawn
Dies:  Spellbinders S2-139 Sentiments 3SCD-012 Pierced Rectangles Dies
Ribbon:  Hug Snug Seam Binding Winter White (Hand Dyed)
Accessories:  ButterBeeScraps-Butterfly Filigree 769-B, Gold Rub-N-Buff, Ranger Gold Embossing Powder, Cartwright's Sequins-Saffron 5, 8, 10mm, Pink Potion 8mm, Tea Rose 5mm, Mermaid Green 5, 8, 10mm, Mixed Colors Iris 5, 6mm, Acrylic Flower, Acrylic Leaf, Stick It Adhesive Sheets, Water Bottle, Mini Mister

Monday, March 30, 2015

Ken Oliver Crafts & Stencil Girl Blog Hop Winners!

Hello everyone!  Thank you all so much for the wonderful comments about my mixed media canvas from the Ken Oliver Crafts and Stencil Girl Blog Hop that was last week!  What a fabulous blog hop filled with so much creative inspiration!


Today, I get to announce the Winners from my blog.  Each person will receive 1 Pack Ken Oliver Crafts 6x6 Papers(24 pieces).  There will also be grand prizes announced on Ken Oliver's Blog and also the Stencil Girl Blog so be sure to check those out and see if you are a winner!

I used Random.org number generator to pick all of the Winners.

Winner #1
SuprFoxDesigns said...
This is such a pretty piece and thanks for the step by step- gorgeous work!
March 23, 2015 at 10:26 AM 

Winner #2
PK Sews said...
Heidi, your creation is gorgeous! I love the delicate red flowers especially. Thanks for sharing!
March 23, 2015 at 5:27 PM

Winner #3
Jean Bullock said...
this is gorgeous, Heidi. Thanks for the great tutorial. So good to know that Stick It works on canvas too. The gilding looks fab.
March 25, 2015 at 11:12 PM

Winner #4
Such a stunning work of art, Heidi! Love that crackle paste so much ;)
March 29, 2015 at 8:47 PM

Winner #5
Karen Hasheck said...
Gorgeous project- loving the colors and the stencils! Can't wait to play with your techniques!
March 23, 2015 at 12:08 PM

Winner #6
Dottie said...
What a fun product...Color Burst Inks. They look like so much fun to play with. And the stencils are really so versatile especially the Nosegay. Thanks for sharing your delightful creation.
March 25, 2015 at 5:41 AM 

A HUGE CONGRATS to all of the Winners!!
If you see your name listed here please email me at Floralfantasy@charter(dot)net so I can get your contact information and have your prize sent out.

If you missed the blog hop but would still like to check out the artwork you can click HERE to see my blog post and you can click HERE for a complete link list of all the Designers and Style Contributors who participated.

Thanks so much for stopping by today!
I hope you all have a wonderful and creative day!

Hugs & Smiles,
Heidi


Sunday, March 22, 2015

Day One Stencil Girl and Ken Oliver Crafts Blog Hop


Hello everyone!  Today, is the first day of the Stencil Girl and Ken Oliver Crafts Blog Hop.  Designers and Style Contributors from both teams have come together to create some fabulous projects using products from both companies.  We hope to inspire you!


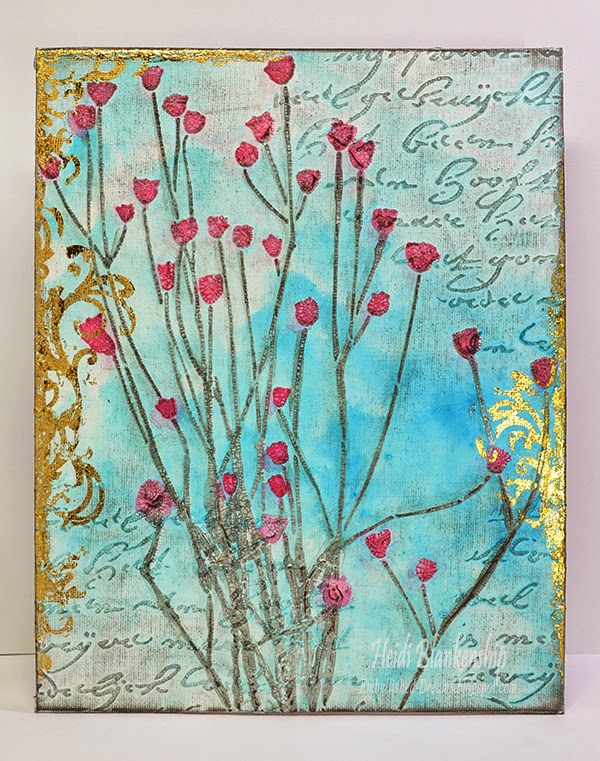
For my project I designed a 8 x 10 mixed media canvas board and I have a tutorial to share with you.


First I applied a layer of white gesso to the canvas.  Once that was dry then I used the 6 x 6 Rembrandt's Words Small Stencil and added a layer of the crackle texture paste.


Once the crackle texture paste was dry then I misted the entire canvas with water and sprinkled a little bit of the Ultramarine Blue Color Burst on to the canvas.  Here you can see the Color Burst already starting to activate with the water.


I used a large watercolor brush and kept adding more water to move the Color Burst around the canvas until I achieved a look I liked.  If you get more than you would like in one spot you can use a paper towel to lift up a little of the color.  Set this aside to dry or you can use a heat tool.


Sorry, I know it's a little hard to see exactly what I am doing in this picture from all of the texture paste lol.  Here I am using the 9 x 12 Nosegay Stencil and adding a layer of the crackle texture paste.


After the crackle texture paste was dry then I started to watercolor the flowers using Color Burst.  I used Alizarin Crimson for the flowers.  Here you can see a close up of the Color Burst as soon as I applied it to the crackle texture paste.  I love how it fills in all the little cracks and makes the flowers really pop.  I mixed a few colors of the Color Burst to create a darker green.  I used Pthalo Green, Alizarin Crimson, Ultramarine Blue, and Lemon Yellow.


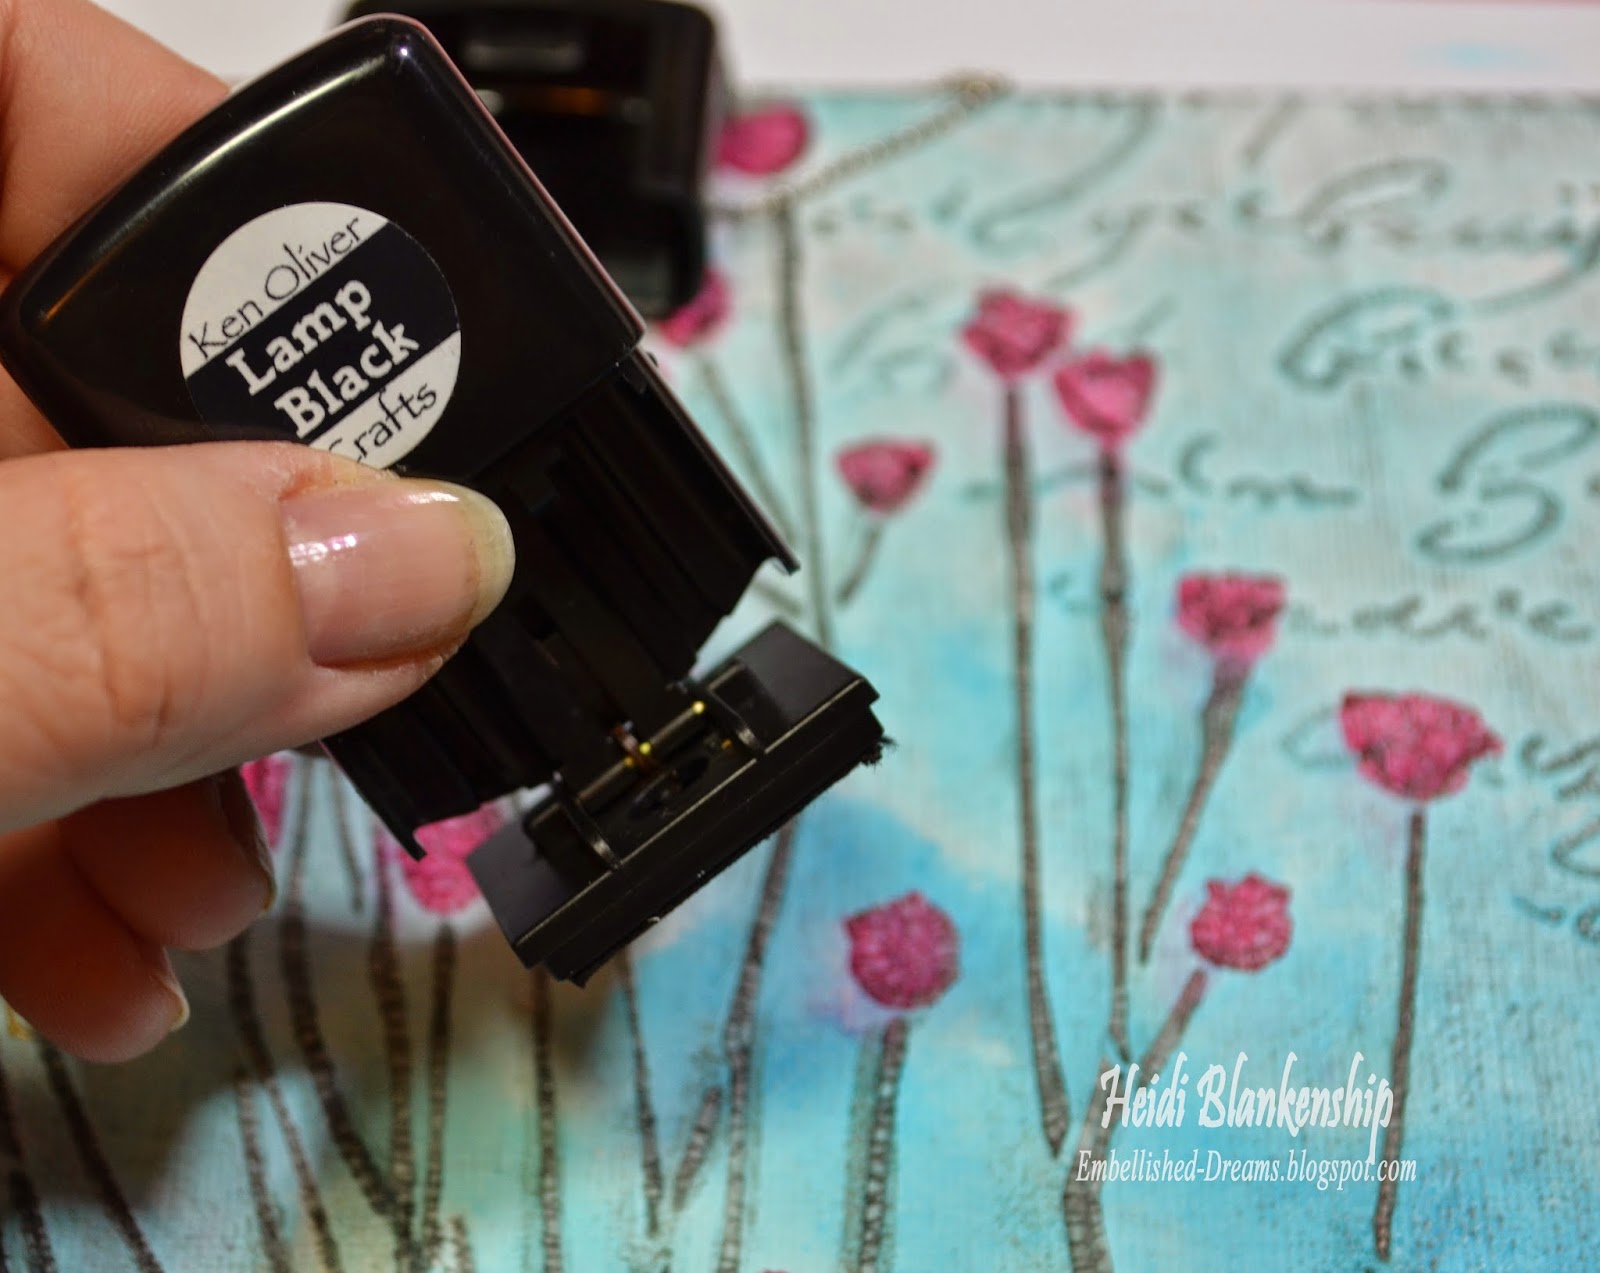
Next I used the Lamp Black Click It Ink to go over the entire canvas board.  Doing this really adds a lot of depth and dimension to the canvas and it picks up all of the little cracks in the texture paste.


To finish off the canvas I created some die cuts using Stick It and the die template from Tonic Studios.  I removed the backing on the Stick It and applied it to the canvas.  Then I added the gold foil on top of the adhesive and rubbed it to to transfer the foil.  I thought this would add a nice decorative element and gold foil it very hot right now.


Here is a close up of some of the flowers with the gold foil along the edge.


I added a few bits of the gold foil along the edges of the canvas.


I hope you enjoyed the tutorial.  Please be sure to visit the blogs listed below to see what the Designers and Style Contributors have created to share with you.

Heidi Blankenship-You are here :)

Thank you so much for visiting our blogs today and I hope that you'll be inspired to create something with Stencil Girl Products and Ken Oliver Crafts! We have a crafty haul of prizes from Ken Oliver up for grabs, just leave a comment below and you'll be eligible to win!

Winners will be randomly selected from our blogs, just leave a comment to become eligible for a prize. It's that easy!

We'll list the daily winners in the comments sections of our respective blogs so watch for the winners names.  

Here's what we're giving away!
12 Daily Prizes - 1 Pack Ken Oliver Crafts 6x6 Papers(24 pieces).
2 Grand Prizes on Friday- 1 Complete Set of Color Burst (6 Colors); 1 Complete Set of Click It Ink Pads (6 Colors); 1 Set Pegz Alphabet Stamp Set;
Leave a comment on each StencilGirl Talk post and the team members posts to be entered to win a $50 gift certificate from Stencil Girl!
Join us every day this week, you can enter every day...

Thank you again and

GOOD LUCK!  

Hugs & Smiles,
Heidi


Friday, March 13, 2015

The Stamp Simply Ribbon Store - Watercolor Memories Hello Card

Hello everyone!  Today, is my day to post for The Stamp Simply Ribbon Store and I have a quick and easy card to share with you using the new Ken Oliver Watercolor Memories 6 x 6 and Ken Oliver Watercolor Memories Ephemera Sheet


The paper from this collection is a floral watercolor print.  It is so beautiful and very easy to work with.  The Ephemera Sheet is filled with beautiful floral images as well.  With a little bit of fussy cutting and die cutting you can create cards in minutes.


Here is a close up of the calla lily image.  I used  Spellbinders S5-019 Labels Eight to make a couple of layers of die cuts.  Then I added some Blue Iris Seam Binding and 5 mm Black Sequins to embellish the card.  I used the JustRite Papercraft CL-02138 Sweet Posies Cling Stamps to stamp the hello sentiment.  I used  VersaFine Ink Pad - Onyx Black and Ranger Super Fine Embossing Powder - Clear with a heat tool to emboss the sentiment.  I also used 3D Foam Squares in between the layers of die cuts.


The background paper is from the Watercolor Memories 6 x 6 collection and even though some of it is covered it is that matching calla lily paper.

Please be sure to check out The Stamp Simply Ribbon Store for all of the fantastic paper crafting products and the Blog for inspiration from the Design Team.

Thanks so much for stopping by today!
I hope you have a great weekend!

Hugs & Smiles,
Heidi


Stamps:  JustRite Papercraft CL-02138 Sweet Posies Cling Stamps (hello sentiment)
Paper:  Ken Oliver Watercolor Memories 6 x 6, Ken Oliver Watercolor Memories Ephemera Sheet, Cardstock-Purple, Black
Ink:  VersaFine Ink Pad - Onyx Black
Dies:  Spellbinders S5-019 Labels Eight
Ribbon:  Blue Iris Seam Binding
Accessories:  Ranger Super Fine Embossing Powder - Clear, 5 mm Black Sequins, Scrapbook Adhesives by 3L 3D Foam Squares, E-Z Runner Permanent Strips-Refillable Dispenser 49', Glossy Accents

Saturday, February 21, 2015

Ken Oliver Crafts - Change the World Card with Color Burst

Hello everyone!  Today, I have a fun and colorful card to share with you.  Have you heard about the new product called Color Burst from Ken Oliver?  


Color Burst is an exciting new product!  It's a micro fine pigment powder and once you add water to it the colors really truly burst!  It is available in six beautiful and vibrant colors.  


Here is the card I designed using Alizarin Crimson and Orange Color Burst.  I used Color Burst to tint some Gel Gloss for stenciling, create a watercolor background and to hand dye some seam binding.  There are so many different applications that Color Burst can be used for.


I mixed some of the  Golden Extra Heavy Gel Gloss with the Alizarin Crimson Color Burst to create this pretty pink tint.  It only takes just a tiny little sprinkle.


Here is a close up of the pretty pink mix.  I used a piece of Ranger Watercolor Paper along with the Prima Finnabair Elementals Lace Stencil and applied the tinted Gel Gloss and then set it aside to dry.  Be sure to wash the stencil right away for easy cleaning.  


Once the gel was dry then I wet the watercolor paper and started adding the Alizarin Crimson and Orange Color Burst to create a beautiful watercolor background.  I have to say I just LOVE this color combination!  It's so pretty!!


I created a color pallet with my Color Burst.  To do this just sprinkle a little of the Color Burst and add water.  When you're done set it aside to dry (my pallet has a plastic lid) and then next time you want to use it just add some water to reactive the Color Burst.


Here is a quit tip.  If you want to have more control over the Color Burst when adding water you can use a water bottle with a dropper.  Since the Color Burst is a Micro Fine Powder even the little bit of air that comes out from a mist bottle can move the Color Burst powder and it might end up where you don't want it.  But if you use a dropper you will have a lot more control.  I picked up a couple of these bottles at Hobby Lobby and they were very inexpensive.


Here is a close up of the background piece.


Here is a close up of the sentiment.  I used the flourish and sentiment stamp from the 71 006059 Ken Oliver WATERCOLORED MEMORIES Clear Stamp Set 2.  I used Memento Inks, Angel Pink for the flourish and Tangelo for the sentiment.  Then I used Tonic Studio 175e TOPPER DIE INNER SET - THANK YOU die template to create the label shape.  I added a few  Wild Orchid Craft Flowers MKX-122 Mixed Pink/White Cosmos Daisy and for the leaves I used one of the die templates from the 657e ROYAL FERN DIE SET from Tonic Studio.  For the bow I used some hand dyed seam binding.  Can you guess how I dyed the seam binding?  Yep, that's right--Color Burst! For some sparkle I added a few sequins and then I also went over the flowers and leaf die cuts using the Zig Wink of Stella Clear Glitter Brush Pen
 **NOTE** Tonic Studio dies linked to a US site and UK site in the supply list.


Here is one more close up of the Color Burst watercolor background with the tinted gels gloss and stenciling.  


I hope you enjoyed the card and tutorial today.  I hope it inspires you to give Color Burst a try!  If you do please let me know--leave a link to your blog or gallery.  I would love to see your artwork!


Thanks so much for stopping by today!
I hope you have a wonderful and creative weekend!

Hugs & Smiles,
Heidi


Supplies
Stamps:  Ken Oliver Crafts 71 006059 Ken Oliver WATERCOLORED MEMORIES Clear Stamp Set 2
Paper:  Ranger Watercolor Paper, Cardstock-White
Ink/Paints/Paste:  Ken Oliver Crafts Color Burst Alizarin Crimson, Orange (watercolor), Golden Extra Heavy Gel Gloss (mixed with Alizarin Crimson Color Burst), Memento Inks-Angel Pink, Tangelo
Dies:  **NOTE** Tonic Studio dies linked to a US site and UK site. Tonic Studio (US) 657e ROYAL FERN DIE SET, 175e TOPPER DIE INNER SET - THANK YOU, Tonic Studio (UK) 657e ROYAL FERN DIE SET175e TOPPER DIE INNER SET - THANK YOU
Ribbon:  Hand Dyed Seam Binding (Orange Color Burst)
Accessories:  Wild Orchid Craft Flowers MKX-122 Mixed Pink/White Cosmos Daisy, Sequins, Prima Finnabair Elementals Lace Stencil. Ranger Multi Medium Matte, Scrapbook Adhesives by 3L 3D Foam Squares, Zig Wink of Stella Clear Glitter Brush Pen, Hot Glue

LinkWithin

Related Posts Plugin for WordPress, Blogger...