Showing posts with label Cartwright's Sequins. Show all posts

Tuesday, May 24, 2016

Tonic Studios - Dreams, Wishes & Fairy Kisses Card and Tutorial

Hello blogging friends!  Today, I have a pretty Springtime and glittery fairy card to share with you.  I am loving all the pretty little fairies in the Fairy Reflections Die and Stamp Collection.  As an added bonus there is also a coordinating paper pack.


Here is a look at the card I designed using the fairy 1306E Aurora Reflections Stamp and 1206E Aurora Reflections Die Set.  I also used 483E Scalloped Circles Layering Die Set524E Pinhole Circle Die Set,112 0E Filigree Flourish Die Set, and 1055E Fairy Wishes Illustrated Paper Pack.


To start I stamped the 1306E Aurora Reflections Stamp using VersaMark ink on to Strathmore mixed media paper.  Then I added 600N Embossing Powder - Classic Gold and used my heat to to melt and heat set the powders.  I used Zig Clean Color Real Brush Pens to watercolor the image.  The colors are listed below in the supplies.


Next I die cut the fairy shape using the silhouette die from the 1206E Aurora Reflections Die Set.  No fussy cutting!  The die cuts that fairy shape perfectly.
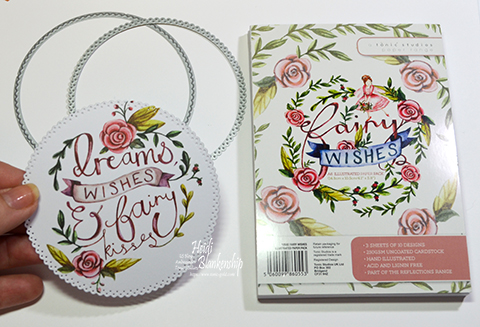

I used one of the sentiments from the 1055E Fairy Wishes Illustrated Paper Pack.  To die cut and add some details to the dies cut shape I used the 483E Scalloped Circles Layering Die Set and 524E Pinhole Circle Die Set.  When using these dies you will want to die cut the scalloped circle first and then you can match up the pinhole circle die to add the detail.  For all of the die cutting I used the  147E Tangerine Machine and Bag Set and I also used the 160E Tim Holtz - 8" Comfort Guillotine/Trimmer to cut all of my paper pieces.


I used the NUVO 203N Glue Pen Medium and 705N US Pure Sheen Diamond Glitter to add some sparkle to the fairy and the flowers in the die cut sentiment.


For some finishing touches on the fairy and sentiment die cuts I added some 651N Crystal Drops Gloss - White to look like some white pearls.


I also used the 112 0E Filigree Flourish Die Set to cut a couple of floral flourished to add on the bottom and right side of the card.  I used the same Strathmore mixed media paper and  Zig Clean Color Real Brush Pens to color the die cuts.  I used a sheet of pattern paper from the Simple Stories Color Vibe 6 x 6 Paper Pad and added that to a pink cardstock base.  I also added some green May Arts ribbon and sequins from Cartwright Sequins & Beads.


I love all the sparkle from the glitter and sequins.


Thanks so much for joining me today and I hope you enjoyed the card tutorial.

Hugs & Smiles,
Heidi


Supplies
Tonic Studios USA
Stamps:  1306E Aurora Reflections Stamp
Dies:  1206E Aurora Reflections Die Set, 483E Scalloped Circles Layering Die Set, 524E Pinhole Circle Die Set,112 0E Filigree Flourish Die Set
NUVO:  600N Embossing Powder - Classic Gold, 651N Crystal Drops Gloss - White, 705N US Pure Sheen Diamond Glitter
Paper Range:  1055E Fairy Wishes Illustrated Paper Pack
Adhesive:  NUVO 203N Glue Pen Medium, 419E Craft Tacky 120ml
Tools:  147E Tangerine Machine and Bag Set160E Tim Holtz - 8" Comfort Guillotine/Trimmer819 - 107E Time Holtz Titanium Shear
Other Supplies
Paper:  Strathmore Mixed Media Paper, Simple Stories Color Vibe 6 x 6 Paper Pad, Cardstock - Pink
Ink/Markers:  Versa Mark Ink, Zig Clean Color Real Brush Pens - Flesh Color, Mustard, Pale Pink, Light Pink, Light Carmine, Wine Red, Geranium Red, Orange, Yellow, Light Green, Olive Green, Oatmeal, Middle Brown, Haze Blue (All colors in set of 60 markers except Haze Blue)
Ribbon:  May Arts Ribbon Sampler - Spring Green
Accessories:  Foam Squares, Cartwright Sequins & Beads - 4mm Medium Pink, 3mm Gold Flower, 3mm Moonshine

Sunday, May 22, 2016

Tonic Studios - Have a Beautiful Day Card

Hello everyone!  Earlier this week we celebrated my mom's birthday and this is the card I made for her.  This was also my first card using the New NUVO Creative Pen Collection.  The Creative Pens are a blendable alcohol based pen from Tonic Studios.


Here is a look at the card I designed.  For the dies I used 1120E Filigree Flourish Die Set, 1227E Have a Beautiful Day Circle Frame530E Layering Butterflies Set 1 - Papillion Pair524E Pinhole Circles Layering Die Set, and 483E Scalloped Circles Layering Die Set.


To create the circle die cuts I used pink cardstock with the 1227E Have a Beautiful Day Circle Frame to die cut the larger scalloped circle.  For the smaller circle I used both the 483E Scalloped Circles Layering Die Set and 524E Pinhole Circles Layering Die Set.  When using these dies you will need to die cut the scalloped circle first and then use the pinhole circle die to add the details.  The Have a Beautiful Day sentiment is also from the 1227E Have a Beautiful Day Circle Frame.  I used white cardstock to die cut the sentiment and then colored it with the NUVO Creative Pen Collection - Supreme Metallics 506 (gold).


For the butterfly I die cut white cardstock using the 530E Layering Butterflies Set 1 - Papillion Pair die set and then I used the NUVO Creative Pen Collection - Rosey Pinks 453, 451, 449 pens to color the butterfly.  I die cut a couple of flourished using white cardstock and the 1120E Filigree Flourish Die Set.  Then I colored the die cuts with the NUVO Creative Pen Collection - Rosey Pinks 453, 451, 449, and Woodland Greens 417, 413.  I wanted to add some sparkly to the butterfly and flourishes so I used the 203N NUVO Glue Pen Medium and added some Pure Sheen Glitter - 705N US Diamond.


For some finishing touches I added Crystal Drops - 675N US Ivory Shell around the scalloped circle die cut, flower centers, and the body of the butterfly.  I also added some tiny white acrylic flowers and for the centers I added Crystal Drops - 682N US Bottle Green.  I fussy cut one of the flowers from the flourish die cut and then added that above the sentiment.  I also added a few sequins from Cartwright Sequins & Beads.


I added some foam tape in between the layers to add a little more dimension to the card.  For all of the die cutting I used the 147E Tangerine Machine and Bag Set and I used the 160E Tim Holtz - 8" Comfort Guillotine/Trimmer for all the paper cutting.

Thanks so much for joining me today!
I hope you enjoyed the card I shared and I hope you have a creative day!

Hugs & Smiles,
Heidi


Supplies:

Tonic Studios USA
Dies:  1120E Filigree Flourish Die Set, 1227E Have a Beautiful Day Circle Frame, 530E Layering Butterflies Set 1 - Papillion Pair, 524E Pinhole Circles Layering Die Set, 483E Scalloped Circles Layering Die Set
NUVO:  Creative Pen Collection - Rosey Pinks 453, 451, 449, Woodland Greens 417, 413, Supreme Metallics 506 (gold), Pure Sheen Glitter - 705N US Diamond, Crystal Drops - 675N US Ivory Shell, 682N US Bottle Green
Adhesive:  419E Craft Tacky 120ml, 203N NUVO Glue Pen Medium
Tools:  147E Tangerine Machine and Bag Set160E Tim Holtz - 8" Comfort Guillotine/Trimmer819 - 107E Tim Holtz Titanium Shear
Other Supplies
Paper:  Cardstock - White, Pink
Accessories:  White Pearl Acrylic Flowers, Cartwright's Sequin & Beads - 6mm Light Chartreuse Satin, 6mm Light Pink Satin, 4mm Gold

Monday, February 29, 2016

JustRite Papercraft - Meadow Circles Hello Watercolor Card

Hello blogging friends!  Today, I have another watercolor card to share with you.  I am loving doing the watercolor cards so I hope you re getting some inspiration from them as well.  :)


For this card I started with a piece of Strathmore Mixed Media paper.  Then I used some of the stamps from the CR-05032 Meadow Circles Clear Stamps along with VersaMark ink and Tonic Studios - NUVO Glod Embossing Powder and a heat tool to heat set the images.  Then I used several colors of the Zig Clean Color Real Brush Pens - Light Blue, Cobalt Blue, Pale Green, May Green, Light Green, Persian Green, Turquoise Green pens,  I started by going from the lightest blue, then in to the green and then finished with the blue greens.  Once the watercolor was dry I used a paint brush with clean water to add water droplets.  I let the water droplets sit for a few seconds and then blotted with a paper towel.  I used the heat to to dry the paper and repeated the water droplets a few times until I was happy with the look of the background.


After the watercolor piece was all dry then I used the NUVO Medium Glue Pen to add adhesive on the flower and leaves inside the circle images.  For the flower I used NUVO Sheer Glitter Turquoise and for the leaves I used NUVO Sheer Glitter Olive Green.  Once the glue had a few minutes to set and dry I removed the excess glitter.  For some embellishments I added some Cartwright Sequins - 8 mm, 10 mm, Bahama Blue SC Iris, 3 mm Gold Flowers, 4 mm Gold.  I used Ranger - Multi Medium Matte to adhere the sequins.


To finish off the card I used VersaMark ink to stamp the hello sentiment from the CR-05032 Meadow Circles Clear Stamps and then I used the same gold embossing powder and heat set the sentiment.  Then I cut a flag tail on one end of the paper and adhered it to the from of the watercolor piece.  I used white craft foam and scor-tape to adhere the watercolor base to a white cardstock mat and then to the aqua card base.

I just love the look of watercolor with the water droplets!

Thanks so much for stopping by today for another card share and I will have another project coming real soon!

Have a fantastic day!

Hugs & Smiles,
Heidi

Supplies

Stamps:  JustRite Papercraft CR-05032 Meadow Circles Clear Stamps
Paper:  Strathmore Mixed Media, CS - White, Aqua
Ink/Markers:  VersaMark Ink, Zig Clean Color Real Brush Pens - Light Blue, Cobalt Blue, Pale Green, May Green, Light Green, Persian Green, Turquoise Green
Accessories:  Tonic Studios - NUVO Glod Embossing Powder, NUVO Sheer Glitter Turquoise, NUVO Sheer Glitter Olive Green, NUVO Medium Glue Pen, Cartwright Sequins - 8 mm, 10 mm, Bahama Blue SC Iris, 3 mm Gold Flowers, 4 mm Gold, Ranger - Multi Medium Matte, White Craft Foam, Scor-Tape, Heat Tool, Paint Brush, Paper Towel

Saturday, December 12, 2015

Exciting News To Share!! Tonic Studios USA Blog Ambassador and Christmas Star Shaker Tag

Hello blogging friends!  Today, I have some exciting news that I can finally share!  If you follow me on Facebook then you already know but I also wanted to share the news here on my blog.  I am so very excited to share that I am a Tonic Studios USA Blog Ambassador!!  I am so honored to be able to design for Tonic Studios!  They are a fantastic company and have so many beautiful products including--dies, punches, tools and cutters (the Tim Holtz tools!), glitters, paints and so much more!!

You can click HERE to check out the official announcement.  :)


I also have a project to share with you using some of the fabulous Tonic Studio dies.  I designed a star shaker tag using the 643E Star Bauble Die Set .  You might have seen this posted on the Tonic Gold Blog but I also wanted to share it here.  I know this tag might look like a lot of work but honestly the dies do most of the work for you lol.  It just a matter of making the die cuts and then layering the pieces together.

1.  Die cut the large fancy star with the center inset star die from gold foil paper.
2.  Die cut the straight edge star with acetate.
3.  Die cut the star ornament piece twice–once from gold foil paper and once from white craft foam.        Then fussy cut and make a couple of snips to remove the center stars from the ornament pieces             leaving just the frame of the largest star.
4.  To assemble use Craft-Tacky Glue–start by gluing the acetate to the back of the gold ornament             piece.  Then adhere the white craft foam ornament piece.  Set aside and let glue dry.
5.  Add sequins.  Use the star die cut that was the drop out piece from the fancy star (gold foil star),          flip to the backside (white) and adhere to the back of the shaker.  Set aside and let glue dry before      shaking the sequins.
6.  To finish adhere fancy star die cut to the front.
7.  Add red seam binding and gold metallic string to attach to gift bag.  This could also be used as a          Christmas ornament!


Here is a look at the shaker tag on the gift bag.  It really dresses up a simple kraft paper gift bag!  I also added some Lipstick Red Seam Binding and May Arts - Metallic Gold String.  I used the 419E Craft Tacky Glue 120ml to adhere all of the pieces together.  I have to tell you on the bottle of glue it says--extra fine precision tip--it really truly is!  There is a tiny pin hole in the tip and it is prefect for adding glue to very detailed die cuts.  Also, I have been using this glue for a while now and I haven't had any problems with the tip getting clogged up so that is another plus!  I used a mix of sequins from Cartwright Sequins to fill the star shaker.  One key thing to making shaker tags or cards -- don't overfill with sequins.  If you add too many sequins they won't be able to move around and when you go to shake the tag or card you won't have any movement.  Sometimes less is more.  :)


Thanks so much for stopping by today!  I hope you have a fantastic weekend!

Hugs & Smiles,
Heidi

Supplies:
Paper:  DCWV - Gold Foil Paper
Accessories: Tonic Studios - 419E Craft Tacky Glue 120ml, Craft Foam, Acetate, Cartwright Sequins, Kraft Gift Bag


Wednesday, September 16, 2015

JustRite Papercraft - Day Two Christmas Release - Gift of Faith Watercolor Card with Tutorial

Hello everyone!  It's day two of the JustRite Papercraft New Christmas Release!  Today, I have a stamp set, a card, and a tutorial to share with you--including how to cover up a mistake.  :)


Here is a look at the CR-02179 Gift of Faith Sentiments Clear Stamps from JustRite Papercraft.  I love all of the beautiful sentiments in this stamp set.


This is the card I designed using CR-02179 Gift of Faith Sentiments Clear Stamps.  I used Kuretake Gansai Tambi Watercolor with an emboss resist technique.


These are the supplies I used for the watercolor and embossing--Kuretake Gansai Tambi Watercolor, Paint Brushes -  Round 8, Round 16, Strathmore Mixed Media Paper, VersaMark Ink, White Embossing Powder, Gold Embossing Powder and a Heat Tool (not pictured).


To start I stamped the sentiment, snowflakes and stars on to Strathmore Mixed Media Paper using VersaMark Ink.  I applied white embossing powder and used my heat tool to heat set it.  The areas where there is embossing will create a resist when the watercolor is applied to the paper.


Using the Round 16 paint brush I applied water over the sentiment and snowflake and I carefully went around the stars.  Then I started adding color using  No. 61 Cornflower Blue, No.64 Blue from the Kuretake Gansai Tambi Watercolor set.  I used the heat tool to dry the paper in between the colors.  Doing this will add the look of layers and depth.


Next, still using the Round 16 brush I added more layers of color using No, 62 Cobalt Blue, No. 139 Purple.  I went back and forth between the watercolor paints and adding water letting the colors blend.  I used a heat tool to dry the paper in between the colors.  *Note when using a heat tool to dry paper that has already been embossed don't hold the heat tool in one place or over the embossed area for too long.  If the embossed area gets too hot it could burn or it might melt too much and not be raised enough anymore to create the resist.  Once the background was done then I applied No. 91 Bluish Gold to the stars.


Do you remember the mistake I mentioned earlier?  Here is a close up of the sentiment.  Do you see how think the embossing is on the word Faith?  When I was drying the card with the heat tool I held it in one place for too long and I pretty much melted the embossing powder (this was near the end of the card).  So I thought I would use my VersaMark marker and lightly go over the word, add more embossing powder, heat set and it would be fix.  Nope it didn't work as planned.  The marker doesn't have a fine enough tip to be able to do this.  So I was left with a big chunky word--it probably would have been ok and most people probably wouldn't have even noticed--but I noticed LOL!  Plus this was the second attempt on this card--I loved how the background turned out and I didn't want to just toss it in the trash.


So here is a close up of my quick fix and covering up my mistake.  I stamped the sentiment again on to white cardstock using VersaMark ink and then I used gold embossing powder and heat set it.  Then I cut cut some of the words and added foam tape to make them pop and add some dimension.  It was a quick fix and nobody know--you'll keep my secret, right?  LOL!  I just wanted to show you that even if you have a little mistake on a card or project try to think outside the box to see if you can do a quick little fix.  :)


For a little bit of sparkle I added some sequins--Gold 2.5mm, 4mm, Lt. Duck Wing Blue 2mm, 4mm, Lt. Purple 4mm, Lt. Purple Satin 3mm.  I used Ranger Multi Medium Matte to adhere the sequins.


I used purple cardstock for the base and the card is a A2 top folding card.

I hope you enjoyed the tutorial and the quick fix on a mistake. :)

Please be sure to visit all of the Design Team Members in the link list below to see the projects they have to share with you.


Thanks so much for stopping by today!

Hugs,
Heidi


Supplies
Stamps:  JustRite Papercraft CR-02179 Gift of Faith Sentiments Clear Stamps
Paper:  Strathmore Mixed Media Paper, Cardstock - White, Purple
Ink/Paint:  VersaMark Ink; Kuretake Gansai Tambi Watercolor - No. 61 Cornflower Blue, No.64 Blue, No, 62 Cobalt Blue, No. 139 Purple, No. 91 Bluish Gold
Accessories:  Paint Brushes -  Round 8, Round 16; White Embossing Powder, Gold Embossing Powder, Cartwright Sequins - Gold 2.5mm, 4mm, Lt. Duck Wing Blue 2mm, 4mm, Lt. Purple 4mm, Lt. Purple Satin 3mm; Ranger Multi Medium Matte, Foam Tape, White Craft Foam (fun foam), Scor-Tape, ATG, Heat Tool

Thursday, July 2, 2015

Pink Ink Stamp Co. - Super Sweet Sundae Card


Hello everyone!  I just realized I forgot to post this card last month.  I have a yummy sweet treat card to share with you using a stamp image from Pink Ink Stamp Co. you can find the entire collection on Ellen Hutson's site. You can click HERE to see the entire collection of Pink Ink Stamps and click HERE to see the entire collection of Lockhart Stamps.  How many of you love to visit the ice cream shop or the local DQ for a treat?  Or do you remember the ice cream trucks?  Unfortunately, I think the ice cream trucks are becoming a thing of the past in many places. But I am sure many of us have great memories hearing the music from the ice cream truck and seeing it turn the corner to come down the street.   Then making a mad dash into the house to get some money LOL.  


Here is the card I designed using the Super Sundae stamp.  This sundae looks so yummy with ice cream, chocolate, cool whip, and a cherry on top!  I stamped the image using Memento Tuxedo Black ink and then I colored the image with Copic markers.  


 Here is a close up of the image.  I colored the ice cream to look like vanilla and strawberry.  Then I colored the chocolate syrup and added some Glossy Accents on top.  Once the image was colored I trimmed it down and added light pink cardstock for a mat.  I added another mat with rose cardstock and a white paper doily.  Then I adhered everything to a light pink card base.  I used some baby pink seam binding for a bow and I also added a small pearl white acrylic bow on top.  To finish of the card I added some pale pink satin, medium pink, and moonshine sequins 2mm-4mm in size.  


Thanks so much for stopping by today!  

Hugs & Smiles,
Heidi

Supplies
Paper:  White, Pink, Rose Cardstock
Ink/Markers:  Memento Tuxedo Black Ink, Copic Markers R29, R39, RV00, RV10, B0000, E57, C0, 0
Accessories:  C. Cartwright Sequins Pale Pink Satin 3mm, Medium Pink 2mm, 4mm, Moonshine 3mm, 4mm, Pearl White Acrylic Bow, Glossy Accents, White Fun Foam, Scrapbook Adhesives By 3L E-Z Runner Permanent Strips-Refillable Dispenser 49'


Tuesday, May 5, 2015

Lilac Bouquet Happy Birthday Shaker Card - JustRite Papercraft New May Release

Hello everyone!  Today, is the first day of the May New Release from JustRite Papercraft.  The Design Team has been busy creating some beautiful projects to share with you!


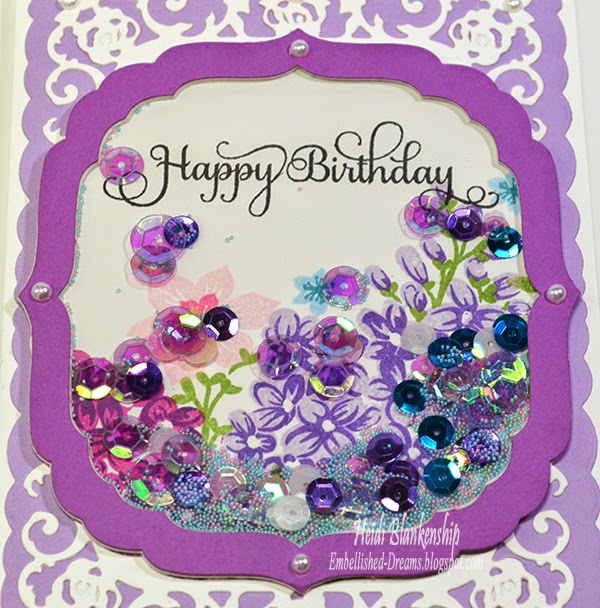
Here is the card that I designed using the new CR-02181 Multi-Step Lilac Bouquet Clear Stamps from JustRite Papercraft.  If you love multi-step stamping then you are going to love this beautiful lilac stamp set!  Lilacs are one of my favorite flowers so I know this is going to be a stamp set that I will use over and over again.


I used the CR-02181 Multi-Step Lilac Bouquet Clear Stamps to create the pretty background for my shaker card.  For the sentiment I used a Happy Birthday stamp from the CR-03815 Large Fancy Sentiments Clear Stamps from  JustRite Papercraft.


I haven't made a shaker card in years but they are back on trend and hotter than ever so I thought this would be a fun and pretty stamp set to create a shaker card with.  I used the S4-489 Labels Forty Seven die template from Spellbinders to create the frame for the shaker.  I started with a piece of white fun foam and I covered the front and back with Ken Oliver Crafts Stick It Adhesive Sheets and then I used the label dies to die cut the frame shape out of the fun foam.  I also applied the adhesive sheets to the purple cardstock and die cut a frame using the same dies.  Lastly I die cut the label shape from a piece of acetate for the window of the shaker.


Once all the die cuts were made for the shaker part of the card all I had to do was assemble the pieces.  I placed the acetate on top of the fun foam and then the purple frame on top of the acetate.  Then I turned the piece over and filled it with some Cartwright's Sequins and Martha Stewart Micro Beads-Blue Topaz, Kunzite (pink).  To finish it off I added the stamped die cut to the back.  Making shaker cards with die cuts is easy peasy.  :)


To finish off the card I used the two largest die templates in the S5-230 Romantic Rose set and made a couple of die cuts for the background of the card.  I also added a few white pearls.

Please be sure to visit each of the Design Team Members in the link list to see their beautiful projects.


Thanks so much for stopping by today!
I hope you have a beautiful day!

Hugs & Smiles,
Heidi

Supplies
Stamps:  JustRite Papercraft CR-02181 Multi-Step Lilac Bouquet Clear Stamps, CR-03815 Large Fancy Sentiments Clear Stamps
Paper:  White, Lavender, Purple
Ink:  Imagine Crafts/Tsukineko Memento LuLu Lavender, Grape Jelly, Lilac Posies, Angel Pink, Rose Bud, Summer Sky, Teal Zeal, Bamboo Leaves, Olive Grove, Tuxedo Black
Dies: Spellbinders S4-489 Labels Forty Seven, S5-230 Romantic Rose
Accessories:  Ken Oliver Crafts Stick It Adhesive Sheets, Fun Foam, Acetate, Cartwright's Sequins, Martha Stewart Micro Beads-Blue Topaz, Kunzite (pink), White Flat Back Pearls, Ranger Multi Medium Matte

Tuesday, April 14, 2015

JustRite Papercraft - Tutorial Tuesday - Color Burst Tutorial Series 1

Hello everyone!  This is my week to post for  JustRite Papercraft  with a new Tutorial Tuesday.  For this week's tutorial I will be sharing with you the fun new Color Burst by Ken Oliver Crafts.  


You will be happy to hear that  JustRite Papercraft is now carrying Color Burst and Stick It Adhesive Sheets by  Ken Oliver Crafts!  I know so many people who are excited to try the new products!


I have both a video tutorial and a tutorial with step out pictures and instructions on the JustRite Inspiration Blog.  Over the next few weeks I will be doing a tutorial series using Color Burst and sharing with you all kinds of fun techniques, tricks and tips to create some beautiful projects.  In the first tutorial I will be sharing how to hand dye seam binding, create color mist spray, and quick and easy watercolor backgrounds.  You can click HERE to see the video and you can click HERE to check out the blog post.  There is also a Giveaway for a $20.00 Gift Certificate to the JustRite Papercraft Store--so be sure to check it out!

I hope you enjoy the tutorial with Color Burst!
Thanks so much for stopping by today!

Hugs & Smiles,
Heidi


Supplies
Stamps:  JustRite Papercraft CR-02172 Grand Handwritten Sentiments Clear StampsCR-02166 Stacking Sentiments Clear Stamps
Paper:  Strathmore Watercolor Paper, White Cardstock
Inks/Paints:  Ken Oliver Crafts Color Burst-Ultramarine Blue, Alizarin Crimson, Lemon Yellow, Orange, Pthalo Green; Memento Tuxedo Black, VersaMark, Ranger Distress Ink-Mowed Lawn
Dies:  Spellbinders S2-139 Sentiments 3SCD-012 Pierced Rectangles Dies
Ribbon:  Hug Snug Seam Binding Winter White (Hand Dyed)
Accessories:  ButterBeeScraps-Butterfly Filigree 769-B, Gold Rub-N-Buff, Ranger Gold Embossing Powder, Cartwright's Sequins-Saffron 5, 8, 10mm, Pink Potion 8mm, Tea Rose 5mm, Mermaid Green 5, 8, 10mm, Mixed Colors Iris 5, 6mm, Acrylic Flower, Acrylic Leaf, Stick It Adhesive Sheets, Water Bottle, Mini Mister

LinkWithin

Related Posts Plugin for WordPress, Blogger...