Wednesday, August 22, 2012

Bazzill Basics Paper - Bazzill Card Swap Starter Kit - WINNER!!!

Hello!  Are you ready to find out who the Winner is for the Bazzill Basics Paper --Bazzill Card Swap Starter Kit?  I am sorry I wasn't able to get this posted on Monday but some other things came up so I apologize for it being a little late.   


I think the Bazzill Card Swap is a Fantastic idea and I am going to sign up for the Starter Kit.  If you would like to join in the fun you can check out all of the details by clicking HERE.  The Offer is available through September 1, 2012 so you still have time to get the Starter Kit!  

I wrote all of the names down and had my little guy help pick the Winner.  :)

And the Lucky Winner is...


CONGRATULATIONS JULIA!!!!


Julia said... 13
Sounds great. Would love to win a kit!


I emailed Julia and hope to hear back from her soon!  :)

Thank you so much to everyone who entered!!

Check back soon--I will be having more fun giveaways from Bazzill Basics Paper!!!

Hugs & Smiles,
Heidi

Tuesday, August 21, 2012

Vintage Inspired Aqua Jewel Flower Necklace

One of my favorite go to die template sets is the Jewel Flowers and Flourishes from Julianna's Positively Me Collection from Spellbinders™ Paper Arts.  I love all of the pieces in the set from the flowers to the leaves and swirls and the sweet little butterflies.  I used one of the flower die templates from the set to create a layered flower and I added it to a necklace I designed.


Here is the necklace I designed.  Using the foil, beads, pearls and antique bronze gives the necklace a vintage look.


I used the Grand Calibur® Machine and S5-143 Jewel Flowers and Flourishes die templates from Spellbinders™ Paper Arts and Aqua Delicate Pastels Premium Craft Foils to create the layered flower.


To see more pictures and find out all of the details on how I designed this vintage inspired necklace please visit Julianna's Blog Positively Me and check out my blog post.

Thanks for stopping by and I hope you have a wonderful and creative week!

Hugs & Smiles,
Heidi

  Supplies Spellbinders™ Paper Arts:  S5-143 Jewel Flowers and Flourishes, Grand Calibur® Machine, Delicate Pastels Premium Craft Foils Assortment Beadalon®:  Semi-Flush Cutter, Round Nose Pliers Accessories:  Bead Gallery Aqua Mix Shiny Rondel Beads, Pearls, Jump Rings, Head Pins, Chain, Clasp; Shabby Scraps Antique Bronze Blank Cameo Charm; Scrapbook Adhesives by 3L Adhesive Sheets; E6000 Adhesive

Thursday, August 16, 2012

JustRite Papercraft - The Amazing Paper Grace Kit Club for September

Hello!  I am so happy to finally be able to share with you The Amazing Paper Grace Kit Club.  This is a monthly kit club that includes exclusive dies and stamps designed by Becca Feeken.  I am so excited for Becca and her new journey!  Becca is such a sweet and amazingly talented lady and so deserving of this.  If you would like to ready Becca's announcement please click HERE.  


Check out this Beautiful stamp set!  This is the exclusive stamp set in Becca's September Kit, AG-04005 Signed Sealed Delivered.  This stamp set coordinates with her exclusive die set too!  


Here is the exclusive AG-04000 Two by Two Postage Die that is included in Becca's September Kit.


Here is the card that I designed using the exclusive die and stamp set from Becca's Amazing Paper Grace September 2012 Kit.  The stamp set and the die template were so fun to work with!  I love creating little faux stamps and how the die template works, you can have one large die cut or you can cut the die cut into smaller postage stamps.  


Here is a close up of the postage stamps I created.  I stamped the image onto Simply Smooth Ivory cardstock and then I colored the images using Ranger Distress Inks Antique Linen, Vintage Photo, Aged Mahogany, Bundled Sage, Tumbled Glass.  I used EG-003 Garden Latice M-Bossabilities to emboss the background piece and then I inked the embossed area and the edges using Antique Linen and Vintage Photo Distress Inks.  Then I added the lace trims and layered the images onto the card.


Next I created a little charm.  I stamped the image onto Simply Smooth Ivory and colored it with Prismacolor Colored Pencils.  Then I used glossy accents to glue on the Small Vintage Alterable Trinket (Acrylic Chandelier Piece).  Once it was dry I cut off the excess paper and attached it to the card.  


To finish off the card I added a black seam binding bow, trinket pins and a pretty button.

Today and tomorrow the JustRite Papercraft designers are sharing their beautiful projects created with Amazing Paper Grace Becca's September 2012 Kit.  Here is the link list for today.  Please be sure to visit each of the designers and leave them a little love.  ♥


Thanks so much for stopping by today!

Hugs & Smiles,
Heidi

Supplies
Stamps: JustRite Papercraft Amazing Paper Grace Becca's September 2012 Kit AG-04005 Signed Sealed Delivered
Paper:  Discount Cardstock Simply Smooth White, Racy Raspberry, Soot
Ink:  Tsukineko Memento Rich Cocoa; Ranger Distress Inks Antique Linen, Vintage Photo, Aged Mahogany, Bundled Sage, Tumbled Glass; Prismacolor Colored Pencils
Dies: JustRite Papercraft Amazing Paper Grace Becca's September 2012 Kit AG-04000 Two by Two Postage Die; Spellbinders Grand Calibur, EG-003 Garden Latice M-Bossabilities
Accessories:  Created by Martha Lace Trims, Button; Maya Road Trinket Pins, Small Vintage Alterable Trinket (Acrylic Chandelier Piece); Ranger Glossy Accents; Scrapbook Adhesives by 3L 3D Foam Squares; Hot Glue

Wednesday, August 15, 2012

Pro 31 Designs - August DT Challenge - Altered Clothespins

Hello blogging friends!  Today, is the Pro 31 Designs DT Challenge for the month of August.  Our DT Challenge Coordinator is Anna Fallas and for this month the challenge was to alter clothespins.  We could do one large chunky one or 3-4 med. to small clothes pins.  The clothespins had to be shabby chic and in light colors.  I didn't have any of the large clothespins so I altered 3 medium sized ones.


Here is a look at the two project I designed with altered clothespins.  I made two magnet clothespins to embellish and hold a notepad and then I made a mini note card holder using another clothespin.


For the clothespins on the notepad I used Ranger Acrylic Snow Cap Paint Dabber.  Once the paint was dry  I added Stretchy Pink Crochet Lace Trim in a double layer on each clothespin and 4mm White Flat Back Pearl Stands down the center.  To finish them off I added Leaves (Sm), Porcelain Blue Roses, Pink Mulberry Roses and then a little Diamond Stickles for some sparkle.  I also added a border across the top of the notepad using Satin White Box Pleated Trim4mm White Flat Back Pearl Stands and a Large Blue Acrylic Flower.


Here is another close up look.


To create the little flower pot clothespin note card holder I used the paint dabber to paint the clothespin and flower pot.  After the paint was dry I used hot glue and glued the clothespin topper into the bottom of the flower pot.  Then I added Satin White Box Pleated Ribbon Trim, Stretchy Pink Crochet Lace Trim and 4mm White Flat Back Pearl Stands around the top of the flower pot.  To fill the flower pot I used Leaves (Sm), Porcelain Blue Roses and Pink Mulberry Roses.  I also added Diamond Stickles to all of the flowers and leaves.  To finish it off I added the little mini note cards.


Here is a close up.


Thank you so much for stopping by today!  Also please be sure to visit Pro 31 Designs and check out all of the fun crafty supplies.  I have to tell you this is the first time I have ever altered clothespins and I honestly wasn't sure what I was going to do with them--LOL!  But I had a lot of fun altering them.  Thanks for a great challenge Anna and for making me think outside the box! *wink*

Hugs & Smiles,
Heidi

Supplies
Pro 31 Designs:  Satin White Box Pleated Ribbon Trim, Stretchy Pink Crochet Lace Trim, 4mm White Flat Back Pearl Stands, Leaves (Sm), Porcelain Blue Roses, Pink Mulberry Roses, Blue Acrylic Flower (Lg)

Other Supplies:  Ranger Acrylic Snow Cap Paint Dabber, Diamond Stickles; Mini Clay Flower Pot; Clothespins; Note Pad & Note Cards; Hot Glue

Monday, August 13, 2012

Really Reasonable Ribbon Blog Hop - August Ribbon Club


Good morning blogging friends!  Today, is the Really Reasonable Ribbon Blog Hop for the month of August.  The RRR Design Team Members and Special Events Design Team Members will be showcasing the Monthly Ribbon Club


This month there is a wonderful assortment of Purple and Gray ribbons included in the August Ribbon Club. Click HERE for more details.

If you are following the order of the blog hop you should have just come from Bonnie's Blog. If not and you just happened to pop in for a visit please click HERE to start the blog hop at the Really Reasonable Ribbon's Ramblings! Blog.


For my project I made a card using a sheer gray with a diamond pattern and a sparkly purple ribbon,both from the August Ribbon Club.


I created a layered ruffle using the same ribbons, a piece of purple cardstock cut into a circle and hot glue.    I used the layered ribbon ruffle to showcase my flower embellishment.  


Here is a close up of the Handmade Faux Metal Flower Embellishment with the layered ribbon ruffles.


To create the label with the sentiment I used S4-161 Labels One die template from Spellbinders.  I cut/embossed the label and then I stamped the sentiment using Tuxedo Black ink and H-811 Friends stamp set from The Rubber Cafe.  Then I used Copic marker V15 to airbrush the inside edges of the die cut.


Here is a close up of the sentiment.  I used S4-379 Decorative Labels One die template and Soot cardstock to create the decorative label and then I layered the two labels using 3D Foam Squares from Scrapbook Adhesives by 3L.  


I added a trinket pin from Maya Roads and a handmade stickpin that I made.  I also added a bow to the top of the card and finished it off with some bling swirls.


To create the mats for the card I used S5-131 A-2 Matting Basics A and S5-132 A-2 Matting Basics B die templates from Spellbinders.  All of the cardstock is from Discount Cardstock and the pattern paper is from Kaisercraft The Lake House 6-1/2 Paper Pad Collection.

Now to continue in the blog hop you need to hop on over to Patti's Blog and check out her fantastic project!

Thank you so much for stopping by today and I hope you enjoy the Really Reasonable Blog Hop!! Don't forget to visit the RRR Store and check out all of the beautiful ribbons, lace and trims!

I hope you have a wonderful and creative day!

Hugs & Smiles,
Heidi 

Supplies
Really Reasonable Ribbon:  Monthly Ribbon Club - August an assortment of Purples and Grays.
Paper:  Discount Cardstock Simply Smooth White, SootViolet #65; Kaisercraft The Lake House 6-1/2 Paper Pad Collection
Ink:  Tsukineko Memento Tuxedo Black; Copic Marker V15
Accessories:  Handmade Faux Metal Flower Embellishment; Handmade Stickpin; Recollections Bling; Maya Road Trinket Pin; Scrapbook Adhesives by 3L 3D Foam Squares; Hot Glue

Sunday, August 12, 2012

Papercrafting Sale!!

Hello blogging friends!
I have a quick post for today, sorry no artwork to share--just an announcement.

This is an announcement for all of the local peeps of southern MN and northern IA.

For the past four years I have had a papercrafting sale at my home and I have received several emails and phone calls for people wondering if I was having the sale this year and the dates.  I posted about this a couple of weeks ago and said I would post the dates as soon as they were set.  
So I am announcing today that the sale will be this coming Friday and Saturday.  

Here are the details--------

Friday 8/17 9am - 7pm
Saturday 8/18 9am - 2pm

I live in Albert Lea, MN and if you are interested in coming 
please email me for my address if you don't already have it.

Click HERE to email me.  

I go through my supplies every year so I can make room for the new products and I have lots of 
pattern papers, stamps, stickers, bling, embellishments and tons of papercrafting supplies
from top name brand companies.

If you have any questions please feel free to email me.

Thanks so much for stopping by today and I hope to see you at the sale later this week!  :)

Hugs & Smiles,
Heidi

Friday, August 10, 2012

Bazzill Card Swap Starter Kit - Would you like a chance to WIN a KIT?

Hello blogging friends!  Did you know Bazzill Basics Paper has a Fun New Card Swap? 


Bazzill wants everyone to discover the love of card making - to enjoy making something and giving it away. So Bazzill created Card Swap, a fun activity that invites card makers to register to join (it’s FREE), create 10 of the same card, send them into Bazzill and get your own card and nine others back from people all over the United States. The swaps always have a theme and a specific paper to include, but the variety of cards that arrive are unbelievable. People that participate continue joining each swap and new people join in every time. To encourage participation, they have created this kit (offer ends 9/1/12).  


Bazzill Card Swap Starter Kit – ($20 value)
Send $10 to cover postage and handling and receive:
  22-sheets of 8x8 Bazzill Spooky & Kooky patterned paper.
   24-sheets of 6x6 Bazzill All Hallows Eve patterned paper.

Use the All Hallows Eve paper to make ten cards 
for Bazzill’s Card Swap. 
Mail in your creations and get your own card and nine 
other cards from swappers.  
For more info and to register to play, visit: http://swaps.bazzillbasics.com/ 
Offer available through September 1, 2012. 
Allow 2 to 3 weeks for shipping. 
 Mail to: 
Card Swap Starter Kit 
Bazzill Basics Paper 
7001 W. Erie St., Ste. 2 
Chandler, AZ 85226.  
**U.S. addresses only.

How would you like to WIN 
one of the 
Bazzill Card Swap Starter Kit?  

All you have to do is leave a comment here 
and let me know what you think about 
the Bazzill Card Swap.

You have until August 18th, 2012  at 12:00 am (CST) 
to leave a comment on this blog post.  
I will pick and announce the 
Winner on Monday August 20th, 2012.  

***Please be sure to leave a link to your blog or your email 
so I can contact you if you win!! 

Subscribe or follow my blog so you don't miss 
when I announce the Winner!   
Once I have the winner's contact information 
I will forward it to Bazzill and 
then they will send the Winner 
Bazzill Card Swap Starter Kit.

Thanks so much for stopping by today & Good Luck!!

Hugs & Smiles,
Heidi


Vintage Street Market - Make A Wish Birthday Card & Smarties Candy Party Favor

Hello!  Today is my day to post over at the Vintage Street Market Blog and I have a couple of sweet little birthday projects to share with you using several of the products from Vintage Street Market.  Speaking of products have you checked out all of the New products in the VSM Store?  If not you should hop on over and take a look at all of the new goodies!


For my first project I designed this Make A Wish birthday card using one of the images from October Afternoon Cakewalk Candles pattern paper.  I also used some die templates from Spellbinder, ribbon and lace trims from Really Reasonable Ribbon and paper from Discount Cardstock.  Then I added some embellishments and some diamond glitter from The Rubber Cafe for a little sparkle.
Make A Wish Card~ 

Other:  
Ranger Antique Linen, Pumice Stone Distress Inks; 
Stick Pink, Ribbon Flower, Mulberry Blossoms, Hot Glue

 
For my second project I made a Smarties candy party favor.  I filled one of the little Glassine Envelopes with Smarties candy and then I attached the envelope to a die cut that I used for the base.  Then I used some fun little embellishments from Vintage Street Market and from my stash to decorate the front.

Smarties Candy Party Favor~ 

Other:  
Buttons, Hot Glue


If you would like to see more pictures and find out all of the details about the projects please visit the
Vintage Street Market Blog.

Thank you so much for stopping by today and I hope you have a Fabulous Friday!!

Hugs & Smiles,
Heidi 

Tuesday, August 7, 2012

JustRite Papercraft August Christmas Release - Believe in the Magic Christmas Ornament

Hello blogging friends!  Today, I have another New Release from JustRite Papercraft to share with you.


For my project I made a Christmas ornament using CR-03780 Antique Christmas Tags One and CL-03560 Shabby Music Background stamp sets from JustRite Papercraft.  To start I cut/embossed the Christmas ornament using Authentique 6 x 6 Bundle Wonder Collection paper and S5-116 2012 Heirloom Ornaments die template from Spellbinders.


Then I stamped the CL-03560 Shabby Music Background on to a piece of ivory paper and used S5-117 2012 Snowflake Pendant to cut/emboss all of the snowflakes.  To create the center die cut I stamped a frame and sentiment from CR-03780 Antique Christmas Tags One and used JB-03775 Antique Tags One Dies from JustRite Papercraft to cut/emboss the tag shape.  


I also added a smaller snowflake at the top of the ornament with the ribbon for a holder.


I layered all of the pieces using 3D Foam Squares.  Then I added red rhinestones from Recollections and Diamond Clear Glitter from The Rubber Cafe for some added sparkle.

Please be sure to visit all of the JustRite Papercraft Design Team Members in the link list below to see what they have created to share with you.


Thank you so much for stopping by and I hope you have a Wonderful Day!!

Hugs & Smiles,
Heidi


Supplies
Stamps:  JustRite Papercraft CR-03780 Antique Christmas Tags One, CL-03560 Shabby Music Background
Paper:  Discount Cardstock Simply Smooth Ivory; Authentique 6 x 6 Bundle Wonder Collection
Ink:  Clearsnap Donna Salazar Mixd Media Inx Schoolhouse, Truffle; Ranger Antique Linen, Old Paper Distress Inks
Dies:  JustRite Papercraft Custom Dies JB-03775 Antique Tags One Dies; Spellbinders Grand Calibur S5-116 2012 Heirloom Ornaments, S5-117 2012 Snowflake Pendant
Accessories:  Really Reasonable Ribbon Red Ribbon with Silver Edge; The Rubber Cafe Scrap Happy Sheer Glue; Diamond Clear Glitter; Recollections Rhinestones; Scrapbook Adhesives by 3L 3D Foam Squares

Monday, August 6, 2012

JustRite Papercraft Shabby Chic Autumn Leaves - Antique Autumn Tags - Antique Tags One Dies - Autumn Blessings Card

Hello blogging friends!  Today, I have another New Release from JustRite Papercraft to share with you.  


To start I cut/embossed S5-135 A2 Fancy Ribbon Threader with watercolor paper and then I stamped a cluster of the leaf images using the masking technique.  


Here is a picture once I removed all of the masks.


I colored the images using Distress Markers.


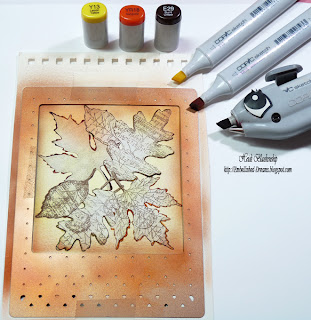
Next I placed the same masks over the leaves and then I put the die cut back into the die template and used it as a stencil to airbrush with Copic markers.


Here is a picture once the masks were removed and the airbrushing was done.


To create the sentiment I stamped the image with Rich Cocoa ink onto watercolor paper.  Next I used one of the die templates from JB-03775 Antique Labels One Dies to cut/emboss the tag.  Before die cutting I added Truffle Mix'd Media Inx to the inside of the die template and then die cut the image.  Doing this gives a nice crisp inked edge on the die cut.  Then I used Distress Markers to color the image. 


Here is a close up of the leaves and tag with sentiment.


I added this beautiful Rudbeckia Hand-Dyed Silk Ribbon from Really Reasonable Ribbon to the ribbon threader and then added a bow.  I thought this ribbon was a perfect match!  I also added some foil die cuts for embellishments.  To create the die cuts I used S5-120 Fall Foliage and Precious Metals Premium Craft Foils Assortment from Spellbinders.


Please be sure to visit each of the JustRite Papercraft Design Team Members in the link list below to see what they have to share with you.  


Thank you so much for stopping by today and I hope you have a Happy Monday!

Hugs & Smiles,
Heidi

Supplies
Stamps:  JustRite Papercraft CR-03870 Shabby Chic Autumn Leaves, CR-03875 Antique Autumn Tags One
Paper:  Discount Cardstock Espresso Waffle Weave, Pop-Tone Orange Fizz; Watercolor Paper
Ink:  Tsukineko Memento Rich Cocoa; Ranger Distress Markers, Antique Linen Distress Ink; Clearsnap Donna Salazar Mix'd Media Inx
Dies:  JustRite Papercraft Custon Dies JB-03775 Antique Tags One Dies; Spellbinders Grand Calibur, S5-131 A2 Matting Basics A, S5-135 A2 Fancy Ribbon Threader, S5-120 Fall Foliage
Accessories:  Spellbinders Precious Metals Premium Craft Foils Assortment; Really Reasonable Ribbon Rudbeckia Hand-Dyed Silk Ribbon; Recollections Rhinestones; Scrapbook Adhesives by 3L 3D Foam Squares

LinkWithin

Related Posts Plugin for WordPress, Blogger...