Wednesday, October 20, 2010

JustRite 12 Weeks of Christmas Blog Hop 7

Good morning and Welcome to JustRite Stampers’ newest Wednesday feature, 12 Weeks of Christmas Blog Hops 7! Every Wednesday up until Thanksgiving some of your favorite designers will be joining some of the JustRite design team for a series of Christmas blog hops, showcasing JustRite’s entire Christmas Collection of stamps! You also might see some projects from the JustRite design team, using some of our newly released CLING stamps! You can find our new collection of cling stamps HERE. This week, the designers joining us are most of the Spellbinders and Caardvarks design teams! So mark your calendars for Wednesdays at 9am Central for great Christmas gift, card & project ideas, starting at the JustRite Inspiration blog!

Today, I have a Christmas snowman card to share with you. To create the card I used the NEW Sparky the Snowman CLING Stamp Set from JustRite.
I started by stamping the snowman image onto white cardstock with Rich Cocoa Ink. Then I started to add color with Copic markers. Below are the photos with the steps for coloring.Next I colored the trees.Then the coat.The scarf.The last little bit of coloring was the mittens, hat and broom.After all of the coloring was done then I used S4-293 Lacey Squares, die #3 to cut/embossed the circle diecut.I added a diamond glitter to the snowman image and the small snowflakes. Then I also created a large snowflake diecut using S4-286 2010 Snowflake Pendant from Spellbinders™ and added a clear chunky glitter. I layered both of the diecuts using 3D Foam Squares from SCRAPBOOK ADHESIVES by 3L™.
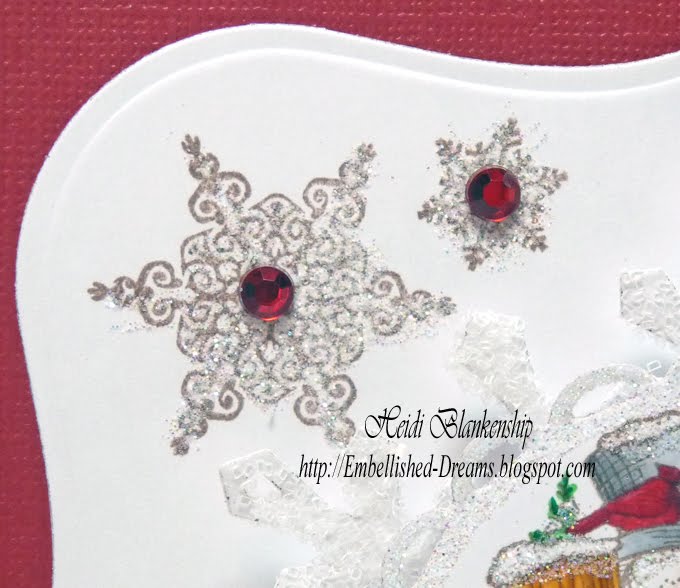
To create the shape card and the mat I used LF-161 Grand Labels One. I stamped snowflakes using Rich Cocoa ink and then I added glitter and a rhinestone to the center of each.Here is a close up of the sentiment.Supplies
Stamps: JustRite Stampers Cling Sparky the Snowman
Dies & Punches: Spellbinders™ Grand Calibur™, LF-161 Grand Labels One dies #2, #4, S4-286 2010 Snowflake Pendant, S4-293 Lacey Circles die #3
Paper: Neenah Solar White, Core'dinations Deep Red
Ink: Tsukineko Memento Rich Cocoa; Copic Markers
Accessories: SCRAPBOOK ADHESIVES By 3L 3D Foam Squares, Crafty Power Tape; Joann's Red Rhinestones, Glitter

Please visit these designers’ blogs to see what fabulous JustRite Christmas inspiration they have for you on the hop today!

Monday, October 18, 2010

Crafty Secrets Design Team Challenge (sewing challenge)

Good morning! Today is the Crafty Secrets DT Challange Day! Our challenge for this month was to create something with a sewing technique. It doesn't have to be a sewing theme but the projects needs to have some type of sewing on it--with a sewing machine, hand stitching or faux stitching. I always love a challenge and believe me this month was kind of a challenge--I don't sew! I can sew a button back on a shirt but that's about the extent of it--LOL! Joining us for this months challenge is Guest Designer Sheila Rumney--Welcome Sheila!! Please be sure to see the bottom of this post as I have a link list for all of the Crafty Secrets Design Team Members and you will be able to visit each of the blogs.Here is the card I created for today's sewing challenge. The images I used are both from the New Little Blessings Creative Scraps from Crafty Secrets. The images are so darling on the Little Blessings sheets! I did a little bit of hand stitching in the corners on the smaller image and then I created a little ribbon rosette. The inspirations for creating the rosettes came from my aunt Gail. She does the most beautiful and exquisite detailed work on her cards with hand sewing and bead work!! She stopped by here one day last week and was showing me a wedding card she was working on and these little ribbon roses--it was Gorgeous!! She showed me how to create the roses right on to the center of a piece of cardstock. I gave it a try and it was worked beautifully but then I got to thinking it would be great if I could make these as embellishments and I will share with you what I came up with. To start punch out a 1'' circle, then punch a hole in the center and use the hole punch to make five notches going around the circle. Next bring the thread up through the center and across to one of the notches and bring up through the center again. Repeat this until all five notches are wrapped in thread. Tape the ends to the back side. For this next step I didn't have a regular needle that I could thread the ribbon through so I used a wide eye beading needle and it worked perfectly. Bring the ribbon up through the center hole and then go under one of the thread loops and over the next one. Just repeat the over and under continuing all the way around the circle. Here is a picture once the flower is starting to take shape.Like I said you just keep repeating this until you have a look you like and then pull the ribbon through a piece of thread on the back side, trim and tape. For a finishing touch add a few tiny pearls to the center. Once the rose was finished I used a 3D Foam Square from SCRAPBOOK ADHESIVES By 3L™ to adhere it to the card front. These little roses are so easy to make you could do up several of them and then you would be ready the next time you need a flower embellishment.Here is a close up look at the ribbon rose and the hand stitching. I also added a piece of trim, buttons and a few pearls.I love the image of this little girl--she's so adorable!Supplies
Crafty Secrets: Little Blessings Creative Scraps
Ink: Range Antique Linen Distress Ink
Paper: WorldWin Ivory, Spring Green
Accessories: My Mind's Eye Buttons; SCRAPBOOK ADHESIVES By 3L™ 3D Foam Squares, My Stik™; Ribbon, Pearls, Trim

Please be sure to visit each of the Crafty Secrets Design Team Members. I can't wait to see what they created!!


Thank you so much for stopping by today and I hope you have a wonderful day!!

Hugs & Smiles,
Heidi

Friday, October 15, 2010

JustRite & Flowersoft Friday Challenge

Good morning! Today, is the Friday Challenge on the JustRite Blog and the challenge is to create a Fall project using the Fall colors from Flowersoft. I really like using Flower Soft , it really adds a lot of texture and detail to your projects. Have you tried the NEW Ultra Fine Flower Soft? I am loving the Ultra Fine!!

I created a couple of projects for today's Fall colors from Flowersoft Challenge. I love creating fun little shape cards and the S4-227 Pumpkins die template from Spellbinders™ is perfect for making a shape card. Then once I colored and added the image from CL-02000 Hangin' Around from JustRite Stampers and the Fall colors from Flowersoft I was able to create a fun little Fall pumpkin shape card. I also created a pumpkin to use as part of a Fall table-scape. Once the pumpkin was made I added some Flowersoft and a tag with a JustRite sentiment for a perfect finishing touch.

Here's the details on how I created the card. I started by stamping the scarecrow image from the NEW CL-02000 Hangin' Around stamp set from JustRite Stampers with Rich Cocoa ink. Then I colored the image with Copic markers. Next I added Chestnut Roan ink to the inside of the S4-112 Classic Ovals Small die template to create a reverse stencil around the outer edge to the diecut. Then I started to add the different Fall colors of Flowersoft to the image. I used Ultra Fine Toffee on the corn stalks.Next I added Ultra Fine Sage for the grass.I also wanted to give the look of fallen leaves so I added Autumn Flowersoft in a few places. I think the Autumn Flowersoft really finishes the Fall look!Here is a close up of the pumpkin shape card. To create a shape card leave the die template just slightly off the fold and tape to hold in place. I used Core'dinations cardstock and sanded the edges to make the embossing pop. I added Ultra Fine Toffee Flowersoft to the stem of the pumpkin, added a bow with some twill and popped up the image using 3D Foam Squares from SCRAPBOOK ADHESIVES By 3L™.On the inside of the card I stamped a sentiment from JB-09800 Nature Nested Sentiments & Verse with Rich Cocoa ink and added a few pearls.Here is a close up look at the Flowersoft on the scarecrow image. I love the added texture!

Supplies for Card:
Stamps: JustRite Stampers CL-02000 Hangin' Around, JB-09800 Nature Nested Sentiments & Verse, JB-09520 Clear Horizontal Stamper (1-3/8'' x 2-1/2'')
Dies & Punches: SpellbindersGrand Calibur™, S4-112 Classic Ovals Small die # 5, S4-227 Pumpkins die #5
Paper: Core'dinations Orange; Neenah Classic Crest Solar White
Inks: Tsukineko Memento Rich Cocoa; Clearsanp Chestnut Roan; Copic Markers
Accessories: Flowersoft Glue, Toffee, Sage, Autumn; SCRAPBOOK ADHESIVES By 3L™ 3D Foam Squares; Twill, Pearls, Sanding Block

I also created a darling little three dimensional pumpkin to use as part of a tablescape. I used the Grand Calibur™ and LF-124 Grand Scalloped Circles die #2 from Spellbinders™ to create the pumpkin. I cut/embossed and sanded five scalloped circles and adhered each of them together. Then I added the stem and vines. I used Glimmer Glam Chandelier on the vines and then added Iridescent Gold Glimmer Mist from Tattered Angels to the entire piece. I added Toffee Flowersoft to the Stem and Sage to the vine. I also took one of the Flowersoft wires, cut it in thirds, added glue and Sage Flowersoft and set aside to dry. Once the wires were dry I made curly vines and glues them in place. I also created a tag to go with the pumpkin using JB-09800 Nature Nested Sentiments & Verse and JB-09520 Clear Horizontal Stamper (1-3/8'' x 2-1/2''). I used Rich Coco ink to stamp the sentiment and inked around the edges. Then I added some twill and tied the tag to the pumpkin.

Supplies for Pumpkin:
Stamps: JustRite Stampers JB-09800 Nature Nested Sentiments & Verse, JB-09520 Clear Horizontal Stamper (1-3/8'' x 2-1/2'')
Dies & Punches: Spellbinders™ Grand Calibur™, LF-124 Grand Scalloped Circles die #2, S7-017 On The Vine Grand Border, S3-030 Tag Shape Three
Paper: Core'dinations Orange, Brown, Green
Ink: Inks: Tsukineko Memento Rich Cocoa; Ranger Shabby Shutters (green)
Accessories: Flowersoft Glue, Wire, Sage, Toffee; Tattered Angels Glimmer Glam Chandelier, Glimmer Mist Iridescent Gold; SCRAPBOOK ADHESIVES By 3L™ Crafty Power Tape, 3D Foam Squares; Twill, Sanding BlockThanks so much for stopping by today and don't forget to hop on over the JustRite Blog to check out all of the details for this weeks challenge. I hope you will play along and you also have a chance to win a great prize!! Hope you have a Wonderful Day!!!

Hugs & Smiles,
Heidi

Demo at Scrapping On The Go!!

Hello! I wanted to do a quick post and let all of you local ladies know I will be at Scrapping On The Go tomorrow demoing the NEW Grand Calibur™ from Spellbinders™ and you will also be able to see the NEW Spellbinders™ Grand Nestabilities™ and all of the other NEW Die Templates.

I am very excited to be demoing the NEW Grand Calibur™!! I love the New Machine and working with the New Grand Nestabilities!! So many possibilities!!!

After the demo I will be doing a make-n-take where you can create a beautiful Fall pin to keep and wear yourself or give as a little gift.

~Demo~
NEW Grand Calibur™ and NEW Grand Nestabilities™ from Spellbinders™
Saturday, Oct 16th 11:00-12:30

~Make-n-Take~
Beautiful Fall Pin
Following Demo

Click HERE to check out all of the details!!

I hope to see you tomorrow!! Thanks for stopping by today--check back real soon--I have some new creative art to share!

Hugs & Smiles,
Heidi

Monday, October 11, 2010

Creating Memories In Time Blog Hop Winner (Huge Bag of Prima Flowers), Photos from the Memory Expo & Photos from this weekend

Good morning!! I hope you had a wonderful weekend. I have several things to share with you today--the CMIT Blog Hop Winner, Photos from the Memory Expo and a few photos from this weekend.

First I want to Congratulate the WINNER for the CMIT Blog Hop!!

Pam and Presley said...AWESOME! I absolutely LOVE this card, the colors the black vine going all around the card and the beautiful vintage Halloween scene.
Thank you so much for sharing
Pam
pamandrandy@gmail.com
October 8, 2010 5:49 PM

Pam and Presley said...I also wanted to thank CMIT and all your designers for a great blog shop I had a lot of fun and thank you for a chance to win an AWESOME prize of the gorgeous
flowers I am a flower NUT!!!
Thank you
Pam
pamandpresley
October 8, 2010 5:54 PM

This was also posted on the CMIT Blog and we want to thank everyone who participated!! Also as a reminder ATC Tuesday will begin on October 12th so come take a look at the CMIT blog to see what the design team creates, play along to win a prize. Thanks!!

Next, I want to share some pictures with you from the Midland Care Memory Expo. The Expo was held in Topeka, Kansas Oct 1-2. One of the best things about the Memory Expo was getting to see my dear sweet friend Karen Taylor! We talk almost everyday but it has been almost 2 years since we have seen each other! It was so wonderful to spend the weekend with her!! Karen & I had asked if we could share a room together and we had these fun gift bags from Jennifer Friedley filled with all kinds of goodies waiting for us! This shot is from the Memory Expo VIP reception on Friday evening. Amazing and Very Talented Industry Personalities from left to right: Brooke Smith, Associate Editor of CardMaker magazine, Heidi Blankenship (me) crafter/teacher, Nikki Sivils owner of Nikki Sivils Scrapbooker papers, Kristi Van Doren crafter/teacher, Trudy Sjolander crafter/teacher, Karen Taylor crafter/teacher, and last but not least, Tanya Fox, Editor of CardMaker Magazine. Here is a photo with Tanya Fox. We have seen each other several times at the CHA shows but have never really had a chance to just sit down and visit and we were able to do that. What a wonderfully sweet lady!! Here's a couple of pictures from one of the classes I taught. The Memory Expo was such a wonderful experience and I met soooo many talented ladies!!

Are you still hanging in here with me? LOL! I know lots of info for one post! I wanted to share a lot of this with you last week but things just kept coming up and life happens. :)

I also wanted to share with you the projects from one of my classes. We created a Vintage Halloween "Boo" Banner and 2 quick Halloween Card.Here is some close up pictures of the cards and each piece from the banner.Supplies
Paper: My Mind's Eye Blackbird Argyle; The Paper Company Black, White, Orange, Yellow, Purple, Green
Ink: Tsukineko Memento Tuxedo Black Ink
Dies: Spellbinders™ Grand Calibur™, S4-126 Classic Squares die #3, S4-301 Labels Sixteen die #3, S4-280 Halloween Fence Scene and Shapes, S4-282 Witches' Brew, S4-277 Nested Bats
Accessories: Crafty Secrets Halloween Greetings Creative Scraps; SCRAPBOOK ADHESIVES By3LCrafty Power Tape, 3D Foam Squares; Joann's Buttons, Ribbon, Thread; Ranger Lime, Orange Peel Stickles; Black Crepe Paper

I have to say a HUGE "Thank You" to several companies that helped sponsor and donate products for the classes and make-n-takes: Spellbinders™, JustRite Stampers, Crafty Secrets, My Mind's Eye, SCRAPBOOK ADHESIVES By 3L™, Heartfelt Creations and Elizabeth Crafts Designs.

Ok, just one more things---LOL! I took a few pictures of my oldest son this weekend for his senior pictures until we can decided for sure on which photographer we are going with.I have to tell you earlier this summer we were driving out in the country and I thought it would be really cool to have some pictures of my son with his drum set outside and I had to laugh when one day he said--hey mom do you think it would be possible to take some pictures with my drum set outside? I think that would be so cool!! He LOVES this one! *wink*Yes, those are real Texas Longhorns in the background! It was interesting working around them--LOL!Ok, taking this one kind of freaked me out!---LOL!
OMGosh I think this is the longest blog post ever--LOL!!! I just had a lot to share and thanks for letting share it with you!! Thanks so much for stopping by today and I guess I better get busy and create something! I hope you have a Wonderful Day!!

Hugs & Smiles,
Heidi

LinkWithin

Related Posts Plugin for WordPress, Blogger...