Friday, June 30, 2017

The Stamp Simply Ribbon Store - Distress Oxide Ink Backgrounds and Stamping with Water Tutorial

Hello everyone and happy Friday!  Today, is my day to post for The Stamp Simply Ribbon Store and I have a fun, easy, and inky tutorial to share with you using some of the Tim Holtz Distress Oxide Inks.  These inks are fantastic for backgrounds!  


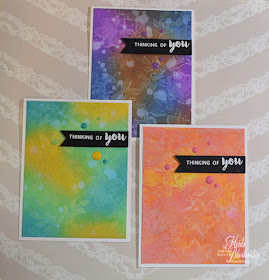
Here is a look at the cards I designed.  You can click on the image to enlarge the picture and see more detail.  I wanted to play around with a few color combinations so I couldn't just make one card lol.  For two of the cards (the top and left cards) I did ink blending and for the card on the right I did some ink smooshing--now there is a technical term for you lol.  So you can create this background with ink blending or ink smooshing.  It just depends on the look you like.


For the first card I did ink blending on the smooth side of Ranger Watercolor Paper,  I used  Tim Holtz Distress Oxide Inks Fossilized Amber, Broken China, and Cracked Pistachio.  I used ink blenders to get a nice smooth blend.


I am using one of the stamps from the Altenew - Floral Shadow clear stamp set.  To wet the stamp I used water.  I hold the stamp about 6 inches away and I spray four times with the  Distress Sprayer Bottle.  If you have a different spray bottle you'll have to text it out and see how many times you need to spray the water to get a good coverage on the stamp.


Once I spray the stamp with water I stamp it onto the paper and I hold it in place for about 10 seconds.  This way the water has a good chance to soak into the ink and paper.  Doing this will remove some of the ink so be sure to use a baby wipe to clean the stamp in between each time of stamping.  Once you have all of the stamping done use a heat tool to heat set the ink and dry the paper. Easy peasy!


Here is a close up of the finished card.  The sentiment is also from the same stamp set.  I used VersaMark Ink to stamp the sentiment onto a piece of black cardstock.  Then I add Ranger Super Fine White Embossing Powder and used a heat tool to melt and heat set the powder.  I cut the sentiment into a strip and then fussy cut out a notch to make a banner end.  I added some Foam Tape to the back of the sentiment to pop it up a little.  I used a variety of enamel dots from My Mind's Eye Record It "Pretty Things"Simple Stories I AM, and Simple Stories Enchanted on all three cards. Then I added the card front to a white A2 top folding card.


For the second card I did the ink smooshing technique and I added ink to my craft mat and sprayed it with water.  I used Tim Holtz Distress Oxide Inks - Worn LipstickSpiced Marmalade, and Fossilized Amber.  Next just smoosh, drag, or tap down your piece of paper in the inks. Use a heat tool to dry the ink and your paper.  You can do this step as many times as you would like as long as you heat set your paper in between the layers of ink.


Here is a look at the paper once all of the inking is done.  I love all the layers of color!  To finish the background do the stamping with water just like the first card.


Here is a look at the finished card.


Here is a look at the background after the stamping is done.


 I wanted to add some water droplets so I used the Distress Sprayer Bottle.  If you squeeze the trigger slowly and halfway you will create larger water droplets.  Let the water sit on top of the paper for a few seconds and then use a paper towel to blot up the water and used a heat tool to dry the paper.


Here is a look at the last card.  Stamping with water--it couldn't be any easier.  Now, I want you to know I am not the first person to do this technique.  You can also do this technique with Distress Inks.  Bold images seem to work best.  You can add less water for a crisper stamped image or more water for a watercolor look.  Its up to you--have fun playing with your inks!

Thanks so much for joining me today and I hope you liked the tutorial.  To see more inspiration you can visit the Stamp Simply Blog.  Also check out The Stamp Simply Ribbon Store for inks, stamps, dies, paper and all kinds of paper crafting goodies.

Hope you have a wonderful weekend!

Hugs & Smiles,
Heidi


Supplies
Stamps:  Altenew - Floral Shadow
Paper:  Ranger Watercolor Paper, Cardstock - White, Black
Inks:  Tim Holtz Distress Oxide Inks - Worn Lipstick, Spiced Marmalade, Fossilized Amber, Broken China, Cracked Pistachio, Faded Jeans, Wilted Violet, Vintage Photo, VersaMark Ink
Accessories:  Distress Sprayer Bottle, EK Success Powder Tool, Ranger Super Fine White Embossing Powder, My Mind's Eye Record It "Pretty Things" Enamel Dots, Simple Stories I AM Enamel Dots, Simple Stories Enchanted Enamel Dots, Scrapbook Adhesives by 3L E-Z Runner, Foam Tape, Heat Tool

Friday, June 23, 2017

The Stamp Simply Ribbon Store - 2017 SUMMER Coffee Lovers Blog Hop

Hello everyone and happy Friday!  Today, is my day to post for The Stamp Simply Ribbon Store and I am also participating in the 2017 SUMMER Coffee Lovers Blog Hop.

If you would like to play along create a card with coffee, tea &/or cocoa images and then visit the Coffee Lovers blog and link your card.  It's always fun to see all of the cards and you will have a chance to win some fabulous prizes!  The Stamp Simply Ribbon Store is one of the Super Sponsors with a $25 GC!

When: Friday, June 23 - Friday, June 30
Time: 6 am pacific
THEME: Summer
USE: coffee, tea &/or cocoa images

You can click HERE to find out all of the details about the 


Here is a look at the card I designed.  I used some of the fun images from the Altenew Coffee Love clear stamp set.  The background was done with Tim Holtz Distress Oxide Inks and I have a tutorial to share with you on how I created the background.


To start I inked up a piece of Ranger Watercolor Paper with Tim Holtz Distress Oxide Inks Vintage Photo and Walnut Stain.  I inked up the top portion of the paper with Vintage Photo and the for the bottom I used the Walnut Stain.  The inks meet and mix on a diagonal angle.


I used the  Tim Holtz Distress Sprayer to add some water droplets on the paper.  Adding the water will make the inks oxidize.  I used a paper towel to blot us the water drops and then used a heat tool to dry the paper.


Next, I smooshed the Oxide Inks Vintage Photo and Walnut Stain on my craft mat and used the Distress Sprayer to add the water.  I sprayed enough water until the ink started to bead up.


I smooshed the paper down in the ink and then used a heat tool to heat set and dry the inks.  I just kept repeating the process until I liked how the paper looked.  I think I smooshed the paper in the ink four or five times and and used a heat tool in between the layers of ink.  That is the beauty of the Tim Holtz Distress Oxide Inks because of the fusion of dye and pigment inks you can layer the inks and they won't muddy up--as long as you heat set in between the layers.  I wanted to add the water droplets to the paper first and then do the ink smooshing to have the different colors and layers of inks on the paper.  Doing this creates more depth and interest to the background. I love creating background with these inks!


I did some masking and stamped the coffee pot and cups using Memento Tuxedo Black Ink on to a piece of white Copic friendly paper.  The Copic markers I used are also in the link list below.  I used one of the dies from the Spellbinders Celebrations Die - Pierced Rectangles set to die cut the rectangle shape.


I used Memento Tuxedo Black Ink to stamp the sentiment from the Altenew Coffee Love clear stamp set.  I added a few Webster's Pages Sequin Mix - Party Time by the sentiment.  I also added a little bit of sparkle with the Zig Wink of Stella Clear Glitter Brush Pen on the little heart and black border on the cups.  Then I added Ranger Glossy Accents on top of the Wink of Stella.


Here is a close up look at the background paper.  You can also click on any of the images to make them bigger and see more detail.  As you can see from the picture I also added some blue ink splatters.  I smooshed the Tim Holtz Distress Oxide Ink Broken China onto my craft mat and then added some water and used a Watercolor Brush to flick on the color.  I also did this on the paper with the colored images but I didn't want to have any of the color on the images so I reapplied the masks and then added the color.


To finish off the card I added some  May Arts 1/4'' Teal Silk Ribbon to a couple of the corners.  Then I added Scrapbook Adhesives by 3L Foam Tape to the back of the colored image and the background and then layered the two pieces together.  I added the card front to a black A2 top folding card and that finished it.

I hope you enjoyed today's card share and tutorial on the background.  If you would like to play along with the 2017 SUMMER Coffee Lovers Blog Hop you can click HERE for all of the details.

Thank you so much for stopping by today and I hope you have a wonderful weekend!

Hugs & Smiles,
Heidi


Supplies
Stamps:  Altenew Coffee Love
Paper:  Ranger Watercolor Paper, Cardstock - White, Black
Ink/Markers:  Tim Holtz Distress Oxide - Vintage Photo, Walnut Stain, Broken China, Memento Tuxedo Black Ink, Copic Markers - E23, E34, E29, B000, BG000, BG53, BG72, RV00, R85, W1, W2, W3, C0, C1, Zig Wink of Stella Clear Glitter Brush Pen
Dies:  Spellbinders Celebrations Die - Pierced Rectangles
Ribbon:  May Arts 1/4'' Teal Silk Ribbon
Accessories:  Tim Holtz Distress Sprayer, Ranger Glossy Accents, Webster's Pages Sequin Mix - Party TimeScrapbook Adhesives by 3L Foam TapeWatercolor Brush

Friday, June 16, 2017

The Stamp Simply Ribbon Store - Make a Wish Shaker Card

Hello everyone!  Today, is my day to post for The Stamp Simply Ribbon Store and I have a fun and sparkly shaker card to share with you.


This is a pretty quick and easy shaker card to create and this could be used with many different dies and paper collections.  All of the pattern paper is from the Simple Stories Enchanted 6 x 6 Paper Pad.  I love the pastel colors in the paper pad.  To start I picked out a couple sheets of the paper.  I wanted to have the stripes for the front of my card and the polka-dot paper for the back of the shaker.  I used the Spellbinders Celebrations Die - Pierced Stars to cut the star shape into the stripe paper.  Next, I added a piece of Hot Off The Press Heat Resistant Acetate to the back side of the paper.  Then I added Crafty Foam Tape White to the backside of the acetate.  I doubled up the foam tape so the sequins would have more room to shake around.  I used the foam tape to build a wall/window around the star.  When you do this make sure the pieces of foam tape are right next to each other so your shaker bits won't fall out.  I added Tiny Silver Star Sequins and some of the sequins from the My Mind's Eye On Trend "Happy" Sequins.  To finish off the shaker I added the polka-dot paper to the back.  Make sure you have all areas of the paper pressed down on to the foam tape before you shake your shaker card.


Here is a close up of the shaker.  I fussy cut some of the words and the make a wish sentiment from the same paper pad and added them to the card with Crafty Foam Tape White.


Along the sides of the card front I added some Ranger Glossy Accents and then sprinkled on some  Tim Holtz Distress Glitter - Clear Rock Candy and Stampendous Crystal Glitter Multi Ultra Fine.  I added some Zig Wink of Stella Clear Glitter Pen to all of the cut out words and the sentiment.  I also added a few more of the Tiny Silver Star Sequins to the card front.


To finish off the card I added the shaker to a white A2 top folding card base.  

I hope you enjoyed today's card share.  If you would like to see more card inspiration I encourage you to check out the Stamp Simply Blog.  You can also check out The Stamp Simply Ribbon Store for a wonderful selection of paper crafting goodies.

Thanks so much for stopping by today and I hope you have a wonderful weekend!

Hugs & Smiles,
Heidi

Supplies
Paper:  Simple Stories Enchanted 6 x 6 Paper Pad, Hot Off The Press Heat Resistant Acetate, Cardstock - White
Dies:  Spellbinders Celebrations Die - Pierced Stars
Accessories:  Tiny Silver Star Sequins, My Mind's Eye On Trend "Happy" Sequins, Tim Holtz Distress Glitter - Clear Rock Candy, Stampendous Crystal Glitter Multi Ultra Fine, Ranger Glossy Accents, Scrapbook Adhesives by 3L E-Z Runner, Crafty Foam Tape White, Zig Wink of Stella Clear Glitter Pen

Tuesday, June 13, 2017

Stamp Simply Clear Stamps Inspirational Video

Hello everyone!  I have something a little different, fun, and inspirational to share with you today.  Darsie Bruno from The Stamp Simply Ribbon Store Design Team made a fabulous video showcasing all of the wonderful projects designed using the Stamp Simply Clear Stamps.

Inspirational Card Ideas
featuring designs from
The video is filled with 64 beautiful projects!!

You can watch the video here on my blog or you can click HERE to go directly to the video on YouTube.  Please leave Darsie a little love.  She did an amazing job on the video!!


You can click HERE to check out all of the Stamp Simply Clear Stamps.  The stamp sets are filled with wonderful verses and sentiments.

You can also take a look at the online catalog by clicking HERE.

I hope you enjoyed the video and you were inspired!  I encourage you to check out the Stamp Simply Blog to see even more inspiration from the design team.  Thanks so much for stopping by!

I hope you have a beautiful and creative day!

Hugs & Smiles!
Heidi

Friday, June 9, 2017

The Stamp Simply Ribbon Store - Congratulations Kraft and Gold Card

Hello everyone and happy Friday!  Today, is my day to post for The Stamp Simply Ribbon Store and I have a card to share with you that features the kraft color.


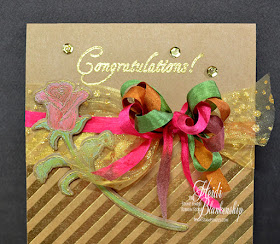
Here is a look at the card I designed.  I have to tell you--I had the idea to create a card using kraft on kraft and I do like the card IRL (in real life) however it was very hard to capture the card in a photo. But I do love the combo of the kraft paper with the gold foil and embossing.


To start I used the EK Powder Tool to brush across the paper.  Doing this will help the embossing powder stick just to the area that you want it to.  Then, I stamped the image of the rose from the  Stamp Simply Clear Stamps - Thinking of You Rose SS-015 stamp set using VersaMark Ink.  I added Ranger Super Fine Gold Embossing Powder to the embossed image and then used a heat tool to melt and heat set the powder.


I used a Wink of Stella Clear Glitter Brush Pen and Distress Oxide Inks -Worn LipstickFired Brick, and Cracked Pistachio to color the image.  Make sure to scribble the pen on a piece of scratch paper to remove the color in between each color and once you are done with the pen.


To die cut the rose I used the Stamp Simply Steel Dies - Rose SS-002.  The base of the card is a kraft A2 top folding card.  On the bottom half I added a piece of the kraft and gold foil stripe paper from the Bazzill Kraft Foil 6 x 6 paper pad.  Then I added May Arts 1.5" Sheer w/Glitter Dots and May Arts Variegated Silk Ribbon.  I just love the variegated ribbon--it's so pretty!  To finish off the card I stamped and embossed the sentiment and added a few 5mm Gold Sequins.  The sentiment is from the Stamp Simply Clear Stamps - Wedding Wishes SS-001 stamp set.


Thanks so much for joining me today!

To see more inspiration from the design team be sure to stop by the Stamp Simply Blog.  If you are looking for any paper craft goodies to add to your stash be sure to check out The Stamp Simply Ribbon Store.

Hope you have a wonderful weekend!

Hugs & Smiles,
Heidi


Supplies
Stamps:  Stamp Simply Clear Stamps - Thinking of You Rose SS-015, Wedding Wishes SS-001
Paper:  Bazzill Kraft Foil 6 x 6 paper pad, Kraft Cardstock
Ink/Pens:  VersaMark Ink, Distress Oxide Inks -Worn Lipstick, Fired Brick, Cracked Pistachio, Wink of Stella Clear Glitter Brush Pen
Dies:  Stamp Simply Steel Dies - Rose SS-002
Ribbon:  May Arts 1.5" Sheer w/Glitter Dots,  May Arts Variegated Silk Ribbon
Accessories: 5mm Gold Sequins, EK Powder Tool, Ranger Super Fine Gold Embossing Powder, Scrapbook Adhesives by 3L E-Z Runner, 3D Foam Squares 

Thursday, June 8, 2017

U-Paint Metal Crafts - Acanthus Leaf Scroll Cuff Bracelet with Tutorial

Hello everyone!  Today, I am excited to share my first U-Paint Metal Crafts® project with you.   If you are not familiar with UPMC I encourage you to visit their website.  They have over 300 U-Paint Metal Craft Kits to choose from.  The metal pieces are designed for all Designers, Artists, Makers, DIY Crafters/Hobbyists. The detail on the designs is amazing! The metal pieces can be used for mixed media, home decor, altered art, and even jewelry.  If you have been following my blog for any length of time you know I love to design jewelry.  So it shouldn't be any surprise that my first project is a jewelry piece--and I have to say I love how it turned out!  I also have a step-by-step tutorial to share with you.


Here is a look at the cuff bracelet I designed using a piece of the Acanthus Leaf Scroll Brass Deco - Trim U-Paint Metal Crafts®.  This leaf scroll design is so beautiful!
All supplies are listed and linked below.  :)


1)  To start, cut a piece of the Acanthus Leaf Scroll Brass Deco - Trim to the desired length.  The length will depend on the size of bracelet you would like to make.

2)  Using a metal file smooth the edges on each end of the metal trim piece.

3)  Then wash the metal piece with warm soap and water to remove any dust and oil.


4)  Using a Vintaj™ Filigree Shaping Pliers bend and shape the piece of metal trim to form the shape of the cuff bracelet. 


5)  Use Krylon© White Matte Spray Paint to paint all sides of the bracelet.  Be sure to paint the edges too.  The backside of the bracelet will feel a little rough at first but with a couple coats of paint it smooths out.


6)  Using a sponge apply Tonic Studios© NUVO® Embellishment Mousse, 822N Pacific Teal and 807N Aquamarine.  If you haven't used the embellishment mousse before it is very easy to work with. It is smooth and creamy--kind of like whipped butter.  For the best coverage pounce the sponge onto the bracelet instead of trying to wipe it on.

7)  Set aside to dry or use a heat tool to speed up the drying time.  If you use a heat tool please be careful as the metal will become very hot.  So allow the piece some time to cool.


8)  Next, use a piece of Steel Wool Grade #0000 to sand and buff back the paint until some of the metal is revealed.  When working with steel wool you might want to wear a mask.  When sanding the steel wool creates a lot of tiny fibers.  


9)  To add the glitter apply a small amount of Beacon Adhesives©, Gem-Tac™ using a Mini Applicator Disposable Adhesive Brush.  If you don't have one of these applicators you can use a small paint brush.  Just be sure to wash the brush right away so the adhesive doesn't dry.  Then sprinkle on some Tonic Studios© NUVO® Pure Sheen Glitter, 720N Champagne.  Whenever I used glitter I use a coffee filter to catch the excess and then it can easily be funneled back into the container.

10)  Set aside to dry.  If you end up with too much glitter in a certain area wait for the adhesive to dry and then gently rub off the excess glitter with your fingers.


11)  Use a toothpick to apply the Beacon Adhesives©, Dazzle Tac Jewelry Glue™ and then add the ButterBeeScraps, SS16 Aquamarine Flat Back Crystals.  Set aside to dry.


12)  For the final step, mix a small amount of ICE Resin®.  Mix ICE Resin® according to the instructions. Then use a brush to apply a thin layer of resin. Be sure not to add resin on top of the crystals, but you can apply it around the edges to secure the crystals even more.  Set aside on a ICE Resin® Studio Sheet to harden and cure.  Approximately 6-8 hours.


If you like to create jewelry this is a really great project and it would make a wonderful gift--for yourself or a friend.  The leafy scroll design is so beautiful!


This aqua blue color is very on trend right now.  I love all of the sparkle from the glitter and crystals.


I hope you enjoyed the step-by-step tutorial.  Don't forget to check out all of the fabulous metal pieces and kits in the U-Paint Metal Crafts® online store.  If you are an Amazon shopper some of the metal kits are also available there.  
Thanks so much for stopping by today!

Hugs & Smiles,
Heidi

Are you interested in the products I used?  I have all of the supplies listed and linked below.  Compensated affiliate links are used when possible.  Products with an asterisk (*) were provided by a store or the manufacturer.
U-Paint Meatal Crafts = UPMC
ButterBeeScraps = BBS
Amazon = AZ
The Stamp Simply Ribbon Store = TSSRS
Tonic Studios = TS
Simon Says Stamp = SSS

Etsy = ET

Supplies
UPMC:  
*Acanthus Leaf Scroll Brass Deco - Trim U-Paint Metal Crafts® (UPMC), (AZ)
Tonic Studios©:  
*Tonic Studios© NUVO® Embellishment Mousse, 822N Pacific Teal (AZ)
*Tonic Studios© NUVO® Embellishment Mousse 807N Aquamarine (AZ)
*Tonic Studios© NUVO® Pure Sheen Glitter, 720N Champagne (AZ)
Adhesive:  
*Beacon Adhesives©, Gem-Tac™ (AZ)
*Beacon Adhesives©, Dazzle Tac Jewelry Glue™ (AZ)
Resin: 
*ICE Resin® (IR), (AZ)
*ICE Resin® Mixing Cup & Stir Stick (IR), (AZ)
*ICE Resin® Brushes (IR), (AZ)
*ICE Resin® Studio Sheets (IR), (AZ)
Accessories: 
*ButterBeeScraps, SS16 Aquamarine Flat Back Crystals (BBS)
Paint:  
Krylon© White Matte Spray Paint (AZ)
Tools:  
Metal Snips (AZ)
Vintaj™ Filigree Shaping Pliers (AZ)
Metal Jewelry File (AZ)
Sponge (AZ)
Steel Wool Grade #0000 (AZ)
Coffee Filter (AZ)
Mini Applicator Disposable Adhesive Brush (AZ), (SSS)
Heat Tool (AZ)
Disposable Face Mask (AZ)
Toothpicks (AZ)