Thursday, April 30, 2015

ButterBeeScraps Pink and Bronze Filigree Flower Necklace

Hello everyone!  Today, I have a beautiful necklace and earring set to share with you.


I thought this would be a fun set for summer.  Bronze with just a touch of pink.  
Pretty but not over the top. 


For the necklace I layered Bronze Filigree Embellishment (Item #022-B)-Lg Flower and Bronze Tibetan Style Charms (Item #J071-B)-Sm Flower.  I used a combination of Lumiere-Pearl Magenta and Vintaj Patina-Quartz paints to add just a touch of pink.  


For a little bling I added Clear AB SS12 Flat Back Crystal Rhinestones to the center of the flower.


I created a beaded dangle to hang from the smaller flower.  I used 4mm Pink Bicones, 8mm Pink Round Crystal Beads, Pink Flower Bead Caps, Clear Rhinestone Rondelle Spacer Beads - 6mm (Item #BD006-B/CL)Bronze Filigree Bead Caps (Item #CAP052-B), and Bronze Ball End Head Pins to create the dangle.


For the earrings I used the Bronze Tibetan Style Charms (Item #J071-B)-Sm Flower.  I used the same paints and creating the same beaded dangles like the one on the necklace.


I love how this set turned out.  Like I said pretty but not over the top and a lovely set that can either go with a casual outfit or dressed up.


If you love making jewelry or using metal filigrees, charms and bling in your art projects please be sure to check out ButterBeeScraps.

Thanks so much for stopping by today!

Hugs & Smiles,
Heidi


Supplies
ButterBeeScraps:  Bronze Filigree Embellishment (Item #022-B)-Lg Flower, Bronze Tibetan Style Charms (Item #J071-B)-Sm Flower, Clear AB SS12 Flat Back Crystal Rhinestones, Bronze Ball End Head PinsClear Rhinestone Rondelle Spacer Beads - 6mm (Item #BD006-B/CL)Bronze Filigree Bead Caps (Item #CAP052-B)
Other Supplies:  4mm Pink Bicones, 8mm Pink Round Crystal Beads, Pink Flower Bead Caps, French Hooks, Chain, Jump Rings, Lobster Clasp, Glossy Accents, E6000, Lumiere-Pearl Magenta, Vintaj Patina-Quartz, Steel Wool, Krylon Sealer

Monday, April 27, 2015

Welcome Baby Boy - JustRite Papercraft & ButterBeeScraps

Hello everyone!  Today, I have a baby card to share with you.  It seems like it has been awhile since I have had to make a baby card.  My husband's work supervisor and his wife just recently just welcomed a sweet baby boy into their family.


Here is the baby boy card that I designed.  I just love this stork image!  I used the CR-04815 Special Delivery Clear Stamps from JustRite Papercraft.  I stamped the image and sentiment on to white cardstock using Memento Rich Cocoa ink from Imagine Crafts/Tsukineko.  Then I colored the image using Spectrum Noir Markers.  After I had all of the coloring done then I die cut the image and a mat using Spellbinders SCD-012 Pierced Rectangles.  The base of the card is white with blue and white layers for mats.  I also used CL-02077 Shooting Stars Cling Stitched Background Stamp and Memento Sky Blue ink to stamp the background and then I inked the edges of the paper too.  I used Bronze Filigree Connector 004-B from  ButterBeeScraps to accent the corners around the focal image.  I added a few white pearls to cover the holes in the connectors.


Here is a close up of the Bronze Filigree Connector 004-B.


I wrapped some twine around the card and tied it into a bow.  I added a charm from the Be Inspired Charm Collection and a Silver Rattle Charm.  I attached the charms using Bronze Jump Rings.  All of the metal filigree and charms are from ButterBeeScraps.


Here is another close up of the stork.  I used 3D Foam Squares from Scrapbook Adhesives by 3L in between the paper layers for some dimension.

A Huge Congrats to Mommy, Daddy and Baby!!

On another note I will be posting an update about my recent Joann.com haul tomorrow (Tuesday).  I know a lot of you were wanting to know what kind of response I received.

Thanks so much for stopping by today!

Hugs & Smiles,
Heidi


Supplies
Stamps:  JustRite Papercraft CR-04815 Special Delivery Clear StampsCL-02077 Shooting Stars Cling Stitched Background Stamp
Paper:  White, Swiss Dot Blue
Ink:  Imagine Crafts/Tsukineko Memento Rich Cocoa, Memento Sky Blue; Spectrum Noir Markers
Dies:  Spellbinders SCD-012 Pierced Rectangles
Accessories:  ButterBeeScrapsBe Inspired Charm Collection, Bronze Jump Rings, Silver Rattle Charm, Bronze Filigree Connector 004-B, Twine, White Pearls, Scrapbook Adhesives by 3L 3D Foam Squares, E-Z Runner Permanent Strips-Refillable Dispenser 49'

Saturday, April 25, 2015

Joann.com Online Haul - Disappointed - Frustrated!!!

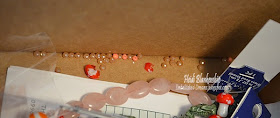
First of all let me say YES, this is going to be a bit of a rant and I am sorry--I have never done a blog post like this before.  BUT right now I am feeling so DISAPPOINTED and FRUSTRATED with Joann.com!!!  I place an order with Joann.com and I was sent the biggest tangled mess you could imagine!!  I place a very large order online and it was mostly beads.  THIS is what the box looked like when I opened it up!!!  UNBELIEVABLE!!!!!


SERIOUSLY!?!?!  Almost all of the beads were glass or porcelain.  Have they ever heard of bubble wrap???  Or any kind of packaging material for that matter?  


Strands of beads busted and broken--lots of bits and pieces in the bottom of the box.  This is just a small corner of the box.


And then there is this tangled mess!!!  If you have ever had strands of beads tangled you know what kind of nightmare this can be!!


Here is just a small part of the tangled mess.


I spent over an hour and a half going through everything in the box and trying to untangle it.  This doesn't include the time it took to take all of the pictures.  Some of the strands of beads were in such a tangled mess I had to cut them apart.


Out of 35 strands of beads 9 were either chipped, scratched or busted!!  Now I know some of the chips and scratches are small and may not seem like that big of a deal BUT if you were to go and buy a finished jewelry piece it would be unexceptionable for it to have scratches and chips--right???  I make a lot of jewelry and I CAN'T use beads like this!!!


Isn't this lovely?  An empty string.  These beads were tiny and most of them are not even in the bottom of the box.  I am guessing they must have fallen out of the little holes in the box during shipping.  


Now for the real kicker!!!  Not ONE BUT...


TWO completely EMPTY BAGS!!!!!

FOR REAL!?!?!?!

Like I said I am SO DISAPPOINTED AND FRUSTRATED with Joann.com!!!!

This is just completely ridiculous and SO unprofessional!!!  I can't believe when they are shipping glass items they didn't use one little bit of packaging material.  What were they thinking???  Believe me I will be calling customer service first thing Monday morning!!  Yes, I know there is an 800 number that I could call over the weekend--but I want to speak to someone in management and I am sure they won't have anyone there during the weekend.  I expect them to make this right!!!!  If you have hung in here until the end I am sorry for the long rant but I think this needed to be said!!  I will keep you posted!

Thanks for stopping by today!

Heidi


Friday, April 24, 2015

Stamp Simply Ribbon Store - Spread Your Wings Card

Hello everyone! Today, is my day to post for The Stamp Simply Ribbon Store and I have a beautiful CAS (Clean And Simple) card with golden highlights to share with you.  Anything gold is so on trend right now--embossing, sequins, foil, and papers just to name a few.


Here is the card that I designed and it had a wonderful mix of gold embossing, sequins and mirror cardstock.  To start I used a couple of stamps from the CR-02149 Whisper of Wings Clear Stamps from  JustRite Papercrafts.  I stamped the feather and sentiment using VersaMark Ink on to white cardstock.  Then I used a heat tool and Ranger Super Fine Detail Gold Embossing Powder to heat emboss.  Next I used Spellbinders S4-489 Labels Forty-Seven  to create the die cuts.  To create another die cut layer I used Bazzill Gold Mirror Cardstock.


Here is a close up of the gold embossing and the die cuts.  For embellishments I added Crystal Iridescent - 10 mmCrystal Iridescent - 5 mmSequins - Gold - 5mm.  I think the sequins add jut the right amount of sparkle.


The card base is a light pink with a couple layers of rose and white cardstock.  I just love how this card turned out!

Thank you so much for stopping by!

Please be sure to check out The Stamp Simply Ribbon Store for all of the fantastic paper crafting products and the Blog for inspiration from the Design Team.

Happy Friday and I hope you have a wonderful weekend!

Hugs & Smiles,
Heidi


Supplies
Stamps:  JustRite Papercrafts  CR-02149 Whisper of Wings Clear Stamps
Paper:  Bazzill Gold Mirror Cardstock, Cardstock--White, Pink, Rose
Ink:  Ink:  VersaMark Ink
Dies:  Spellbinders S4-489 Labels Forty-Seven 
Accessories:  Ranger Super Fine Detail Gold Embossing Powder, Glossy Accents, Sequins- Crystal Iridescent - 10 mmCrystal Iridescent - 5 mmSequins - Gold - 5mmScrapbook Adhesives by 3L E-Z Runner Permanent Strips-Refillable Dispenser 49'

Monday, April 20, 2015

The Stamp Simply Ribbon Store - Butterfly Birthday

Hello everyone! Today, is my day to post for The Stamp Simply Ribbon Store and I have a CAS (Clean And Simple) card with lots of sparkle to share with you.


I stamped a border of butterflies down one side of the card.  I used the butterflies in each of these stamp sets--CL-02034 Butterflies Cling Stamps, CL-02136 Morning Glory Cling Stamps, CL-02137 Thank You Daffodil.  To stamp the butterflies I used three colors of ink,  Memento Nautical Blue, LuLu Lavender, New Sprout.  I stamped each butterfly one time with a different color of ink and then I inked the butterfly stamp a second time but I stamped on a piece of scratch paper to pull off some of the ink and then stamped on to the card base.  Doing this gives the appearance of a lighter shade of ink.  If you don't have many colors of ink this is a fun little trick to stretch your ink.


I applied the Zig Wink of Stella Clear Glitter Brush Pen to the butterflies to add some shimmer and sparkle.


For the Happy Birthday sentiment I used CR-02152 Best Wishes clear stamps from JustRite Papercrafts.  I used VersaMark Ink and Ranger Super Fine Detail Gold Embossing Powder and then used a heat tool to emboss the sentiment.  I added a strip of Bazzill Gold Mirror Cardstock along the side and then I also added a few Webster's Pages Party Time Sequins.  The card base is lavender.

Thank you so much for stopping by!

Please be sure to check out The Stamp Simply Ribbon Store for all of the fantastic paper crafting products and the Blog for inspiration from the Design Team.

Hugs & Smiles,
Heidi


Supplies
Stamps:  JustRite Papercrafts CL-02034 Butterflies Cling Stamps, CL-02136 Morning Glory Cling Stamps, CL-02137 Thank You Daffodil, CR-02152 Best Wishes
Paper:  Bazzill Gold Mirror Cardstock, Cardstock-White, Lavender
Ink:  VersaMark Ink, Memento Nautical Blue, LuLu Lavender, New Sprout
Accessories:  Zig Wink of Stella Clear Glitter Brush Pen, Ranger Super Fine Detail Gold Embossing Powder, Glossy Accents, Webster's Pages Party Time Sequins, Scrapbook Adhesives by 3L E-Z Runner Permanent Strips-Refillable Dispenser 49'

Tuesday, April 14, 2015

JustRite Papercraft - Tutorial Tuesday - Color Burst Tutorial Series 1

Hello everyone!  This is my week to post for  JustRite Papercraft  with a new Tutorial Tuesday.  For this week's tutorial I will be sharing with you the fun new Color Burst by Ken Oliver Crafts.  


You will be happy to hear that  JustRite Papercraft is now carrying Color Burst and Stick It Adhesive Sheets by  Ken Oliver Crafts!  I know so many people who are excited to try the new products!


I have both a video tutorial and a tutorial with step out pictures and instructions on the JustRite Inspiration Blog.  Over the next few weeks I will be doing a tutorial series using Color Burst and sharing with you all kinds of fun techniques, tricks and tips to create some beautiful projects.  In the first tutorial I will be sharing how to hand dye seam binding, create color mist spray, and quick and easy watercolor backgrounds.  You can click HERE to see the video and you can click HERE to check out the blog post.  There is also a Giveaway for a $20.00 Gift Certificate to the JustRite Papercraft Store--so be sure to check it out!

I hope you enjoy the tutorial with Color Burst!
Thanks so much for stopping by today!

Hugs & Smiles,
Heidi


Supplies
Stamps:  JustRite Papercraft CR-02172 Grand Handwritten Sentiments Clear StampsCR-02166 Stacking Sentiments Clear Stamps
Paper:  Strathmore Watercolor Paper, White Cardstock
Inks/Paints:  Ken Oliver Crafts Color Burst-Ultramarine Blue, Alizarin Crimson, Lemon Yellow, Orange, Pthalo Green; Memento Tuxedo Black, VersaMark, Ranger Distress Ink-Mowed Lawn
Dies:  Spellbinders S2-139 Sentiments 3SCD-012 Pierced Rectangles Dies
Ribbon:  Hug Snug Seam Binding Winter White (Hand Dyed)
Accessories:  ButterBeeScraps-Butterfly Filigree 769-B, Gold Rub-N-Buff, Ranger Gold Embossing Powder, Cartwright's Sequins-Saffron 5, 8, 10mm, Pink Potion 8mm, Tea Rose 5mm, Mermaid Green 5, 8, 10mm, Mixed Colors Iris 5, 6mm, Acrylic Flower, Acrylic Leaf, Stick It Adhesive Sheets, Water Bottle, Mini Mister

Friday, April 10, 2015

The Stamp Simply Ribbon Store - Golden Thank You Card

Hello everyone! Today, is my day to post for The Stamp Simply Ribbon Store and I have a beautiful card that is accented with gold.  Gold is so popular right now and if it has gold foil on it even better.


Here is the card I designed using some of the gorgeous Bazzill Kraft Foil 6x6 paper.  All of the paper has a kraft background and then it has different patterns with gold foil.  The paper is wonderful for making some elegant cards.


I used JustRite Papercraft CR-02172 Grand Handwritten Sentiments Clear Stamps for the sentiment.  I used VersaMark Ink and Ranger Super Fine Gold Embossing Powder for the sentiment.  Then I used Spellbinders S4-491 Diamondessence and S4-486 Labels Forty-Four die templates to create the die cut shapes.  To finish of the card I added some Petaloo Botanica Minis - Fuchsia and Botanica Sugared Blooms - Pine Green flowers.  I also used some  3D Foam Squares in between the die cut layers to add some dimension.


Thank you so much for stopping by!  I hope you have a wonderful weekend!

Please be sure to check out The Stamp Simply Ribbon Store for all of the fantastic paper crafting products and the Blog for inspiration from the Design Team.

Hope you have a great weekend!

Hugs & Smiles,
Heidi


Stamps:  JustRite Papercraft CR-02172 Grand Handwritten Sentiments Clear Stamps
Paper:  Bazzill Kraft Foil 6x6Bazzill Mirror Cardstock - Gold, Cardstock-White, Kraft
Ink:  VersaMark Ink
Dies:  Spellbinders S4-491 DiamondessenceS4-486 Labels Forty-Four
Accessories:  Petaloo Botanica Minis - Fuchsia, Botanica Sugared Blooms - Pine GreenRanger Super Fine Gold Embossing Powder, Scrapbook Adhesives by 3L 3D Foam Squares, E-Z Runner Permanent Strips-Refillable Dispenser 49', Heat Tool

Wednesday, April 8, 2015

Updates - Some Changes, Classes, Upcoming Sale, and Online Store

New Year and New Beginnings.  Ok, so it’s not the beginning of the year anymore lol.  But life and things happen.  So I just wanted to give you a little update with some changes and maybe some new and different things that you will be seeing here on the blog.  So let’s go back a few months—back to last November (2014).

As most of you know I design for ButterBeeScraps and I am the Lead Designer.  Over the past year or so I have been helping Monique, the owner of BBS, with some of the Design Team things.  Back in November she asked me if I would possibly be able to take on some new rolls with the company.  I am still the DT Lead and now in addition to that I also do the company blog, Facebook and Pinterest.   Monique is wonderful and we have a fantastic team so I am enjoying this new position.

Also, this past November I made the decision to step down from the Spellbinders Blog Team.  I had been with Spellbinders since 2007.  I met and worked with so many wonderful people along the way and had great opportunities over the years.  I love the products and will continue to use them but I knew for myself it was time to step down and move on to the next chapter in my creative journey.

Now on to the New Year and New Beginnings.  In January I joined Ken Oliver’s Design Team as one of the Style Contributor.  Ken is fabulous and so are all of his new products—which by the way have taken off like wildfire!  Beautiful paper, inks, Color Burst, stamps, and Stick It adhesive sheets.  We have a great team with a wonderful mix of designers.

In March I started designing for Pink Ink Stamp Company.  Peggy who is the owner, is an amazing artist and designs the stamps.  Do you remember Karen Lockhart stamps?—if you loved them you will love the Pink Ink Stamps—one because the design style is very similar and two because Peggy purchased Lockhart stamps and also carries them in her collection.  So I was thrilled when Peggy asked me to join the design team.

Starting this month (April) I will be teaching stamping classes twice a month.  If you follow my blog you know I live in a smaller town and unfortunately we no longer have any local stamping or scrapbooking stores.  I will be teaching at the Senior Center out at the Skyline Mall.  Since we don’t have any local stores we are making the classes open to the public as well as members.  They have a large fantastic craft room with great lighting, large tables and lots of storage space.  I am really excited and looking forward to getting back to teaching!  If you are in the local area and are interested in the classes all of the information will be at the end of this post. 

For all the local people I am planning on having another sale this year.  Last year we had a fire in our garage so most of the spring and summer was spent on clean up and redoing the garage so I didn't have a sale last year.  But I have had sales the past several years.  So I have been going through all of my paper crafting supplies and products and pulling out a lot of supplies to make room for newer supplies.  I will have a large selections of papers, inks, stamps, dies, die cutting machines (manual and electric), ribbon and embellishments.  This year I will also be setting up an area with handmade cards, jewelry and some small home decor pieces that will be for sale.  I haven’t set a date as of yet but as soon as I have the date I will be posting here on my blog and on Facebook.  


Lastly, in case you missed the post I now have an online Zibbet store.  I right now I have some jewelry pieces listed and I will be adding more very soon.  You can click HERE if you would like to check out my store.  The image that is above is also in my sidebar and you can click there to visit the store too.

~~~~~~~~~~~~~~~~~~~~~~~~~~~~~~~~~~~~~~~~~~~~~~~~~~~~

If you are local and interested here is the information for the classes.  
Please feel free to share this with your friends.

Stamping 101
Classes will begin on April 16
1:45 pm in the Craft Room.
You must register for the class.
In this class you will learn the basics of 
rubber stamping. You’ll create five 
handmade greeting cards using inks, 
stamps, paper and die cut shapes.
All supplies will be provided
for the this class.

Advanced Stamping
This Class will begin on April 30
6:45 pm in the Craft Room.
You must register for the class.
In this class you will make three cards
and learn some new fun techniques.
Please bring your basic 
stamping kit with you.

Open to the public!
The cost for stamping classes;
$15.00 Members $20.00 NM
April 2015
Albert Lea Senior Center
1739 W Main, Albert Lea, MN 56007
(507) 373-0704
STAMPING CLASSES: 2nd and 4th Thursdays

~~~~~~~~~~~~~~~~~~~~~~~~~~~~~~~~~~~~~~~~~~~~~~~~~~~

Thanks so much for stopping by today!  I have a few other things in the works but I can’t share about them just yet.  Thank you so much for your support and I am looking forward to all of the great things the future holds. 

Hugs & Smiles,
Heidi


Sunday, April 5, 2015

Happy Easter!

Wishing everyone a very Happy Easter!  I hope you all have a Wonderful and Blessed Day!!


Much Love and Hugs to you all!

Heidi

Friday, April 3, 2015

The Stamp Simply Ribbon Store - Birthday Wishes Watercolor Card

Hello everyone! Today, is my day to post for The Stamp Simply Ribbon Store and I have a CAS (Clean And Simple) watercolor card to share with you.  Now I know you are probably thinking--CAS watercolor?  LOL!  But yes, it is very quick and easy to achieve--even if you are new to watercolor.


Here is the card that I designed.  It has a beautiful watercolor look but it is also very simple and elegant.  To start I used I stamped a sentiment from JustRite Clear Stamp - Grand Handwritten Sentiments using VersaMark Ink on to Ranger Watercolor Paper .  I applied Stampendous Super Fine Embossing Powder - Detail White to the inked sentiment and then used a heat tool to heat set the embossing powder.  Next I used a Faber-Castell Mix & Match Deluxe Water Brush and  I applied just plain water to the paper in the shape of a square around the sentiment--about a 3 x 3 square.  Then I took Distress Inks Spun Sugar, Worn Lipstick, and Picked Raspberry and I pressed the ink pads on my craft mat.  Using the Water Brush and starting with the lightest color of ink (Spun Sugar) I added water to the ink to create the watercolor.  Then I applied it to the wet area on the watercolor paper using a dabbing motion and just letting the water and ink move around on the paper.  I didn't cover the whole area--I just added the ink in about three different spots.  Then I added the second color (Worn Lipstick) and a third color (Picked Raspberry).  Like I said just dab the color on and let the colors blend and move around with the water.  I know it might sound like a lot but it only takes a minute or two to do the watercolor background on this card.  When you add the water to the paper first it will help the watercolor and the water to freely move around and blend.  Once you are done with the background you can either set it aside to dry or use a heat tool to speed up the drying time.


Here is a close up of the watercolor.  I used Spellbinders Celebrations Die - Pierced Squares to create the die cuts.  I layered the watercolor piece on top of a pink die cut square.  I used  3 D Foam Squares in between the layers for some dimension.  Then I added some May Arts Pink Sheer Ribbon and created a pretty pink bow.  


To finish off the card I added a few  Sequins White Iridescent - 5mm.

Thank you so much for stopping by!  I hope you have a very Happy Easter!!

Please be sure to check out The Stamp Simply Ribbon Store for all of the fantastic paper crafting products and the Blog for inspiration from the Design Team.

Hope you have a great weekend!

Hugs & Smiles,
Heidi


Stamps:  JustRite Clear Stamp - Grand Handwritten Sentiments
Paper:  Cardstock-White, Pink, Ranger Watercolor Paper
Ink:  Distress Inks Spun Sugar, Worn Lipstick, Picked Raspberry, VersaMark Ink
Dies:  Spellbinders Celebrations Die - Pierced Squares
Ribbon:  May Arts Pink Sheer Ribbon
Accessories:  Sequins White Iridescent - 5mm, Scrapbook Adhesives by 3L 3 D Foam Squares, EZ Runner, Stampendous Super Fine Embossing Powder - Detail WhiteFaber-Castell Mix & Match Deluxe Water Brush, Heat Tool

Wednesday, April 1, 2015

JustRite Papercraft - Day Two April New Release - DIY Hope Frame

Hello everyone!  It's day two of the JustRite Papercraft April New Releaase!  Today, I have a fun DIY home decor piece to share with you.


I altered a simple wood frame to create this pretty frame using some of the stamps from  JustRite Papercraft.  To start I painted the frame with white acrylic paint and then lightly sanded the frame to give it an aged look.  Then I used the CR-04620 Let Your Soul Sing Clear Stamps with the matching SVG File to stamp the branches and flowwers and cut images of the birds and butterflies.  Then I used the new CR-02171 Grunge Alphabet Clear Stamp Set and SVG Grunge Alphabet Digital Cut File Download for CR-02171 to stamp and cut the letters for the word Hope.


Here is a close up.  I used a piece of twine and black mini clothespins to attach the letters.


Here is a close up of the butterflies.


I also used the CL-02157 Script Cling Background Stamp for the background piece in the frame.


I picked this frame up at Michael's for just a couple of dollars and with just a little paint and stamps I was able to create this fun DIY home decor piece in less than an hour.


Thanks so much for stopping by today!

Hugs & Smiles,
Heidi


Supplies
Stamps:  JustRite Papercraft CR-02171 Grunge Alphabet Clear Stamp Set,  CR-04620 Let Your Soul Sing Clear Stamps, CL-02157 Script Cling Background Stamp
Paper:  White
Ink:  Imagine Crafts/Tsukineko StazOn Jet Black, Memento Tuxedo Black
SVG Cut Files:  JustRite Papercraft SVG Grunge Alphabet Digital Cut File Download for CR-02171, Let Your Soul Sing SVG
Accessories:  Frame, White Acrylic Paint, Sand Paper, Mini Clothespins, Twine, Hot Glue