Thursday, January 31, 2013

String of Hearts Valentine Card - The Rubber Cafe`

Hello blogging friends!  Today, I have a Valentine card to share with you and a technique using the Scrap Happy Sheer Glue from The Rubber Cafe'.  


Here is the card that I designed.  I used F-881 Love Words and G-779 Heart Strings stamps from The Rubber Cafe`.  I also used S6-001 5 x 7 Matting Basic AS6-003 5 x 7 Enchanted Labels Twenty-EightS6-004 5 x 7 Detailed Scallops and S5-127 Labels Twenty-Eight die templates from Spellbinders.


To achieve the glittery script background on the card I applied Scrap Happy Sheer Glue to the F-881 Love Words stamp and then I stamped the background several times onto the label die cut while the paper was still in the die template.  When you do the stamping with glue technique be sure to wash your stamp with warm water and soap right away to remove all of the adhesive.


Next I just used my finger to apply the You're So Fine Glitter Silver Medal over the background.  One of the great things about using the Scrap Happy Sheer Glue is that you don't have to rush through your projects and try to apply the glitter before the glue dries.  Because even when the glue is dry it still remains tacky and the glitter will adhere to it perfectly.  I know the middle part of the background is kind of messy but that is because I overlapped the background so it would show on both side and it is going to be covered up so its ok.  ;-)  After all of the glitter is applied I used a paint brush to remove the excess glitter.  Then I inked the edges of the label with Angel Pink ink.


Next, I stamped the G-779 Heart Strings image from The Rubber Cafe` on to Simply Smooth White paper from DiscountCardstock.com using Memento Tuxedo Black ink from Imagine Crafts/Tsukineko.  Then I colored the image with Copic markers.


I used S6-004 5 x 7 Detailed Scallops die template to cut/emboss the stamped image and layered that piece on top of the glittery background.  I used 3D Foam Squares from Scrapbook Adhesives by 3L to add some dimension to the layers.

 
To finish off the card I added Holly Berry Red Jellie Dots using the Scrap Happy Sheer Glue and Stick "EM" Up Tool to apply them to the card.

I just wanted to let you know I will hopefully be posting the winner for the Valentine Blog Candy tomorrow. Sorry I am running a little behind with this, I have been having problems with my email the past couple of days and I am hoping the issue is resolved now.  I promise I will post the winner as soon as I can!! ;-) 

Thanks so much for stopping by today!

Hugs & Smiles,
Heidi


Supplies

Wednesday, January 30, 2013

Mixed Media Crown - I Should Live In A Castle

Hello!  Today, I am back to share another mixed media project with you using more of the New Media Mixage™ line products from Spellbinders Creative Arts™.


This is a little ceramic crown wall hanging that I altered.  I found the crown at Hobby Lobby a few weeks back and as soon as I saw it I knew exactly how I wanted to alter it.


Here is a before picture of the crown.


Here is a close up of the MB1-006S Shields One-Silver bezel before I attached it to the crown.  I started by  die cutting a piece of the F-014 Delicate Pastels Premium Craft Foil using the Artisan X-plorer™ and MD1-006 Shields One die template.  Then I wanted to add some texture to the foil so I used the MT1-007 Interlock texture plate.  When using the texture plates and the craft foil place a piece of wax paper in between the texture plate and the foil for easy removal of the foil.  Next I lightly sanded the foil and then I glue it in to the bottom of the MB1-006S Shields One-Silver bezel.  Then I fussy cut the word blocks and glued them in place and I also glued the crown brad at the top.  I used and old typewriter font for the word blocks and I cut the back prongs off of the brad.  After the glue was dry then I added the ICE Resin®, pearls and crystals.   I let the bezel sit over night so the ICE Resin® could harden and then I glued on the vintage lace trim.


I used E6000 adhesive to glue the bezel on to the crown.


To finish off the crown I added more vintage lace and Recollections bling.

I hope you are enjoying seeing some of my new projects with the new  Media Mixage™ product line from Spellbinders Creative Arts™.  I know I am having so much fun creating with all of the fun new products.  ;-) 

Thank you so much for stopping by today!

Hugs & Smiles,
Heidi

Supplies
Spellbinders Creative Arts™:  Media Mixage™ Artisan X-plorer™, MB1-006S Shields One-Silver (bezel), MD1-006 Shields One (die template), MT1-007 Interlock (texture plate), F-014 Delicate Pastels Premium Craft Foil
Paper:  DiscountCardstock.com Simply Smooth Ivory
Accessories:  ICE Resin®, Paper Studio Spare Parts Antique Brads (crown brad), Pearls, Crystals, Plaid® Mod Podge Matte Finish, Recollections Bling, Vintage Lace, Hot Glue, E6000 Adhesive, Ceramic Crown, Sanding Block, Wax Paper

Monday, January 28, 2013

Spellbinders Media Mixage - Romantic Steampunk Corset Pin

Hello blogging friends! Do you ever have one of those days that just doesn't go as planned?  Well, today was that day for me--LOL!  As a result of the ice storm our power went out for awhile today and it just kind of threw the whole day off.  So needless to say I have been working (off and on) on this blog post and editing pictures for most of the day and now I can finally share it with you.  ;-) 

I am so excited about the New  Media Mixage™ line from Spellbinders Creative Arts™ that was introduced at CHA!!  All of us designers have been working behind the scenes on projects for the past several months and now we can finally share about it on our blogs.  Several of the projects we worked on were picked up for different publications so some of that stuff we can't share just yet but I have a new project to share with you today using products from the Media Mixage™ line.


Here is the Romantic Steampunk Corset pin that I designed using MD2-007 Dresses Two (die template), MB6-007 Dresses Two (blank) and MB6-004 Flowers One (blank) from the Media Mixage™ line.  I also used the New Artisan X-plorer™ for the die cutting.


I started with the MD2-007 Dresses Two die template and the Prima Romance Novel  pattern paper and then I used the Artisan X-plorer™ to die cut the shape.  Then I used Beacon ZipDry Adhesive to adhere the pattern paper to the MB6-007 Dresses Two blank.  Once the adhesive was dry I lightly sanded the edges of the paper.


Next using my finger I edged the paper with white acrylic paint.  Then I used an Action Screw Hole Punch to punch the little holes in the blank.  The Action Screw Hole Punch is a great little tool for punching holes in the blanks and it is so easy to use!  All you do is slide the blank in place under the screw and then turn the handle to tighten down and it punches a hole.  This one can do two different size holes.  I picked this up at Hobby Lobby and it was under $10.  I think most of the big box craft stores carry these in the jewelry and beading area.  You can click on the pictures to enlarge them.


After I punched the holes then I lightly added Diamond Stickles on the entire piece.  I added the MB6-004 Flowers One blank to the top, this is one of the small flowers in the set.  I used a round nose pliers to curl the petals on the flower.  Then I added a metal gear to the center with some pearls.


On the bottom half I added some small pieces of chain, metal gears, pearls and jump rings with acrylic crystal drops.


*EDIT--I'm sorry, I totally forgot to add this photo last night!  Here is a picture of the pin back that I used. I used E6000 to adhere the pin back to the back of the blank.


I had so much fun creating this little pin! 

Spellbinders is challenging everyone to Explore Beyond with their own creativity.  Don't be afraid to try new things and make it all your own style!!  There is no right or wrong--it's all about you and whatever you like.  Have Fun and CREATE!! ;-) 

Hugs & Smiles,
Heidi

Supplies
Spellbinders Creative Arts™:  Media Mixage™ Artisan X-plorer™, MD2-007 Dresses Two (die template), MB6-007 Dresses Two (blank), MB6-004 Flowers One (blank)
Paper:  Prima Romance Novel 6 x 6 pad
Accessories:  Beacon ZipDry Adhesive; Ranger Glossy Accents, Diamond Stickles; Round Nose Pliers, Action Screw Hole Punch, White Acrylic Paint, Sanding Block, Chains, Pearls, Metal Gears, Jump Rings, Acrylic Crystal Drops, Pin Back, E6000

Sunday, January 27, 2013

Mini Gift Bag for Wedding - Valentine - Anniversary & Valentine Blog Candy Reminder

Hello blogging friends!  I have had so much fun reading all of your comments for the Valentine Blog Candy and what everyone likes to get or do on Valentine's Day with their special someone.  There is still time to leave a comment and get your name in for the Valentine Blog Candy!  
Click HERE for all of the details.  ♥

I also want to let everyone know that this past weekend Google Chrome detected some sort of malware on the  Stamping Top 50 site.  So if you tried to get on my blog during this time you would have seen a warning about the malware.  I want you to know that I have removed the Stamping Top 50 widget from my blog so my blog will remain a safe place.  Hopefully the problems on the Stamping Top 50 site will be resolved soon. 

Today, I have a fun mini gift bag that would be prefect for Valentine's Day, a wedding or and anniversary.


To start apply Rose Bud ink to the S5-159 Gold Labels Four die template on the raised areas and then cut/emboss the die cut shape using White Linen cardstock.  Applying the ink and then doing the die cutting/embossing will result in a true letterpress effect. 


Using the Swiss Dot Slipper cardstock and S5-175 A2 Locking Loops die template cut/emboss the die cut shape.  Then I used Rose Bud ink to stamp the frame and sentiment stamps from CR-04325 Antique Valentine Tags One from JustRite Papercraft on to the labels four die cut.  


  Using the Gold Mirro cardstock and S5-183 Gold Elements One die templates cut/emboss two flourish shapes.  Adhere the die cuts to the gift bag and use 3D Foam Squares on the Labels Four die cut to add some dimension.  To finish off the gift bag I added flowers, diamond stickles and pearls.

Thank you so much for stopping by today and I hope you are having a great weekend!  Here in MN we are in the middle of an ice storm so we are just staying in and keeping warm.  

Hugs & Smiles,
Heidi

Supplies
Paper:  DiscountCardstock.com Swiss Dot Slipper, Gold Mirror Mirri, White Linen
Stamps:  JustRite Papercraft CR-04325 Antique Valentine Tags One
Ink:  ImagineCrafts/Tsukineko Memento Rose Bud
Dies:  Spellbinders Creative Arts™ Grand Calibur® Machine, S5-175 A2 Locking Loops, S5-183 Gold Elements One, S5-159 Gold Labels Four
Accessories:  The Rubber Cafe` Scrap Happy Sheer Glue, Stick "EM" Up Tool, Pearls; I am Roses Pink Roses; Ranger Diamond Stickles; Scrapbook Adhesives by 3L 3D Foam Squares; Pink Mini Gift Bag


Friday, January 25, 2013

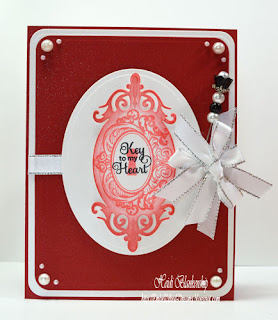
Key To My Heart Card and Valentine Blog Candy!!


Hello blogging friends!  I know it's been a few days since my last post.  I have been having a hard time trying to get back in to the swing of things after coming home from CHA.  You would think a week later and I would be all rested up but I feel like I am still trying to get caught up on sleep.  I have still been working on projects but the past couple of days I have been typing up instructions for publications.  I will admit it--I hate typing--LOL!!  But at least I got it done and now I can move on to some fun things.  

Today I have a Valentine card to share with you and I also have some fun Valentine Blog Candy!!  First I will show you the card and then I will get to all of the details on the Blog Candy.


Here is the Valentine card that I designed.  It's a clean and simple look but I love the red and white with just a hint of black and silver.  I used Pearlized Dark Red Scored Card for the base and one of the matting layers and White Linen for one of the matting layers, oval and tag.  All of the die templates are from Spellbinders Creative Arts™ January 2013 CHA Collection.  These are the die templates that I used, S5-171 A2 Curved Matting Basics AS5-172 Curved Matting Basics B and S5-177 A2 Filigree Delight .  All of these die templates are part of the Card Creator Collection from Spellbinders.


I used CR-04325 Antique Valentine Tags One stamp set from JustRite Papercraft.  I stamped the decorative key hole using Memento Lady Bug and then edged the tag with both Lady Bug and Rhubarb Stalk.  Then I used Tuxedo Black ink to stamp the sentiment. I used 3D Foam Squares to layer the oval and the tag and then I added 3/8" White Satin with Silver Metallic Edge ribbon from Really Reasonable Ribbon and a handmade stick pin.  


To finish off the card I added some Pearl Jellie Dot and tiny pearls from The Rubber Cafe`.

Ok, are you ready to hear all about the 
♥ Valentine Blog Candy ♥ and 
see some pictures of the goodies?  


Here is a picture of all of the goodies.


Items included in the Valentine Blog Candy
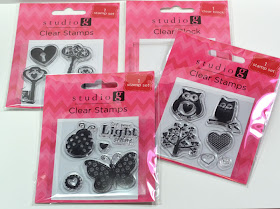
3 Mini Stamp Sets
1 Mini Clear Block
1 Package of Buttons
2 Gift Bags
1 Heart Punch
2 Bottles of Glitter Glue
2 Dye Ink Pads
2 Spools of Ribbon
8+ Yards of Assorted Ribbons and Trims
1 Package of Brads (The Paper Company)
Mica
12 Pink Roses (I am Roses)
1 Mini Clipboard w/ Notepad
3 Acrylic Flowers
6 Baubles 
4 Doves
1 Yard Rose Fabric Tape
6 Charms (2 keys, 2 locks, 1 heart, 1 Eiffel Tower)
2 Ribbon Buckle Sliders w/ 2 Pink Lg Flat Back Pearls 
4 Pearl Hearts
6 Garment Pins


~Rules~

1.Tell me what you like to get for Valentine's Day--Flowers, Candy, Perfume--do you go out for a special date night with your sweetheart? 

2.  Please be sure to leave your email or a link back to you blog so I can contact you if you win.

You will have until Monday, January 28th at midnight CST to leave a comment.  I will pick the winner and email them on Tuesday.  The winner will have 48 hours to reply to the email.  
If you would like to subscribe or follow my blog that would be greatly appreciated too.  ♥  **but not required for the blog candy. :)

Thank you so much for stopping by today and I hope you have a Fantastic weekend!! 
Stay warm and Good Luck with the Blog Candy!!

Hugs & Smiles,
Heidi


Supplies
Paper:  DiscountCardstock.com Pearlized Dark Red Scored Card and EnvelopesWhite Linen
Stamps: JustRite Papercraft  CR-04325 Antique Valentine Tags One
Ink:  ImagineCrafts/Tsukineko Memento Lady Bug, Rhubarb Stalk, Tuxedo Black
Dies:   Spellbinders Creative Arts™ Grand Calibur® Machine, S5-171 A2 Curved Matting Basics A, S5-172 Curved Matting Basics B, S5-177 A2 Filigree Delight 
Accessories:  Really Reasonable Ribbon 3/8" White Satin with Silver Metallic EdgeThe Rubber Cafe` Scrap Happy Sheer Glue, Stick "EM" Up ToolPearl Jellie DotScrapbook Adhesives by 3L 3D Foam Squares; Hot Glue; Handmade Stick Pin

Friday, January 18, 2013

NEW Spellbinders™ Artisan X-plorer™ Machine and Explore Fairy Necklace

Hello blogging friends!  I had a wonderful time at CHA and I am back home trying to get back into the swing of things.  I will be posting some pictures from the Spellbinders booth at CHA in the next few days. 


Check out this sweet new little toy that I got to bring home with me!!  
It's the NEW Spellbinders™ Artisan X-plorer™ Machine.  


The Artisan X-plorer™ Machine is a multi-purpose, high pressure machine.  It's a compact roller press perfect for cutting, embossing and pressing a multitude of materials, including paper, metals, fabric, plastics and more.  

                                                          4 1/2'' Wide embossing folders

Color coded plates
Weighing only five pounds
Jewelry to home decor
Adornments to art journals, cards, layouts, fabric arts and mixed media


Check out the sided of the machine--you can see the gears!


I was pretty excited to see a piece of my artwork on the Artisan X-plorer™ box!  I designed the candle in the middle picture. 


Spellbinders also has a new section on the website called Explore Beyond.
In this new section you will find--
Idea Gallery
Explore Artists
Explore Events
Explore Style
Explore Techniques
and the NEW Explore Blog!

To find out all of the details please visit Spellbinders Creative Arts site by clicking HERE and looking for the Explore Beyond tab at the top of the navigation bar.

Click HERE for all of the details on the New Artisan X-plorer.

I am so happy that I can also finally start sharing some of my design work with you.  I have been busy over the past few months working on projects and I was thrilled to see that one of the necklaces I designed is in the Explore Gallery.


This is the Explore Fairy necklace that I designed.


Here is a close up of the necklace before it was completely finished.


Here is another close up after the necklace was finished.

To check out the Explore Gallery click HERE and to
download step-by-step instructions for my Explore Fairy necklace please click HERE.

Thank you so much for stopping by today and I hope you have a
Fantastic Friday!!

Hugs & Smiles,
Heidi

Tuesday, January 15, 2013

JustRite Papercraft New Release French Rose Background Stamp

Hello!  Today, I have another New Release to share with you from  JustRite Papercraft.


Check out this gorgeous CR-04355 French Rose Background Stamp.  I Think this is going to be another favorite!  I love the roses, swirly flourish and text background.


For my project I altered a 4 x 4 mini canvas.  To start I painted the canvas with black acrylic ink.  Then I stamped part of the background image on to Simply Smooth White and used inks from Imagine Crafts/ Tsukineko to color the image.  Next I distressed the edges of the paper and dry brushed over the entire image with gesso.  Then I added some gold ink to the edges and mica flakes for a little sparkle.


For the MB1-005 Hearts One Bezel I stamped and colored the image just like the canvas but instead of applying gesso I applied diamond stickles to the image.  Then I die cut the image using the matching bezel MB1-005 Hearts One Bezel, added the image and then added the ICE Resin®.  I also fussy cut and added a couple of the ribbon banner words from the CR-04375 Live, Love, Laugh Vintage Labels Two and placed them in the ICE Resin®.  To finish off the bezel I sprinkled some mica flakes around the outer edge of the bezel.


Please be sure to visit each of the JustRite Papercraft Designers in the link list below to see what they have created to share with you.  


Thanks so much for stopping by today!  Today is the last day of CHA and I will have some pictures to post in the next couple of days after I get home.

Hugs & Smiles,
Heidi

Supplies
Stamps:  JustRite Papercraft CR-04355 French Rose Background Stamp, CR-04375 Live, Love, Laugh Vintage Labels Two
Paper:  DiscountCardstock.com Simply Smooth White
Ink:  Imagine Crafts/ Tsukineko
Dies:  Spellbinders Creative Arts™ Grand Calibur® Machine, MB1-005 Hearts One Bezel, MD1-005 Hearts One Die Template
Accessories:  ICE Resin®; Really Reasonable Ribbon Black Seam Binding; Gesso; Mica Flakes; 4 x 4 Mini Canvas; Ranger Diamond Stickles; Black Acrylic Paint

Monday, January 14, 2013

JustRite Papercraft For All You Do Vintage Labels Three

Hello blogging friends!  Today, I have another New Release from JustRite Papercraft to share with you.  


SW-04420 For All You Do Vintage Labels Three is a wonderful stamp set designed by Samantha Walker for JustRite Papercraft.  This set is filled with several frames and fantastic sentiments.  


Here is the card that I designed using  SW-04420 For All You Do Vintage Labels Three stamp set.  I also used JB-03995 Vintage Labels Three die template and CL-04430 Floral Flourishes Background Stamp.  I love all of the little details and lacy edges around the stamp images!  All of the paper is from DiscountCardstock and I used inks from Imagine Crafts/Tsukineko.  I added some tiny pearls and a few roses from I am Roses.  The light pink ribbon is from Really Reasonable Ribbon.  To add some dimension I used 3D Foam Squares in between each layer of paper.


Please be sure to visit all of the Designers in the link list below to see what they have to share with you.


Thanks so much for stopping by today!

Hugs & Smiles,
Heidi


Supplies
Stamps:  JustRite Papercraft SW-04420 For All You Do Vintage Labels Three  JB-03995 Vintage Labels Three, CL-04430 Floral Flourishes Background Stamp
Paper:  DiscountCardstock.com Simply Smooth White, Sno Cone, Pink Lemonade, Purple
Ink:  Imagine Crafts/Tsukineko Memento Inks
Accessories:  Really Reasonable Ribbon Pink Ribbon, I Am Roses, Pearls, Scrapbook Adhesives by 3L 3D Foam Squares.

Sunday, January 13, 2013

Really Reasonable Ribbon January Blog Hop

Good morning blogging friends!  Today, is the Really Reasonable Ribbon Blog Hop for the month of January.  The RRR Design Team Members and Special Events Design Team Members will be showcasing the Monthly Ribbon Club


This month there is a beautiful assortment of Pink, White and Red ribbons included in the January Ribbon Club.   This is such a pretty and perfect combination for Valentine cards.  Click HERE for more details on how you can sign up for the Monthly Ribbon Club.


If you are following the order of the blog hop you should have just come from Judy's Blog. If not and you just happened to pop in for a visit please click HERE to start the blog hop at the Really Reasonable Ribbon's Ramblings! Blog.


For my project I altered an mini canvas for Valentine's Day.  I started by painting the canvas with white acrylic paint.  Then I added pink ribbon and white crochet trim from Really Reasonable Ribbon around the outer edges of the canvas.  Then I added a paper doily and edged the doily with Angel Pink ink and then I added Scrap Happy Sheer Glue and Diamond Clear Glitter from The Rubber Cafe


Next I stamped the Floral Heart stamp from The Rubber Cafe using Rose Bud ink.  Then I applied Scrap Happy Sheer Glue and  Diamond Clear Glitter to the stamped image.  I fussy cut the heart image and then I used the pink ribbon and white crochet trim to create the ruffle around the heart.  I stamped the word Love from the Pictures Framed stamp set and fussy cut it and added a ribbon banner behind it.  To finish of the canvas I added a ribbon hanger to the top and Diva Pink Jellie Dots.


Now to continue in the blog hop you need to hop on over to Vivian's Blog and check out her fantastic project!

Thank you so much for stopping by today and I hope you enjoy the Really Reasonable Blog Hop!! Don't forget to visit the RRR Store and check out all of the beautiful ribbons, lace and trims!
I hope you have a wonderful and creative day!

Hugs &  Smiles,
Heidi  

Supplies