Monday, December 31, 2012

Today and Always Card

Hello and Happy New Year's Eve!!  I have one more card and tutorial to share with you for 2012.


The card I am sharing with you today is a wedding card but the sentiment could be switched out and this could be a card for just about any occasion.  I used S5-153 Butterfly Magic die template which is one of the  Spellbinders Shapeabilities® Expandable Patterns.  Basically what that means is that if you wanted to make a larger card, background paper, or cover an altered project the die template is made so that when you make the die cuts the first time you can move the die template over and continue to cut the paper thus expanding the pattern.  I think it's a pretty cool idea and that is what makes the Expandable Patterns die templates so unique.


To start I covered one side of the Sno Cone (blue) paper with Adhesive Sheets from Scrapbook Adhesives by 3L.  Then I used S5-132 A2 Matting Basics B die template to cut/emboss the paper.


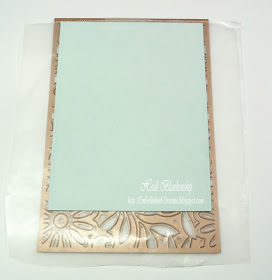
Next place the S5-153 Butterfly Magic on the cutting plate, place a piece of wax paper on top and then add the blue paper with the adhesive side down.  Use the Grand Calibur® Machine to cut/emboss the detailed die cut.


Use the S5-131 A2 Matting Basics A to cut/emboss a piece of Simply Smooth White.  Carefully peel the backing off of the adhesive sheet on the blue paper and apply the blue die cut paper to the white paper for a perfect match.


Here is a close up of the butterfly.  I cut/embossed a second piece of blue paper using the S5-153 Butterfly Magic die template and then I trimmed out the butterfly.  I glued down the body of the butterfly on top of the other one and added Diamond Clear Glitter and Pearls from The Rubber Cafe`.  


For the sentiment I used CR-03825 Ever After Antique Labels  from JustRite Papercraft.  I also used S5-148 Decorative Labels Eight to create the die cuts for the sentiment.  Then I added a couple of stick pins and some Noel White Crochet Trim (retired) and Sheer Ruffle Pink Edge from Really Reasonable Ribbon.

If you have any of the Spellbinders Shapeabilities® Expandable Patterns die template I hope you will give this a try.

Happy New Year!!  Blessings to you all and celebrate safe!!

Hugs & Smiles,
Heidi

Supplies
Stamps:  JustRite Papercraft CR-03825 Ever After Antique Labels 
Paper:  DiscountCradstock.com Simply Smooth WhiteSno ConePink Lemonade
Ink:  Imagine Crafts/Tsukineko Memento Tuxedo Black
Dies:  Spellbinders Paper Arts™ Grand Calibur® MachineS5-131 A2 Matting Basics AS5-132 A2 Matting Basics B, S5-153 Butterfly Magic, S5-148 Decorative Labels Eight
Accessories:  Really Reasonable Ribbon Noel White Crochet Trim (retired), Sheer Ruffle Pink EdgeThe Rubber Cafe` Scrap Happy Sheer Glue, PearlsStick "EM" Up Tool, Diamond Clear Glitter; Scrapbook Adhesives by 3L 3D Foam Squares, Adhesive Sheets; Ranger Glossy Accents; Stick Pins, Wax Paper

Sunday, December 30, 2012

Good Luck Card

Hello blogging friends!  Today, I have a Good Luck card to share with you.  This is another card that I made for one of my husband's coworkers. 


The sentiment and flourish stamps are from the CR-03640 Spring Words stamp set from JustRite Papercraft.  I used S5-131 A2 Matting Basics AS5-132 A2 Matting Basics BS5-127 Labels Twenty-Eight and S5-134 A2 Fancy Postage Stamp die templates to create all of the die cuts.  The pattern paper is from the My Mind's Eye Stella Rose Hattie Collection.


I wrapped some 20lb Hemp Cord Set Earthy from Really Reasonable Ribbon around the bottom of the card and added a garment pin with a charm.


We had a wonderful Christmas celebration with family yesterday but woke up this morning to our youngest one having a fever and a really bad cough--tis the season!  I hope he is feeling better soon--it's no fun being sick over Christmas vacation!  I hope you all had a wonderful weekend!!

Hugs & Smiles,
Heidi

Supplies
Stamps:  JustRite Papercraft CR-03640 Spring Words
Paper:  DiscountCardstock.com Simply Smooth Ivory, Blue #67; My Mind's Eye Stella Rose Hattie Collection
Ink:  Imagine Crafts/Tusinkeko Memento Rich Cocoa
Dies:   Spellbinders Paper Arts™ Grand Calibur® MachineS5-131 A2 Matting Basics AS5-132 A2 Matting Basics BS5-127 Labels Twenty-Eight, S5-134 A2 Fancy Postage Stamp
Accessories:  Really Reasonable Ribbon 20lb Hemp Cord Set Earthy; Garment Pin, Charm; Scrapbook Adhesives by 3L 3D Foam Squares

Saturday, December 29, 2012

With Sympathy Pink Roses Card

Hello everyone!  Here is a sympathy card that I made a couple of weeks ago and didn't get a chance to post it at the time.  


I used Memento Rich Cocoa ink to stamp the image of the rose and then used Copic markers to color the image.  The rose image and the sentiment are both from the CR-03570 With Sympathy stamp set from JustRite Papercraft.  Once I had the image of the roses colored then I used S5-127 Labels Twenty-Eight to die cut the image.  For the sentiment I used S5-109 Vintage Lace Motifs die template.


Here is a close up of the rose image.


To create the mats for the card I used S5-131 A2 Matting Basics A and S5-132 A2 Matting Basics B die templates.  All of the cardstock is from DiscountCradstock.com.  I added some pretty Sheer Organza w/ Satin Center Ivory ribbon from Really Reasonable Ribbon and some tiny pearls from The Rubber Cafe`.

Thanks so much for stopping by today and I hope you are having a wonderful weekend!  We have one more Christmas celebration with our family today.

Hug & Smiles,
Heidi

Supplies
Stamps:  JustRite Papercraft CR-03570 With Sympathy
Paper:  DiscountCradstock.com Simply Smooth Ivory, Sno Cone, Pink Lemonade
Ink:  Imagine Crafts/ Tsukineko Memento Rich Cocoa; Copic Markers R81, R85, G21, G24, B000
Dies:  Spellbinders Paper Arts™ Grand Calibur® Machine, S5-131 A2 Matting Basics A, S5-132 A2 Matting Basics B, S5-127 Labels Twenty-Eight, S5-109 Vintage Lace Motifs
Accessories:  Really Reasonable Ribbon Sheer Organza w/ Satin Center Ivory; The Rubber Cafe` Scrap Happy Sheer Glue, Pearls, Stick "EM" Up Tool

Friday, December 28, 2012

Retirement Card - Enjoy Your Days

Hello blogging friends!  The card I am sharing with you today is a retirement card that I made for one of my husband's coworkers.  


I used Simply Smooth Ivory and Posh Milk Chocolate cardstock from DiscountCardstock.com.  I printed the sentiment and then used S5-127 Labels Twenty-Eight to create the die cut.  Before removing the paper from the die I used Memento Desert Sand ink to ink the inside edges of the paper.  I added some Argyle Grosgrain Tan and Brown ribbon from Really Reasonable Ribbon across the center.  


To create the foil die cuts I used S5-120 Fall Foliage die template and Spellbinders Premium Craft Foil.  The embossed foil die cuts are a perfect little accent.


To finish off the card I added a few Root Beet Jellie Dots from The Rubber Cafe'.

Thank you so much for stopping by today!

Hugs & Smiles,
Heidi

Supplies
Paper:  DiscountCardstock.com Simply Smooth Ivory, Posh Milk Chocolate
Ink:  Imagine Crafts/Tsukineko Memento Desert Sand
Dies:  Spellbinders Paper Arts™ Grand Calibur® Machine, S5-131 A2 Matting Basics A, S5-132 A2 Matting Basics B, S5-127 Labels Twenty-Eight, S5-120 Fall Foliage
Accessories:  Spellbinders Premium Craft Foils; Really Reasonable Ribbon Argyle Grosgrain Tan and Brown; The Rubber Cafe` Scrap Happy Sheer GlueRoot Beer Jellie Dots, Stick "EM" Up Tool

Thursday, December 27, 2012

Simple Stories Winter Wonderland Card

Hello!  Just a quick post today sharing another holiday card.


I love this little snowman image!  All of the pattern paper and stickers are from Simple Stories Handmade Holiday Collection.  I used S5-131 A2 Matting Basics A with Simply Smooth Ivory paper and S5-132 A2 Matting Basics B with the pattern paper to create the mats for the card.  Then I used S4-356 Floral Ovals with Simply Smooth Ivory paper to create the decorative oval.  For the card base I used Kraft paper.   All of the solid colored cardstock is from DiscountCardstock.com.  


The snowman, snowflakes and sentiment are from the sticker sheet.  I added 3D Foam Squares to the back of the snowman and snowflakes.  Then I lightly dusted the back of the sticker to remove the stickiness, then peeled the back off of the 3D Foam Squares and applied them to the card.  For a little bit of sparkle I added mica flakes and pearls to the snowflakes and at the bottom of the snowman.


This is a quick and easy card that would wonderfully not only for Christmas but throughout 
the winter months.

Thank you so much for stopping by today!

Hugs & Smiles,
Heidi

Supplies
Paper:  DiscountCardstock.com Simply Smooth Ivory, Kraft; Simple Stories Handmade Holiday Collection, Handmade Holiday Fundamentals Cardstock Stickers
Dies:  Spellbinders Paper Arts­™ Grand Calibur® Machine, S5-131 A2 Matting Basics A, S5-132 A2 Matting Basics B, S4-356 Floral Ovals
Accessories:  Mica Flakes, Pearls, Glue, Baby Powder,Scrapbook Adhesives by 3L 3D Foam Squares

Wednesday, December 26, 2012

Merry Christmas

Hello blogging friends!  I hope all of you had a very Merry Christmas and a wonderful time with your family and friends!!   I am sorry I haven't been around for a few days.  A couple of weeks before Christmas I found out that I needed to have surgery.  My surgery was on the 20th and I didn't want to say anything here on my blog because I wasn't exactly sure what the outcome was going to be.  But I am feeling better and I am happy to say I got the report back from the doctor and all is good!!  :-)  Now I just have a lot to catch up on!  I have several cards (some Christmas) and projects that I didn't get a chance to post before my surgery so you will be seeing them over the next few days.


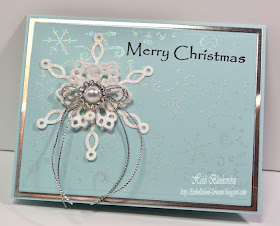
Today, I have a Christmas card to share with you. This card is so sparkly and glittery I just love how it turned out.  I have a couple of close up pictures that show more of the sparkle from the glitter.  Santa gave me a Fabulous new camera for Christmas that I absolutely LOVE but now I have to figure out all the bells and whistles--LOL!  So it may take a little while (and practice) to get the perfect pictures.  


To start I stamped the sentiment from the S-109 Christmas Tidings stamp set using Tuxedo Black ink.  Then to create the glittery snowflake background I used the H-920 Elegant Snowflake Border stamp, Scrap Happy Sheer Glue and Diamond Clear Glitter all from The Rubber Cafe`.  I applied a little bit of glue to the makeup sponge and dabbed it onto the rubber stamp and then stamped the image.  I randomly stamped the image over the entire piece of cardstock.  I let the glue sit for a couple of minutes and then I added the Diamond Clear Glitter.  I love using the Scrap Happy Sheer Glue for this technique and the You're So Fine Glitter picks up every detail.  


Here is a close up of the die cut snowflake and the background.  Using the makeup sponge I also applied glue and glitter to all of the layers of snowflakes.  To add some dimension to the snowflake I used 3D Foam Squares in between each layer.   To create the snowflake I used Simply Smooth White cardstock and S5-117 2012 Snowflake Pendant.  Then I added some Silver Metallic String and a pearl with a ribbon buckle slider to the center of the snowflake.  For the layered mats I used Sno Cone and Silver Mirri cardstock and S5-131 A2 Matting Basics A and S5-132 A2 Matting Basics B die templates.


If you like the look of stamping with glue and glitter I hope you will five this a try.  It's fun and easy to do and oh so sparkly!!

Thanks so much for stopping by today!

Hugs,
Heidi

Supplies
Stamps:  The Rubber Cafe` H-920 Elegant Snowflake Border, S-109 Christmas Tidings
Paper:  DiscountCardstock.com Simply Smooth White, Sno Cone, Silver Mirri
Ink:  Imagine Crafts/Tsukineko Memento Tuxedo Black
Dies:  Spellbinders Paper Arts™ Grand Calibur® Machine, S5-131 A2 Matting Basics A, S5-132 A2 Matting Basics B, S5-117 2012 Snowflake Pendant
Accessories:  The Rubber Cafe' Scrap Happy Sheer Glue, Diamond Clear Glitter; Really Reasonable Ribbon Metallic Silver String; Large Flat Back Pearl, Ribbon Buckle Slider; Scrapbook Adhesives By 3L™ 3D Foam Squares; Makeup Sponge

Monday, December 17, 2012

Spellbinders Explore Beyond Challenge: Craft to Win - $5,000 Grand Prize Package!!

How would you like to have a chance to WIN a $5,000 Grand Prize Package from Spellbinders Paper Arts™ and their cross promotional partners?  Do you own at least two Spellbinders die templates?  Do you love to craft?  If you answered YES to all of the questions then you just need to let your creativity flow and create some art!!  

Here are all of the details about the contest.

Spellbinders is currently running the BIGGEST contest they've ever hosted to date! Spellbinders Explore Beyond Challenge: Craft to Win gives you a chance at a $5,000 Grand Prize Package from Spellbinders and their cross promotional partners! They'll also be choosing a 2nd place winner to receive a $1,000 prize package and a $500 3rd place prize package!


How do you participate? It's easy!
Simply create an original project using at least two (2) Spellbinders dies. And get creative with it! Push your own creative boundaries...do something different. We'll be looking for those crafters and artists who have really taken on the challenge to truly "Explore Beyond".

Take photos of each step of your project. If chosen as a finalist... You'll be asked to submit these photos.
Submit a photo (of your finished project only!) to the appropriate Spellbinders Flickr Group.
Contest runs from November 26th, 2012 through December 26th, 2012 Midnight EST.

 Categories:

Official Rules:
You may enter more than once in multiple categories. Projects entered must be original. A total of twelve (12) finalists will be chosen. There will be two (2) finalists from each category. Finalists will be announced on December 27, 2012. Finalists will be asked to submit photos of the steps of their projects to validate their originality. Finalists will be asked to mail in their final original project to the Spellbinders office. Original projects must be received by end of day, Friday, January 4, 2013.

A celebrity panel of judges will review the twelve (12) final submissions and narrow it down to three (3) winners. Winners will be announced on Friday, January 11, 2013. There will be one (1) Grand Prize winner of a $5,000 prize package and the project will be featured at the Spellbinders booth at the Craft and Hobby Association show on January 12, 2013. There will be one (1) 2nd prize winner of a $1,000 prize package and featured on the Spellbinders blog. There will be one (1) 3rd prize winner of a $500 prize package and featured on the Spellbinders blog.

Legal:
All federal, state and local taxes are the sole responsibility of the winners. By acceptance of the prize, winners agree without limitation to the use of his/her name, photograph and/or likeness for publicity purposes without any additional compensation. Winners agree to be bound by these rules and the decisions of the Spellbinders panel, which are final and binding in all matters regarding this event. Winners agree that the event and its representatives affiliates, agents, directors, officers and employees have no liability whatsoever for any injuries, losses or damages of any kind relating to or arising from this event or resulting from participation in this contest.Contest is not open to Spellbinders Employees, Various Team Members, or their immediate family members (Grandparents, Parents, Siblings, Spouses, Children).

Thank you so much for stopping by today and Good Luck to all who enter the contest!!

Hugs & Smiles,
Heidi

Sunday, December 16, 2012

Keeping Newtown, CT In My Thoughts and Prayers

My thoughts and prayers go out to the community of Newtown, CT and especially to the families who lost children and loved ones.  It is such a tragedy and breaks my heart.  I know it will take a lot of time for hearts to heal and I guess the best thing we can do is to pray for them all.

This picture and poem was posted on Facebook and I just wanted to share it.


Twas' 11 days before Christmas, around 9:38
when 20 beautiful children stormed through heaven's gate.
their smiles were contagious, their laughter filled the air.
they could hardly believe all the beauty they saw there.
they were filled with such joy, they didn't know what to say.
they remembered nothing of what had happened earlier that day.
"where are we?" asked a little girl, as quiet as a mouse.
"this is heaven." declared a small boy. "we're spending Christmas at God's house."
when what to their wondering eyes did appear,
but Jesus, their savior, the children gathered near.
He looked at them and smiled, and they smiled just the same.
then He opened His arms and He called them by name.
and in that moment was joy, that only heaven can bring
those children all flew into the arms of their King
and as they lingered in the warmth of His embrace,
one small girl turned and looked at Jesus' face.
and as if He could read all the questions she had
He gently whispered to her, "I'll take care of mom and dad."
then He looked down on earth, the world far below
He saw all of the hurt, the sorrow, and woe
then He closed His eyes and He outstretched His hand,
"Let My power and presence re-enter this land!"
"may this country be delivered from the hands of fools"
"I'm taking back my nation. I'm taking back my schools!"
then He and the children stood up without a sound.
"come now my children, let me show you around."
excitement filled the space, some skipped and some ran.
all displaying enthusiasm that only a small child can.
and I heard Him proclaim as He walked out of sight,
"in the midst of this darkness, I AM STILL THE LIGHT."

Written by Cameo Smith, Mt. Wolf, PA


Thank God everyday for all the gifts you have in your life, especially your children, loved ones and friends.  Let them know how important they are to you and how much they are loved.

Hugs,
Heidi 

Thursday, December 13, 2012

Really Reasonable Ribbon December Blog Hop


Good morning blogging friends!  Today, is the Really Reasonable Ribbon Blog Hop for the month of December.  The RRR Design Team Members and Special Events Design Team Members will be showcasing the Monthly Ribbon Club


This month there is a beautiful assortment of White, Blue, Aqua, Lavender and Pink ribbons included in the December Ribbon Club.   This is such a pretty combination for Christmas cards.  Click HERE for more details on how you can sign up for the Monthly Ribbon Club.

If you are following the order of the blog hop you should have just come from Judy's Blog. If not and you just happened to pop in for a visit please click HERE to start the blog hop at the Really Reasonable Ribbon's Ramblings! Blog.


For my project I made a set of four quick and easy Christmas cards with the ribbon being the main focus.  On the first card I stamped snowflakes on the bottom half, added a sentiment at the top, ribbon and a snowflake with glitter and bling.  For the second card I made a banner going across the top of the card using the ribbon, added a sentiment at the bottom and a snowflake with glitter and bling.  


For the third card I added ribbon and crochet lace across the top, a sentiment at the bottom and a couple of twig die cuts with glitter and bling.  For the forth card I did a ribbon weave in the top corner, added a sentiment and a snowflake with glitter and bling.  


I used Simply Smooth White, Sno Cone, Pink Lemonade paper from DiscountCardstock.com on all of the cards.  The stamp set is CR-03800 Large Fancy Holiday Sentiments from  JustRite Papercraft.  I used several die templates to create the cards including--S5-131 A2 Matting Basics A, S5-132 A2 Matting Basics B, S5-117 2012 Snowflake Pendant, S4-365 Create A Flake Four and S4-328 Foliage all from Spellbinders.  For the inks I used Memento Rose Bud and Teal Zeal.  With just a few products and keeping the ribbon front and center I was able to create some fun and pretty Christmas cards in no time at all. 
 
Now to continue in the blog hop you need to hop on over to Vivian's Blog and check out her fantastic project!

Thank you so much for stopping by today and I hope you enjoy the Really Reasonable Blog Hop!! Don't forget to visit the RRR Store and check out all of the beautiful ribbons, lace and trims!
I hope you have a wonderful and creative day!

Hugs & Smiles,
Heidi  


Supplies
Really Reasonable Ribbon:  December Ribbon of the Month Club
Stamps:  JustRite Papercraft CR-03800 Large Fancy Holiday Sentiments
Paper:  DiscountCardstock.com Simply Smooth White, Sno Cone, Pink Lemonade
Ink:  Imagine Crafts/Tsukineko Memento Rose Bud, Teal Zeal
Dies:  Spellbinders Paper Arts™ Grand Calibur® Machine, S5-131 A2 Matting Basics A, S5-132 A2 Matting Basics B, S5-117 2012 Snowflake Pendant, S4-365 Create A Flake Four, S4-328 Foliage
Accessories:  Crystal Glitter; Recollections Bling; Scrapbook Adhesives by 3L 3D Foam Squares

Wednesday, December 12, 2012

The Rubber Cafe` New Release Blog Hop - Day 3

Welcome to The Rubber Cafe new release blog hop! We'll be kicking this all off on Monday December 10th and ending on Wednesday December 12th. Today you'll be hopping with Jen, Karen and myself. 


If you just happened to visit my blog today and would like to start this BLOG HOP from the beginning, simply follow THIS LINK to be taken to The Rubber Cafe blog to begin the celebration.  There will be a Grand Prize for one lucky winner so be sure to stop at each blog and leave a comment to be registered. Don't forget to also leave a comment on each main blog post at The Rubber Cafe too.  This time our new releases are featuring stamps designed for us by Jamie Doughtery, and can be found here!


Here is the project that I designed to share with you today.


I used  L-1227 Don't Be Wishy Washi and S-125 Pictures Framed to create the background for my card.  For the music notes I used Rich Cocoa ink and for the polk-a-dots I used Tuxedo Black ink.  Then I lightly went over the entire card front using Desert Sand ink to give the paper a softer and vintage look.  


I stamped two of the word blocks from S-125 Pictures Framed, fussy cut them and used 3D Foam Squares to pop up the words and add a little dimension.   


Next I used a Copic marker (R81) to color the polk-a-dots pink.


Then I added some baby pink seam binding from Really Reasonable Ribbon along the side of the card.  I applied Scrap Happy Sheer Glue and You're So Fine Glitter Diamond Clear Cool Highlights to the flowers and added a stick pin.


Using the Stick "EM" Up Tool and Scrap Happy Sheer Glue I added a few Pearl Jellie Dots to finish off the card.

Thank you so much for stopping by today and I hope you enjoy the Blog Hop!!

Hugs & Smiles,
Heidi

The Rubber Cafe`:  L-1227 Don't Be Wishy Washi, S-125 Pictures Framed, Scrap Happy Sheer Glue, You're So Fine Glitter Diamond Clear Cool Highlights, Pearl Jellie Dots, Stick "EM" Up Tool
Paper:  DiscountCardstock.com Simply Smooth Ivory, Kraft, Black Licorice
Ink:  Imagine Crafts/Tsukineko Memento Tuxedo Black, Rich Cocoa, Desert Sand; Copic Marker R81 Rose Pink
Accessories:  Score Tape 1/4''; I am Roses; Really Reasonable Ribbon Baby Pink Seam Binding; Stick Pin; Scrapbook Adhesives by 3L 3D Foam Squares


PRIZES:


There will be a GRAND PRIZE for one lucky winner. To be eligible simply:
  1. Comment on ALL blog hop destinations including The Rubber Cafe  Blog.
  2. Subscribe to The Rubber Cafe blog
Want more ways to enter? For each addition task below, you’ll receive an ADDITIONAL ENTRY. Please comment on this post with a link to let us know you have earned an additional entry. Good luck!
  1. Become a fan of our Facebook page
  2. Share our blog hop announcement on Facebook
  3. Follow us on Pinterest!
  4. Pin our Blog Hop image to Pinterest
EARN A TRIPLE ENTRY for signing up for our newsletter HERE!


Contest ends Wednesday, December 12, 2012 midnight CST. Winner will be announced Monday December 17, 2012. GOOD LUCK!