Friday, August 31, 2012

Blue Moon Behind the Clouds

It's a little cloudy here in MN tonight but we can still see the Blue Moon.  I thought I would share a couple of pictures of the Blue Moon behind the clouds.  


Thanks for stopping by.  ;-) 
I hope you have a Fantastic weekend!!

Hugs & Smiles,
Heidi

Pumpkin Patch Scrapbook Layout

***If you are looking for the Blog Candy post click HERE***

Hello!  Today, I have a scrapbook layout from our visit to the pumpkin patch last year to share with you.

  
Every year we visit Farmer John's Pumpkin Patch and these are some of the pictures of my youngest son and husband from last year.  We always have a lot of fun walking through the pumpkin filled fields in search of the Great Pumpkin!  We picked some fun ones last year--they weren't all perfect.  A couple of them were the really bumpy ones and they sure are fun to decorate!


I added a pumpkin border along the bottom of the page.  I used S5-053 Pumpkin Accents die templates from Spellbinders and Orange Fizz paper from Discount Cardstock to create the die cut.  Then I added Banana Split paper on the backside and added Diamond Stickle to the front for a little bit of sparkle.


For the smaller faux Polaroid pictures I used S5-149 Snapshot and S4-126 Classic Squares Large die templates from Spellbinders and Simply Smooth Ivory paper from Discount Cardstock.  After I had the die cuts made I inked the edges with Antique Linen and Rich Cocoa inks and then layered the two pieces together.  I also added another little pumpkin and vines to the top of the page.


I can't believe how fast the time flew by!  It won't be long and it will be time for another visit to Farmer John's Pumpkin Patch.

Thanks so much for stopping by today and I hope you have a Fantastic weekend!!

Hugs & Smiles,
Heidi

Supplies
Paper:  Discount Cardstock Simply Smooth Ivory, Black Licorice, Kraft, Orange Fizz, Banana Split
Ink:  Clearsnap Mango Tango, Olive Pastel; Tsukineko Memento Rich Cocoa; Ranger Distress Ink Antique Linen
Dies:  Spellbinders Grand Calibur, S5-053 Pumpkin Accents, S5-149 Snapshot, S4-126 Classic Squares Large
Accessories:  Scrapbook Adhesives by 3L 3D Foam Squares; Ranger Diamond Stickles; Black Sharpie Marker

Thursday, August 30, 2012

Friends are Flowers Card

Hello!  Today, I have a fun little friendship card to share with you.  


I know I don't usually design cutesy cards but I have to tell you I just love this little image and it was so fun to color.  Besides when I read the name of the little stamp I just had to get it--Heidi among the Flowers.  ;-) 
The stamp is from C.C. Designs.


To start I stamped the image on to Simply Smooth White using Rich Cocoa ink and then I colored it with Copic markers.  I don't usually color images of people so I had to do a little practicing on the hair but I think it came out pretty good.  Then I used S4-161 Labels One die template to cut/emboss the image.


These are the Copic markers I used to color the image.


I stamped the image on to some copy paper and then fussy cut it to create a mask for the colored image.  Using a 2-Way Glue Pen I added some adhesive to the back of the mask and let it dry so it was just a little tacky.  Then I placed the mask over the colored image that was still in the die template and airbrushed the sky using a Copic marker and the Copic airbrush system.


Here is a close up of the finished image.  After I did the airbrushing I stamped the sentiment from Amy R. Friend Sentiments.  Then I added some Diamond Stickles to the center of the flowers and the little hair pretties.  I used the S4-379 Decorative Labels One with Violet 65# cardstock to cut/emboss the decorative label shape and then I layered the two labels.


For the base of the card I used Violet 65# and then for the mats I used Blue 67# and Pink Lemonade.  All of the paper I used is from Discount Cardstock.  To create the mats I used S5-131 A2 Matting Basics A and  S5-132 A2 Matting Basics B die templates from Spellbinders.   To finish of the card I added White Mini Pom-Poms (love these!!) and 1/8'' Diagonal Stripe Lavender Ribbon from  Really Reasonable Ribbon .

Thank you so much for stopping by today!

Huge & Smiles,
Heidi

***If you are looking for the blog post with my Blog Candy click HERE.***


Supplies
Paper:  Discount Cardstock Violet 65#, Blue 67#, Pink Lemonade, Simply Smooth White
Stamps:  C.C. Designs Swiss Pixies Heidi among the Flowers, Amy R. Friend Sentiments
Ink:  Tsukineko Memento Rich Cocoa; Copic Markers E0000, E000, E00, E23, E27, E34, R20, R81, RV55, Y11, Y13, B000, B00, B01, BG10, G21, YG61, V15, V25, C1
Dies:  Spellbinders Grand Calibur S4-161 Labels One, S4-379 Decorative Labels One, S5-131 A2 Matting Basics A, S5-132 A2 Matting Basics B
Accessories:  Really Reasonable Ribbon White Mini Pom Pom, 1/8'' Diagonal Stripe Lavender Ribbon; Ranger Diamond Stickles


Wednesday, August 29, 2012

Bazzill Basics Paper Beach House 6 x 6 Mini Prints and Card Shoppe - Tags & a Card & BLOG CANDY!!

Hello blogging friends!  I have a couple of projects to share with you today using the Beach House 6 x 6 Mini Prints and Card Shoppe papers from Bazzill Basics Paper.  I also have some fun Blog Candy!!  How would you like a chance to Win the Beach House 6 x 6 Mini Prints and Card Shoppe papers from 

The Beach House Collection by Janet Hopkins includes 24 sheets of Double-sided pattern paper with four sheets of all six designs. 


Bazzill Card Shoppe is a yummy collection of solid colored cardstock which includes 25 8-1/2 x 11 sheets.


Over the next couple of weeks I will be sharing projects I designed using the Beach House 6 x 6 Mini Prints and Card Shoppe papers from Bazzill Basics Paper.

So what do you think?  Would you like a chance to Win?

~ These are the Rules ~
1.  Tell me what your Favorite Bazzill Basics Paper Product is.
2.  Subscribe or Follow My Blog.
(If you already subscribe or follow my blog please let me know in the comments)

PLEASE be sure to leave a link back to a blog or an email 
so I have a way to contact you if you win!!

If you would like a second chance to win share this on your personal blog or Facebook with a link back to this blog post.  Then leave me a comment to let me know you have shared the post and link.

Commenting for this Blog Candy will be open from today (8/29) through Wednesday, September 5th, 2012 11:59 pm (CST).


For my first project I made a couple of decorative tags using Beach House 6 x 6 Mini Prints.  


For the first tag I fussy cut two of the smaller tags from the pattern paper.  I inked the edges on both tags with Vintage Photo ink.  I added a small strip of red pattern paper to the bicycle tag and then I added brads to both tags.  I added a few strips of pattern paper to the larger tag and then inked the tag with Vintage Photo and Chipped Sapphire Distress Ink.  


Next I added some small pieces of hemp rope and then layered the smaller tags with 3D Foam Squares.


To embellish the tag I added Holly Berry Red Jellie Dots from The Rubber Cafe' and a custom made button using the pattern paper and Epiphany Crafts EC Button Studio Round 14 Punch & Self Adhesive Buttons.

For my second tag I inked the edges with Antique Linen Distress Ink and then I used a stamped image from CR-03710 Anchors Away from JustRite Papercraft and added the pattern paper.  I fussy cut the three tags, inked the edges with Vintage Photo Distress Ink and then added brads.  


Here is a close up of the three small tags.


I added some Earthy True Hemp from Really Reasonable Ribbon across the bottom of the tag.  For the embellishment I used Epiphany Crafts EC Shape Studio Round 14 Punch & Bubble Caps Vintage Settings Cabana and a piece of the Beach House 6 x 6 Mini Prints.  


For my second project I designed a card using both the Beach House 6 x 6 Mini Prints and  Card Shoppe Cotton Candy along with some 12 x 12 White Bazzil Paper.


The image is from Stamping Bella Uptown Girl Flora the Cyclist and I colored it using Copic Markers.  Once the image was colored I used S5-127 Labels Twenty-Eight to cut/emboss the label shape.  Then I used the Scrap happy Sheer Glue from The Rubber Cafe' and added some Diamond Clear Glitter.  


Next I designed a ribbon flower using Sheer Box Pleats Pink Ribbon and White Mini Pom-Poms from Really Reasonable Ribbon.  For the flower center I added a Faux Rhinestone Ribbon Slider and a Flat Back Pearl from Beady Bom Bom.  I made the leaf die cut using S5-129 Foliage Two and covered it with glitter.


I airbrushed the sky and the grass and on the inside of the tag with the sentiment. To create the tag I used S4-367 Back to Basics Tags die templates from Spellbinders.

I hope you enjoyed both of the projects I designed using Beach House 6 x 6 Mini Prints and Card Shoppe papers from Bazzill Basics Paper.  Thank you so much for stopping by today and good luck!!

Hugs & Smiles,
Heidi

Supplies

Beach House Tags

Paper:  BBP Beach House 6 x 6 Mini Prints
Stamps:  JustRite Papercraft CR-03710 Anchors Away
Ink:  Ranger Distress Ink Antique Linen, Vintage Photo, Chipped Sapphire
Accessories:  Really Reasonable Ribbon Earthy True Hemp, 4mm Hemp Rope; The Rubber Cafe' Scrap Happy Sheer Glue, Holly Berry Red Jellie Dots; Epiphany Crafts EC Button Studio Round 14 Punch & Self Adhesive Buttons, EC Shape Studio Round 14 Punch & Bubble Caps, EC Vintage Settings Cabana; Created by Martha Tags; Brads; Scrapbook Adhesives by 3L 3D Foam Squares; Hot Glue


Uptown Bella Card

Paper:  BBP Card Shoppe Cotton Candy, Beach House 6 x 6 Mini Prints, Bazzill White
Stamps:  Stamping Bella Uptown Girl Flora the Cyclist
Ink:  Memento Tuxedo Black; Copic Markers B000, B21, B26, B39, E0000, E000, E00, E02, R20, R85, RV55, YR30, Y21, E23, E29, G24, YG61
Dies:  Spellbinders Grand Calibur, S5-127 Labels Twenty-Eight, S4-367 Back to Basics Tags, S5-129 Foliage Two
Accessories:  Really Reasonable Ribbon Sheer Box Pleats Pink Ribbon, White Mini Pom-Poms; The Rubber Cafe' Scrap Happy Sheer Glue, Diamond Glitter; Scrapbook Adhesives by 3L 3D Foam Squares; Beady Bom Bom Faux Rhinestone Ribbon Slider, Flat Back Pearl; Hot Glue, White Crochet Thread


Tuesday, August 28, 2012

The Rubber Cafe' New Release Blog Hop Day #2!

Welcome to The Rubber Cafe new release blog hop. 
This is Day #2 and you'll be hopping with Debbie Seyer and myself!!

The Rubber Cafe Blog Hop

 If you just happened to visit my blog today and would like to start this BLOG HOP from the beginning, simply follow THIS LINK to be taken to The Rubber Cafe blog to begin the celebration. There will be a Grand Prize for one lucky winner plus smaller prizes along the way. . . so be sure to stop at each blog and leave a comment to be registered. Don't forget to also leave a comment on each main blog post at The Rubber Cafe too. We are celebrating the newest release called:

on-the-fence-bundle
On the Fence Bundle

This bundle comes with a brand new exclusive die template manufactured by Spellbinders Paper Arts called On the Fence Die! What makes this die unique? It's versatility! At first glance, you might see just a fence but soon you'll realize it can be so much more. Follow us on the blog hop each day from August 27-31 to find out what all this die can do. Let's get started. 


Here is the Christmas ensemble that I designed using a few different products from the On the Fence Bundle and some accessories from The Rubber Cafe'.   I designed a Christmas Ornament and a little Christmas shape card.  I have a full step-by-step tutorial to show you how I designed the Christmas ornament.  


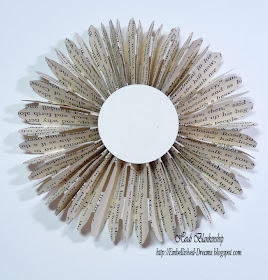
To start creating the rosettes I used old book pages and the On the Fence die template to cut out twelve fence die cuts.  The book pages are pretty thin so I was able to cut several pages at one time.


Then I hand cut all of the little tabs on the side of the die cuts.


Next I made two long strips gluing six (6)  fence die cuts end to end using Scrap Happy Sheer Glue.  


Fold each long strip with the peaks and valley folds or fan folds and then adhere each end to create the rosettes.  


For the smaller rosette trim the bottom edge off, about 1/2 an inch.


Then I used a circle punch and hot glued it to the back of the rosette.  I did this for each rosette.


Here is a picture so you can see the difference in size for the two rosettes.


Following the instructions on the ICE Resin package I mixed up the resin solution and let it sit for a few minutes before applying to the rosettes.  


To apply the ICE Resin I used a sponge brush.  I started on the back and made sure to get in between each fold.  Then I applied the ICE Resin to the front.  I held the rosette over the cup as I was applying the resin so the excess could drip back into the cup and there was no waste.  Now for the hard part--I had to let the rosettes sit over night to dry--without touching them!  LOL!  I left them on an old craft mat to dry.


Once the rosettes were dry I was able to pop them right off the craft mat.  I applied Scrap Happy Sheer Glue to the outer edges of the rosettes.


Then I applied You're So Fine Glitter Diamond Clear and tapped off the excess.


I applied a little more glue just to the tips of the rosettes and added You're So Fine Glitter Patriotic Red.


I used hot glue to adhere the two rosettes together.  Then for the embellishments I used a Faux Rhinestone Ribbon Slider with a large Flat Back Pearl from Beady Bom Bom and then I added Silver Filigree Jewelry Findings around the center piece.  I added Pearl Jellie Dots to the center of each filigree piece using Scrap Happy Sheer Glue and the Stick "EM" Up Tool from The Rubber Cafe'.


I made a dangling charm using a Maya Road Vintage Alterable Trinkets (chandelier charm) along with pearls, filigree pieces, chain, head pins and jump rings.  I made a tiny hole in the back of the rosette to hang the charm from.


I added some deep red ribbon for a hanger at the top and streamers at the bottom.  


I had so much fun designing this vintage style Christmas ornament and I bet you never would have guessed it was made using the On the Fence die template from The Rubber Cafe!  ;-) 


For my card I used the S-121 Window Garden  and C-342 Solid Holly stamp sets from The Rubber Cafe'.  I colored the window with Copic markers (listed below) and then for the holly and berries I used Distress Markers (listed below).  I inked the edges for the label with Antique Linen Distress Ink.  I also used S5-127 Labels Twenty-Eight, S4-385 Little Leaf Sets and S5-129 Foliage Two die templates from Spellbinders.  I used S5-127 Labels Twenty-Eight to create the shape card.  Then I die cut and extra label for the stamping and adhered it to the card front.  I added deep red ribbon and a Faux Rhinestone Ribbon Slider with a Flat Back Pearl.  Then for a little sparkle I added You're So Fine Glitter Diamond ClearPatriotic Red to the die cut leaves and berries on the stamped image.


Thank you so much for stopping by today!  I hope you enjoy the New Release Blog Hop and all of the fantastic projects from the Design Team.  Please be sure to check out The Rubber Cafe' and all of the wonderful products they carry.

Hugs & Smiles,
Heidi

Supplies

Vintage Book Print Christmas Ornament ~
The Rubber Cafe':  On the Fence Custom Die Template, Scrap Happy Sheer Glue, You're So Fine Glitter Diamond Clear & Patriotic Red, Stick "EM" Up Tool, Pearl Jellie Dots
Paper:  Old Book Pages
Accessories:  ICE Resin; Blue Moon Silver Filigree Jewelry Findings, Pearls, Jump Rings, Bead Caps, Chain; Beady Bom Bom Faux Rhinestone Ribbon Slider, Flat Back Pearl; Maya Road Vintage Alterable Trinkets (chandelier charm); Deep Red Ribbon; Hot Glue, Circle Hole Punch

Christmas Shape Card ~
The Rubber Cafe':  S-121 Window Garden Stamp Set, C-342 Solid Holly, Scrap Happy Sheer GlueYou're So Fine Glitter Patriotic Red & Diamond Clear
Paper:  Discount Cardstock Simply Smooth Ivory, Herbal Garden
Ink:  Tsukineko Memento Rich Cocoa Ink; Copic Markers YR30, Y21, E31, E23, E25; Ranger Distress Markers Forest Moss, Aged Mahogany, Distress Ink Antique Linen
Dies:  Spellbinders Grand Calibur, S5-127 Labels Twenty-Eight, S4-385 Little Leaf Sets, S5-129 Foliage Two
Accessories:  Beady Bom Bom Faux Rhinestone Ribbon Slider, Flat Back Pearl; Deep Red Ribbon; Hot Glue

Monday, August 27, 2012

Because You Are So Amazing ~ Tag - New Bazzill Card Swap Winner


Hello!  Today I have a decorative tag to share with you but before I get started with the tag I need to make an announcement.  A little over a week ago I had a blog post offering up some blog candy from Bazzill Basics Paper for one of the Card Swap Starter Kits.  I emailed the winner twice and never received and email back so tonight I had my little guy pick another winner.  I also wanted to mention there is still time to sign up for the Starter Kit.  If you would like to join in the fun you can check out all of the details by clicking HERE.  The Offer is available through September 1, 2012.

The winner is------------------>

CONGRATULATIONS EMA!!!! 

Ema said... 1
This is great! I signed up! Sounds like fun! :)


Here is the decorative tag that I designed using Blue 67# and Simply Smooth White paper from Discount Cardstock.  I also used S5-127 Labels Twenty-Eight, S4-382 Butterflies & Flowers and S4-371 Les Papillions die templates from Spellbinders.  


To start I die cut the label shapes and then I added ribbon 5/8" Black Crochet Lace Trim, Pink Netting Trim and Sheer Blue Butterfly Trim all from Really Reasonable Ribbon.  


Next I added the butterfly die cuts, sentiments and Diamond Clear Glitter with Scrap Happy Sheer Glue from The Rubber Cafe'.  

For the sentiment I used AG-04015 Just the Right Words from JustRite Papercraft.  The Just the Right Words stamp set is one of Becca Feeken's sets from her Amazing Paper Grace Collection.  Then I added some bling and mulberry roses and leaves.

Thanks so much for stopping by today!

Hugs & Smiles,
Heidi


Supplies
Paper:  Discount Cardstock Blue 67#Simply Smooth White
Stamps:  JustRite Papercraft AG-04015 Just the Right Words
Ink:  Tsukineko Memento Tuxedo Black
Dies:  Spellbinders Grand Calibur S5-127 Labels Twenty-Eight, S4-382 Butterflies & Flowers, S4-371 Les Papillions
Accessories:  Really Reasonable Ribbon 5/8" Black Crochet Lace Trim, Pink Netting Trim, Sheer Blue Butterfly Trim; The Rubber Cafe' Diamond Clear Glitter, Scrap Happy Sheer Glue;  Recollections Bling; I am Roses Mulberry Roses and Leaves