Wednesday, August 27, 2008

Crafty Secrets Girlfriends Challenge

This week our design team was given a challenge by our wonderful and extremely talented team leader, Vicki Chrisman. Our challenge was to make a project/card using images from the "Girlfriends" Images & Journal Notes. What a fun challenge!! Here is the card that I made using the Crafty Secrets "Girlfriends" Images & Journal Notes.I love this image with just a hint of color. I thought it would go perfectly with the flower basket lady from the Crafty Secrets NEW Glamour Girls stamp set. On the image of the ladies I slightly distressed the edges and inked them with Ranger Distress Ink, Frayed Burlap. Then I added just a tiny bit of diamond stickles on the flowers. For the flower basket lady I stamped the image on Cryogen White CS using Ranger Adirondack Pitch Black Ink and then colored the image with Copic markers. I stamped the image twice, colored and cut out the bow and layered on top of the first image. The background paper is from the Crafty Secrets Classic Paper Pad. I used Ranger Distress Ink, Milled Lavender on the edges and stamped a couple of flourished corner elements in two of the corners and then I lightly went around the design on the paper with waterfall stickles. To finish the card I stamped the sentiment and added some floral stickers from the Heartwarming Vintage Sticker, Best Wishes sticker sheet, added some blue ribbon and purple brads.

Supplies~
Stamps~Crafty Secrets-Glamour Girls
Ink~Ranger-Adirondack Pitch Black, Distress Inks-Milled Lavender, Frayed Burlap
Paper~Crafty Secrets-Classic Designer Paper Pad, WorldWin-Medium Lovely Lilac, Prism-Frosted Cobalt
Other~Crafty Secrets "Girlfriends" Images & Journal Notes, Heartwarming Vintage Stickers-Best Wishes, Copic-Sketch Markers, Ranger-Waterfall & Diamond Stickles, Joann's-Blue Ribbon & Purple Brads, Clear Silicone Adhesive

I hope you have enjoyed the card I made for the Crafty Secrets "Girlfriends" Challenge. Be sure to check out all of the fabulous samples by the Crafty Secrets Design Team!!

Vicki Chrisman
Lisa Zappa
Marisa Grossman
Pam Hooten
Vivian Peters

Thanks so much for stopping by today and I hope you are having a Wonderful Week!!

Smiles!
Heidi

Saturday, August 23, 2008

Come Fly Away With Me

Have you seen the New Crafty Secrets Halloween Fun stamp set? I absolutely LOVE IT!! The little witch is so adorable! You can see the Halloween Fun stamp set by clicking HERE. The stamp set has 24 images (including sentiments) which gives you lots of options.

Here is a card I made using the Crafty Secrets Halloween Fun stamp set, Earthy Paper Designs Pad & Halloween Time Vintage Cuts.I used the corner elements and the stripe to give the appearance of a opening to a room. All of the images were stamped using Adirondack Pitch Black ink by Ranger and colored using Copic markers. For the corner elements and the stripe I stamped then unto Cryogen White CS, colored and then cut each piece out. Then I used clear silicone adhesive on each piece to pop them up. Here is a close up...For the sweet little witch I stamped her twice and colored the first image, on the second image I colored just the hat. I cut out both pieces and layered the hat using the clear silicone adhesive. Here is a close up of the witch...I also used the clear silicone adhesive behind the body or the spider and the cat. The picture of the witch on the broom is one of the vintage images from Crafty Secrets Halloween Time Vintage Cuts. I layers CS behind the picture and added some ribbon and a brad to give the appearance of a poster. The ribbon I used for this was black and white and I wanted to change it to orange so I colored it in using a orange Copic marker. The sentiment "Come Fly Away With Me", was cut from newsprint and and then I stamped some bats in the background. For the spider's web I stamped that onto a piece of vellum and then ran it through the xyron.

For the base of the card I used WorldWin CS in an Orange and layered with a Purple. All of the stamped images are mounted onto a piece of Crafty Secrets Earthy DP. I also added some ribbon on the side and tied it into a bow. The ribbon is from Heidi Grace, Daydreamers Ribbon and I think it goes perfectly with the colors on the card. I also added some rhinestones for a little bling. Here is a little tip...instead of buying several different colors of rhinestones you can just buy the clear ones and color them using your Copic markers. The rhinestone on this card were colored with the Copic markers. Also to add a little sparkle I used Spica glitter pens on the stamped images.

Here is another picture ( a side view) of the card so you can see the dimension.Supplies~
Stamps~Crafty Secrets-Halloween Fun
Ink~Ranger-Adirondack Pitch Black
Paper~Crafty Secrets-Earthy Paper Designs Pad, WorldWin-Orange & Purple, Cryogen White
Other~Crafty Secrets-Vintage Cuts Halloween Time, Heidi Grace-Daydream Believers Ribbon (Orange Polk-a-dot), Copic Sketch Markers-E00, E15, E53, YR000, YR21, YR04, G40, YG13, V17, BV000, BV04, Spica Glitter Pens-Orange, Gold, Melon, Lavender, Black, Joann's-Rhinestones, Black Brad, My Stash-Black & White (Orange) Ribbon, Newsprint, Clear Silicon Adhesive

Just a reminder to check out the JustRite Stampin' Champion Contest, this is the beginning of week number two! Also if you haven't voted for your favorite "hopeful" don't forget to do that...the voting is open until 9 PM Tuesday. My Think Pink card was chosen as one of the "hopefuls"Click HERE to vote.

I hope you had a wonderful weekend and a good start to a new week! Thanks so much for stopping by today!!

Smiles!
Heidi

Friday, August 22, 2008

Nestabilities Purse Card

Here is a fun little purse card that I made awhile back using the Classic and Scallop Oval Nestabilites from Spellbinders. This is a very quick and easy card to make but depending on how you embellish it it can take on many different looks.To make the little purse card fold a piece of CS in half just like you would for making a regular card. Then have the folded edge of the CS slightly off of the cut edge of the scallop oval die. You might want to add a small piece of tape to the edge to hold the die in place. Run the die and the CS through your Wizard or whichever die cutting system you have to cut and emboss. Pop your CS out and you know have the base for your purse card. You can design it however you would like! I used a Fancy Pants stamp from the Simply Stated set. I stamped the floral images in black and then colored in using Copic sketch markers. I added some beaded fringe to the bottom of the purse and some black ribbon for the handle. To make the closure at the top I used a die cut from the Ladies Fashion Buckles die (S3-034). Also to finish of the inside I added two of the Classic Oval Nestabilities.A couple of days ago I entered the JustRite Stampin' Champion Contest and I found out today that my card was chosen as one of the six "hopefuls"!! The voting started today and goes until 9 PM Tuesday. I did a "Think Pink" card for Breast Cancer Awareness. My card and all of the other "hopefuls" can be seen by clicking HERE. So please check it out and go vote for your favorite project!! Also all of the details for the JustRite Stampin' Champion Contest can be found by clicking HERE. There is still time to enter the contest so check it out!!

I hope you have enjoyed todays card. Thank you so much for stopping by today & I hope you have a great weekend!!

Smiles!
Heidi

Thursday, August 21, 2008

Sweet Little One

Here is another card that I made for the JustRite Stampin' Champion Contest. All of the details for the contest can be found HERE. It's a lot of fun trying to think of different ways to use the stamps other than just for monograms. The background piece, Welcome Sweet Little One, was created using white CS, the Small Letter set and the Dots Border from the C-45 Monogram set. I used Memento Summer Sky ink for all of the stamping. For the card base I used WorldWin Light Tempting Tanzanite CS. For the Baby Boy sentiment I used white CS, the Dots Border from C-45 Monogram, Curlz Font and Small Letters set. The border and sentiment were stamped onto a Classic Circle Nestabilites and then I layered two of the Petite Scallop Circle Nestabilites behind it. For the Petite Scallop Nestabilities I used WorldWin Light and Medium Tempting Tanzanite CS. I added some ribbon and a baby charm and then used pop dots behind the baby boy sentiment. I also added some Diamond stickles for a little sparkle.
Supplies~
Stamps~JustRite Stampers-Small Letters, Curlz Font, Dots Border from C-45 Monogram
Paper~WorldWin-Light & Medium Tempting Tanzanite, Georgia Pacific-White
Ink~Tsukineko Memento Summer Sky
Tools~Spellbinders-Wizard, Lg. Classic Circle Nestabilites (S4-114), Lg. Petite Scallop Circle Nestabilites (S4-115)
Other~Ranger-Diamond Stickles, Joann's -Ribbon, Wilton-Charm, Pop dots

I hope you have enjoyed todays card! Thanks so much for stopping by & I hope you have a great day!

Smiles!
Heidi

Wednesday, August 20, 2008

Think Pink

The card I am sharing with you today is one I did for the JustRite Stampin' Champion Contest. All of the details about the contest can be found HERE.
I really love using the JustRite Stampers! There are so many possibilities with all of the different fonts and little frames. The JustRite Stampers really allows you to be able to personalize your design. October will be here before we know it and I'm sure many of you know that October is Breast Cancer Awareness Month. So I thought I would get a head start on some cards for a few friends. I used the Small Letter set from JustRite Stampers for the "Think Pink" on the outer edge of the Classic Circle Nestabilities and added the Petite Scallop Circle behind it. The Just Rite Stampers are fantastic with the Spellbinders Circle Nestabilites and they are a perfect match! The other stamped images are from Crafty Secrets Support the Girls and Cherubs stamp sets. The vintage image is also from Crafty Secrets Girlfriends~Images & Journal Notes. The black dots around the edge were done with a marker and then I also added metal embellishments, stickles and some rhinestones for a little sparkle and bling.

Thanks so much for stopping by today & I hope you are having a wonderful week!

Smiles!
Heidi

Tuesday, August 19, 2008

We are back home

Hello to everyone out in blog land! We were on vacation in West Virginia for the past week and we got home late Saturday. We all had a wonderful time, it was a nice and relaxing vacation! We really enjoyed our visit with Eric's mom and Amanda, Chase (my step-son), Ben and other family and friends. We took so many pictures (over 500!), West Virginia is very Beautiful! I wanted to share some of the pictures with you so I created a slide show for those of you that would like to take a look. The boys really loved the trip & it was very exciting for them as it was their first time flying! Some of the places we visited...East River lookout, The famous Tree in the Rock (it's the largest living thing growing out of a rock!), New River Gorge, Endless Wall trail, Babcock State Park, Babcock Mill, WV Visitor Center, WV Memorial Fountain.


I hope you enjoy the pictures! Please check back soon, I am working on some new projects to share with you. *wink*

Also THANK YOU so much for all the wonderful comments & personal emails & congrats for the Crafty Secrets Design Team!! I have to tell you I received my Crafty Secrets DT package from Sandy and there are sooooo many fun goodies I can't wait to show you some of the things I'm working on!

Smiles!
Heidi

Saturday, August 9, 2008

I have a Secret...

I have been keeping and now I can finally spill the beans!! I received the privilege of being asked to be on the Crafty Secrets Design Team!! I was so thrilled when Sandy from Crafty Secrets asked me to join! I am so honored to be associated with such an amazing and talented group of ladies!!! I absolutely LOVE the vintage style of Crafty Secrets!! Be sure to check out all of the details on the Heartwarming Vintage Blog.

I want to also say Congratulations to Marisa Grossman and Vivian Peters, they were also chosen to join the Crafty Secrets Design Team!! I look forward to getting to know each of the ladies from the design team!

Here is a card that I recently made using some of the Crafty Secret images. I used images from the Cherish and Sweet Kids stamp sets.One of the great advantages to the clear stamps is being able to line them up very easily. I used five stamps to create this scene, the little boy, little girl, large branch, small branch and a cluster of flowers. The coloring was done using Copic sketch markers. After all of the images were colored in then I masked off the images and colored in the grass and the sky using the Copic markers and the Copic air brush system. Then I lightly misted over the entire piece with a pearl mist (Ranger Distress Antique Linen ink refill, Gold Perfect Pearls & water). I know this didn't show up in the picture but it has a very pretty light shimmer to it. I stamped the sentiment on to one of the tag images from the Crafty Secrets Classic paper pad, added the pearl mist and inked the edges. I also added the ribbons, lace, flower, buttons & metal embellishments and assembled as shown. Once the card was all assembled then I added a little touch of glitter with some diamond stickles.

Paper~Crafty Secrets Classic Paper Pad, Prism

Stamps~Crafty Secrets Cherish & Sweet Kids

Ink~Brilliance Graphite Black

Other~Copic Sketch Markers & ABS, Lace, Ribbon, Flower, Buttons, Metal Embellishments, Ranger-Diamond Stickles, Pearl Mist

Thank you so much for stopping by & I hope you are having a Fantastic Weekend!!

Smiles!

Heidi


Sunday, August 3, 2008

CHA Kids Craft Creations

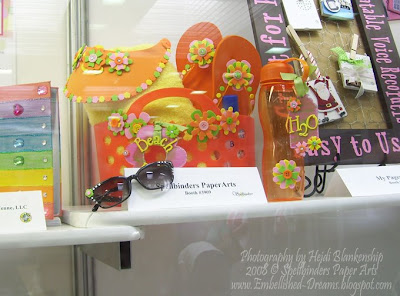
Awhile back I made a really fun project for Spellbinders and now I can finally share it with you! One of my projects was chosen for the Kids Craft Creations and was on display at CHA. Everyone who participated had to make a craft that kids between the ages of 7-12 could recreate.

The project I did was using Spellbinders dies, fun foam and a whole lot of glue dots along with a few other supplies. The project was called "Beach Bum" and here is a picture of it on display at CHA.Here another one with me...my sweet friend and fellow Spellbinders DT member Holly Craft took the pictures.The "Beach Bum" project is also being featured online at Today's Creative Home Arts. If you would like to see more close up pictures of each item and find out all of the details you can click HERE or above on Today's Creative Home Arts.

Thank you so much for stopping by!! I know since I have been back from CHA I haven't been able to post much but thanks for hanging in there with me!! Please check back soon as I have some very Exciting News to share with you all!!!

Smiles!
Heidi